
Last Updated on August 21, 2023
Hi and welcome to another tutorial from Codingdemos, today we are going to learn how to improve the appearance of an android edit text by adding an icon. Having an Android edittext icon gives the user an idea of the type of data that they need to fill in.
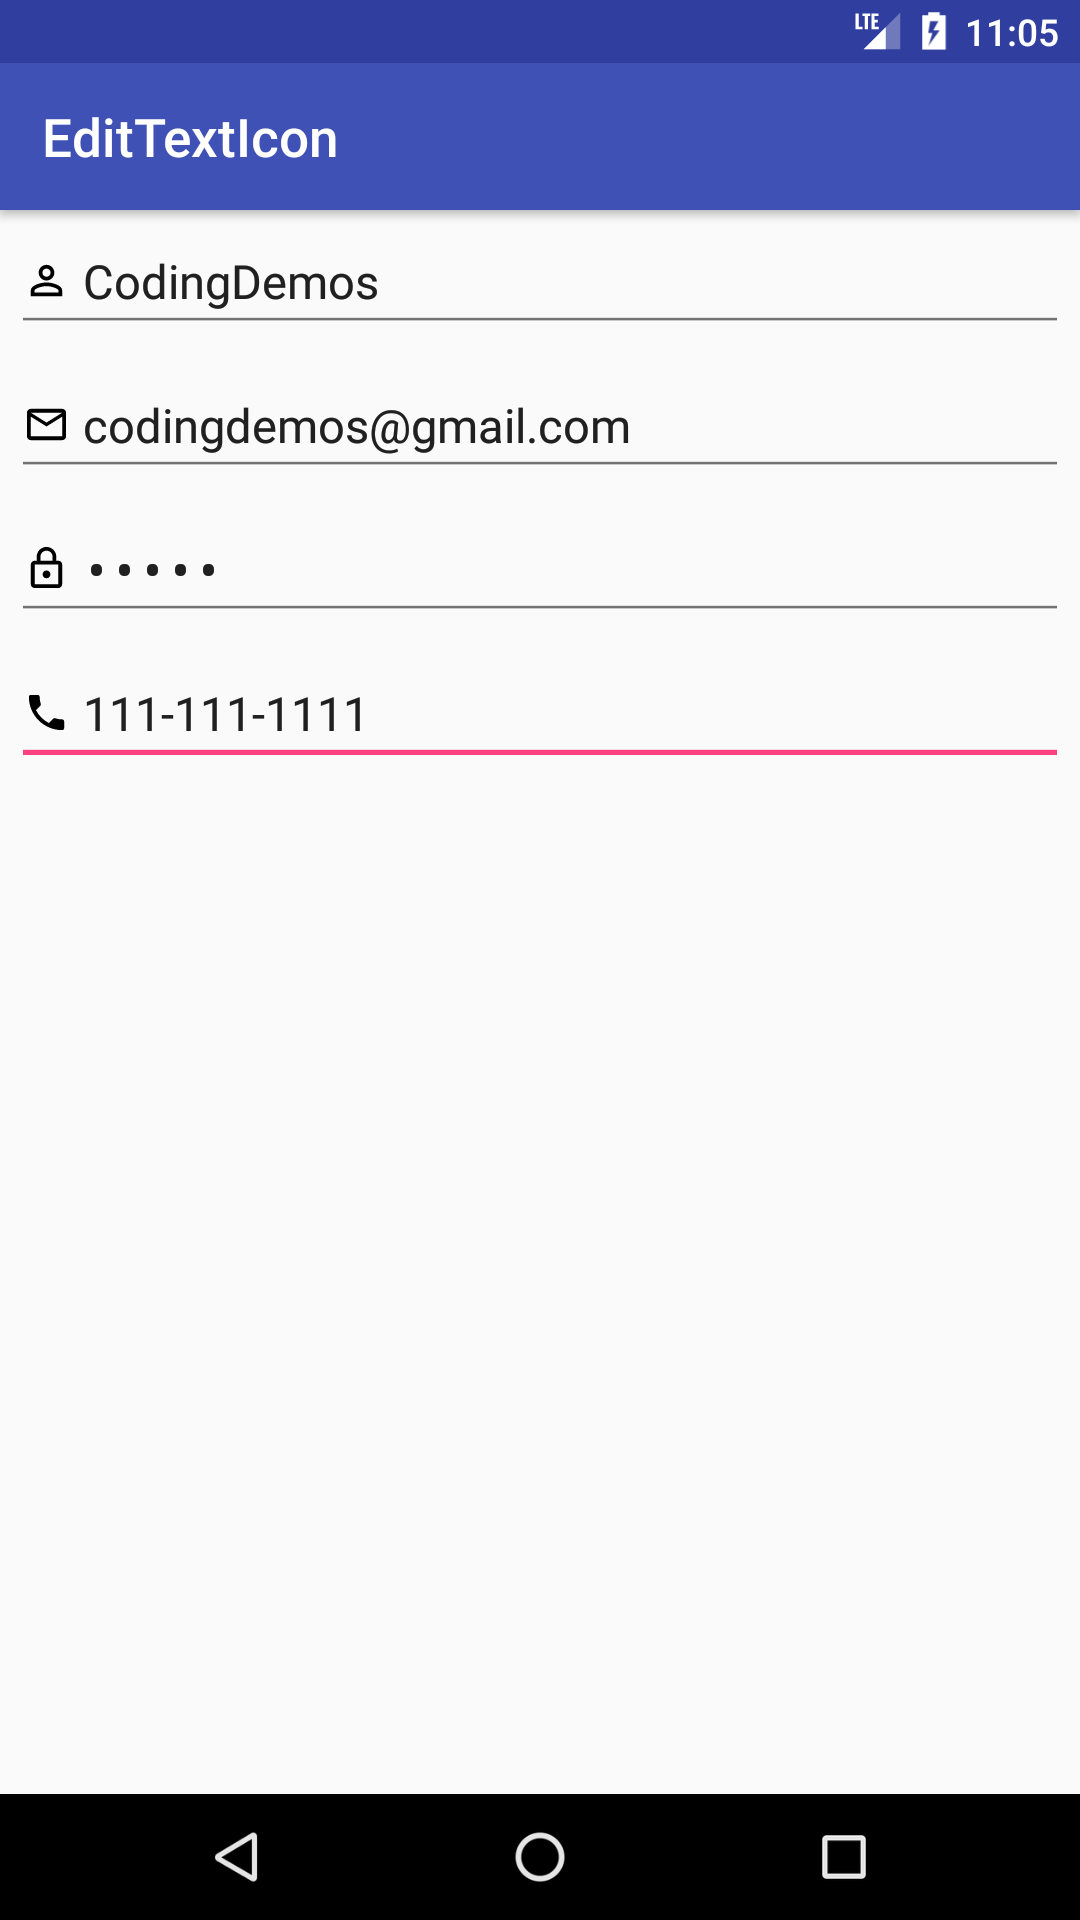
By the end of this article, we will have an app that looks like this. (Large preview)
In this tutorial we will be using the following:
-
- – Android Studio Chipmunk | 2021.2.1 Patch 1 (May 2022)
-
- – Android emulator Pixel 5 with API 32
- – Minimum SDK API 21
1- Open up Android Studio and create a new Android Studio project and give it a name, in our case we’ve named it (EditTextIcon), choose API 21 as the minimum SDK, then choose a blank activity, click “Finish” and wait for Android Studio to build your project.
2- First thing we need to do is to look for icons that we can use them for the android edittext. Right click on res folder → New → Vector Asset . Adjust the size from (24dp x 24dp) to (18dp x 18dp), choose the icon that you want by clicking on the android icon, click “Next” button and then click “Finish”.
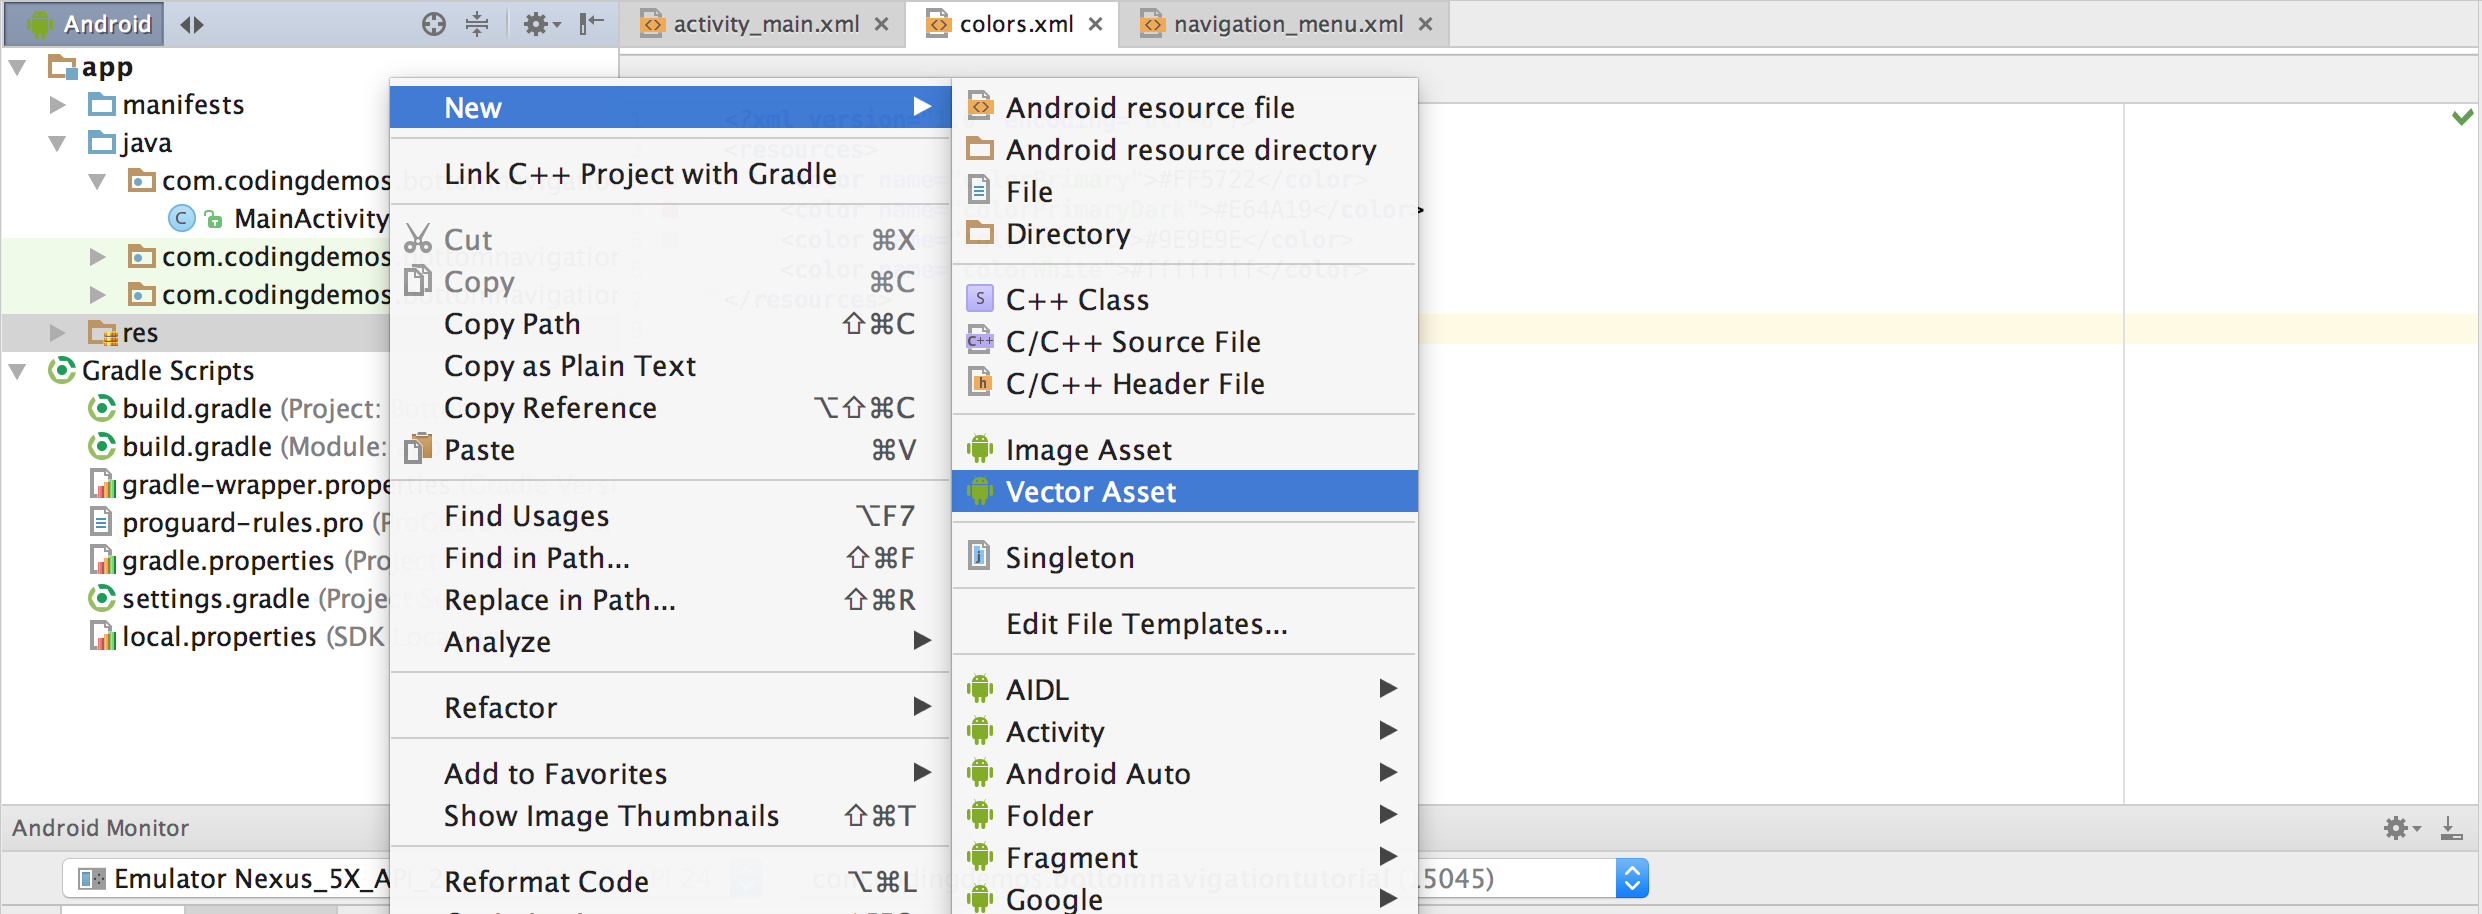
How to open Android studio vector asset. (Large preview)
3- Open activity_main.xml file and add 4 android edittext: Name, email, password and phone number.
    < EditText android:id="@+id/etName" android:layout_width="match_parent" android:layout_height="wrap_content" android:hint="Full name" android:inputType="textPersonName" />

    < EditText android:id="@+id/etEmail" android:layout_width="match_parent" android:layout_height="wrap_content" android:layout_marginTop="10dp" android:hint="Email address" android:inputType="textEmailAddress" />

    < EditText android:id="@+id/etPassword" android:layout_width="match_parent" android:layout_height="wrap_content" android:layout_marginTop="10dp" android:hint="Password" android:inputType="textPassword" />

    < EditText android:id="@+id/etPhone" android:layout_width="match_parent" android:layout_height="wrap_content" android:layout_marginTop="10dp" android:hint="Phone number" android:inputType="phone" />
4- Now we can use those icons that we created through Android Studio Vector Asset for android edittext icon. We will use android:drawableStart to place the drawable icon on the left of an android edittext.
< EditText android:id="@+id/etName" android:layout_width="match_parent" android:layout_height="wrap_content" android:drawableStart="@drawable/ic_baseline_person_18" android:hint="Full name" android:inputType="textPersonName" />
5- Let’s give some space between the icon and the android hint using android:drawablePadding="5dp"
< EditText android:id="@+id/etName" android:layout_width="match_parent" android:layout_height="wrap_content" android:drawablePadding="5dp" android:drawableStart="@drawable/ic_baseline_person_18" android:hint="Full name" android:inputType="textPersonName" />
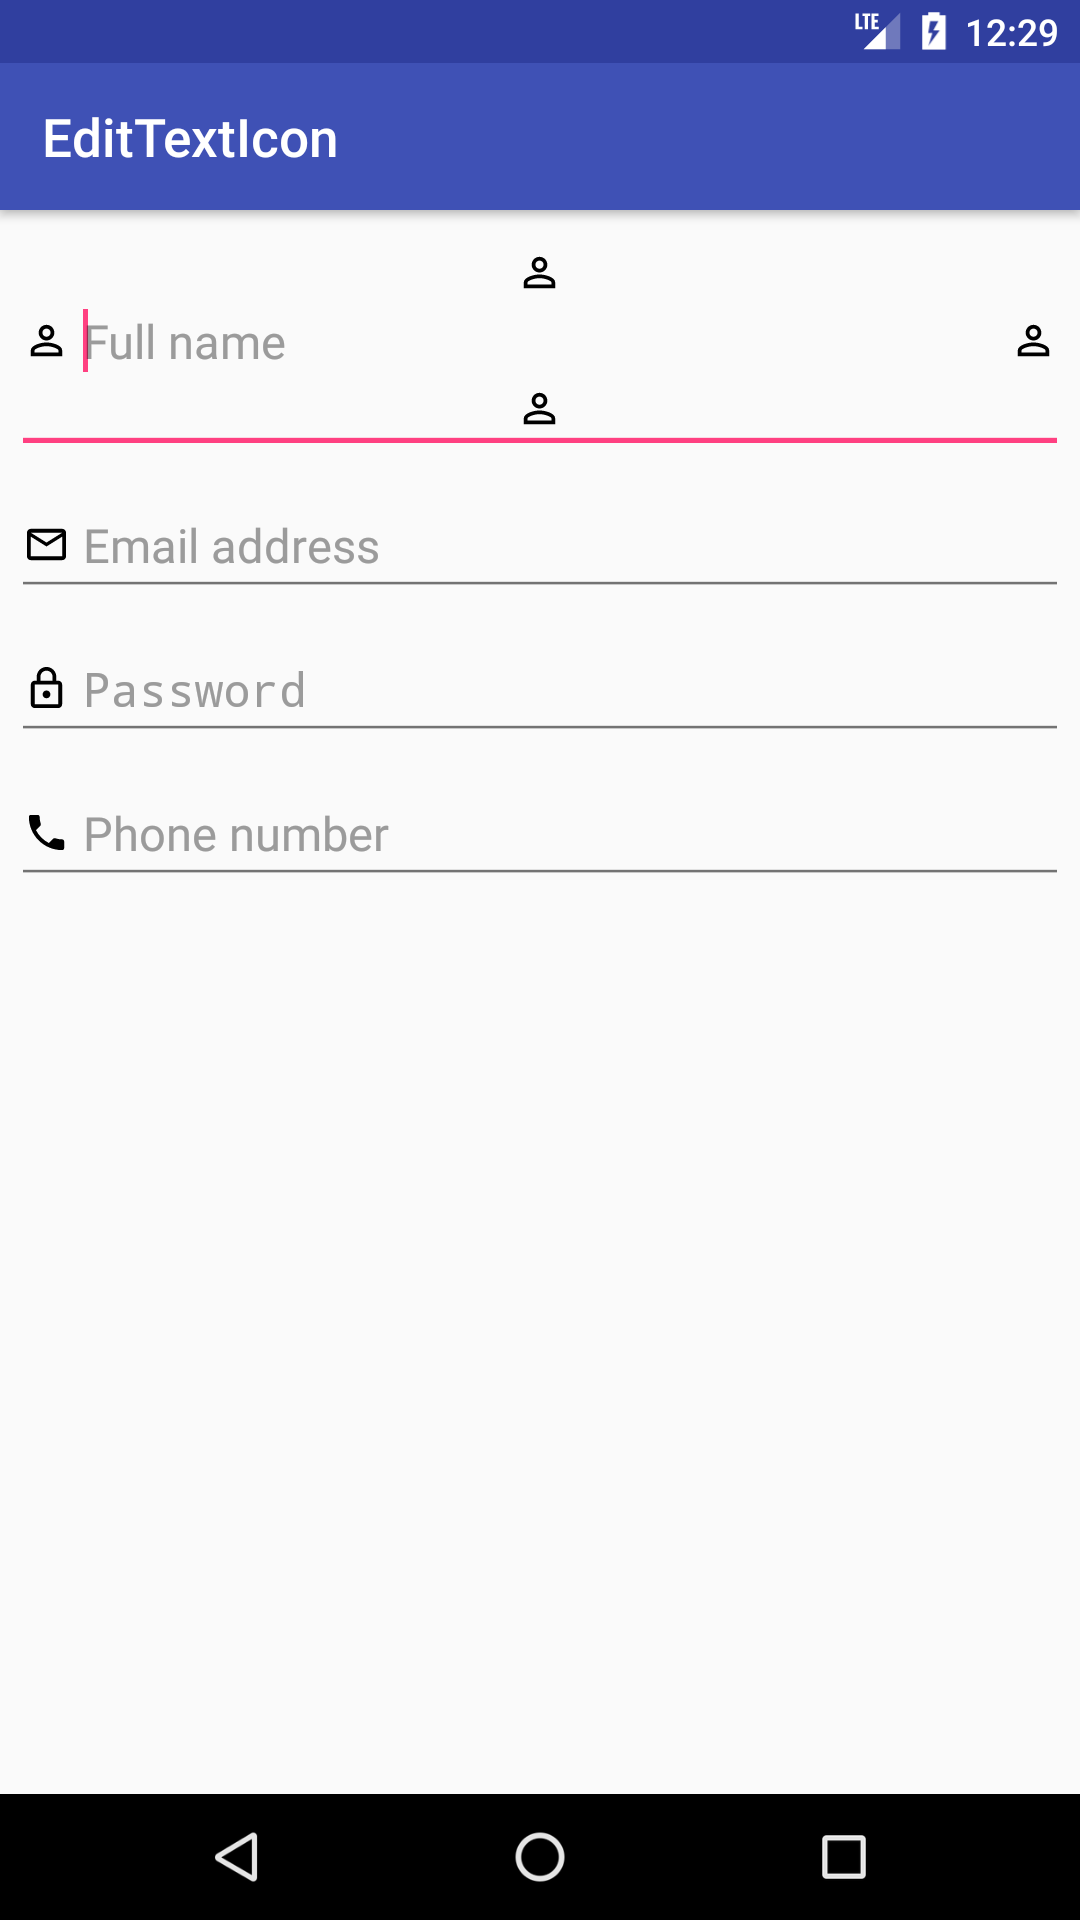
6- We can add an icon to the right, top and bottom of an android edit text.
< EditText android:id="@+id/etName" android:layout_width="match_parent" android:layout_height="wrap_content" android:drawableBottom="@drawable/ic_person_outline_black_24dp" android:drawableEnd="@drawable/ic_person_outline_black_24dp" android:drawablePadding="5dp" android:drawableStart="@drawable/ic_person_outline_black_24dp" android:drawableTop="@drawable/ic_person_outline_black_24dp" android:hint="Full name" android:inputType="textPersonName" />
Android edittext icon in different position. (Large preview)
7- After adding icons for each android edittext, the full code will look like this:
< ?xml version="1.0" encoding="utf-8"?>
< LinearLayout xmlns:android="http://schemas.android.com/apk/res/android" xmlns:tools="http://schemas.android.com/tools" android:layout_width="match_parent" android:layout_height="match_parent" android:orientation="vertical" android:padding="5dp" tools:context=".MainActivity">

    < EditText android:id="@+id/etName" android:layout_width="match_parent" android:layout_height="wrap_content" android:drawableStart="@drawable/ic_baseline_person_18" android:drawablePadding="5dp" android:hint="Full name" android:inputType="textPersonName" />

    < EditText android:id="@+id/etEmail" android:layout_width="match_parent" android:layout_height="wrap_content" android:layout_marginTop="10dp" android:drawableStart="@drawable/ic_baseline_mail_outline_18" android:drawablePadding="5dp" android:hint="Email address" android:inputType="textEmailAddress" />

    < EditText android:id="@+id/etPassword" android:layout_width="match_parent" android:layout_height="wrap_content" android:layout_marginTop="10dp" android:drawableStart="@drawable/ic_baseline_lock_18" android:drawablePadding="5dp" android:hint="Password" android:inputType="textPassword" />

    < EditText android:id="@+id/etPhone" android:layout_width="match_parent" android:layout_height="wrap_content" android:layout_marginTop="10dp" android:drawableStart="@drawable/ic_baseline_phone_18" android:drawablePadding="5dp" android:hint="Phone number" android:inputType="phone" />

< /LinearLayout>
8- Compile and run the app, you will see all the android edittext with icons. The source code for android edittext icon tutorial is available in Github. I hope you find this tutorial helpful and if you have any question please post them in the comment below.
tank you very much
thanks a lot,you helped me a lot
Thanks, you helped me. thanks a lot