
Last Updated on February 6, 2018
Hi and welcome to another tutorial from Codingdemos, in this tutorial you will learn how to add rating stars to your Android app using Android ratingbar. We will build a demo app that uses Android ratingbar to allow the user to rate the food service and share their overall experience.
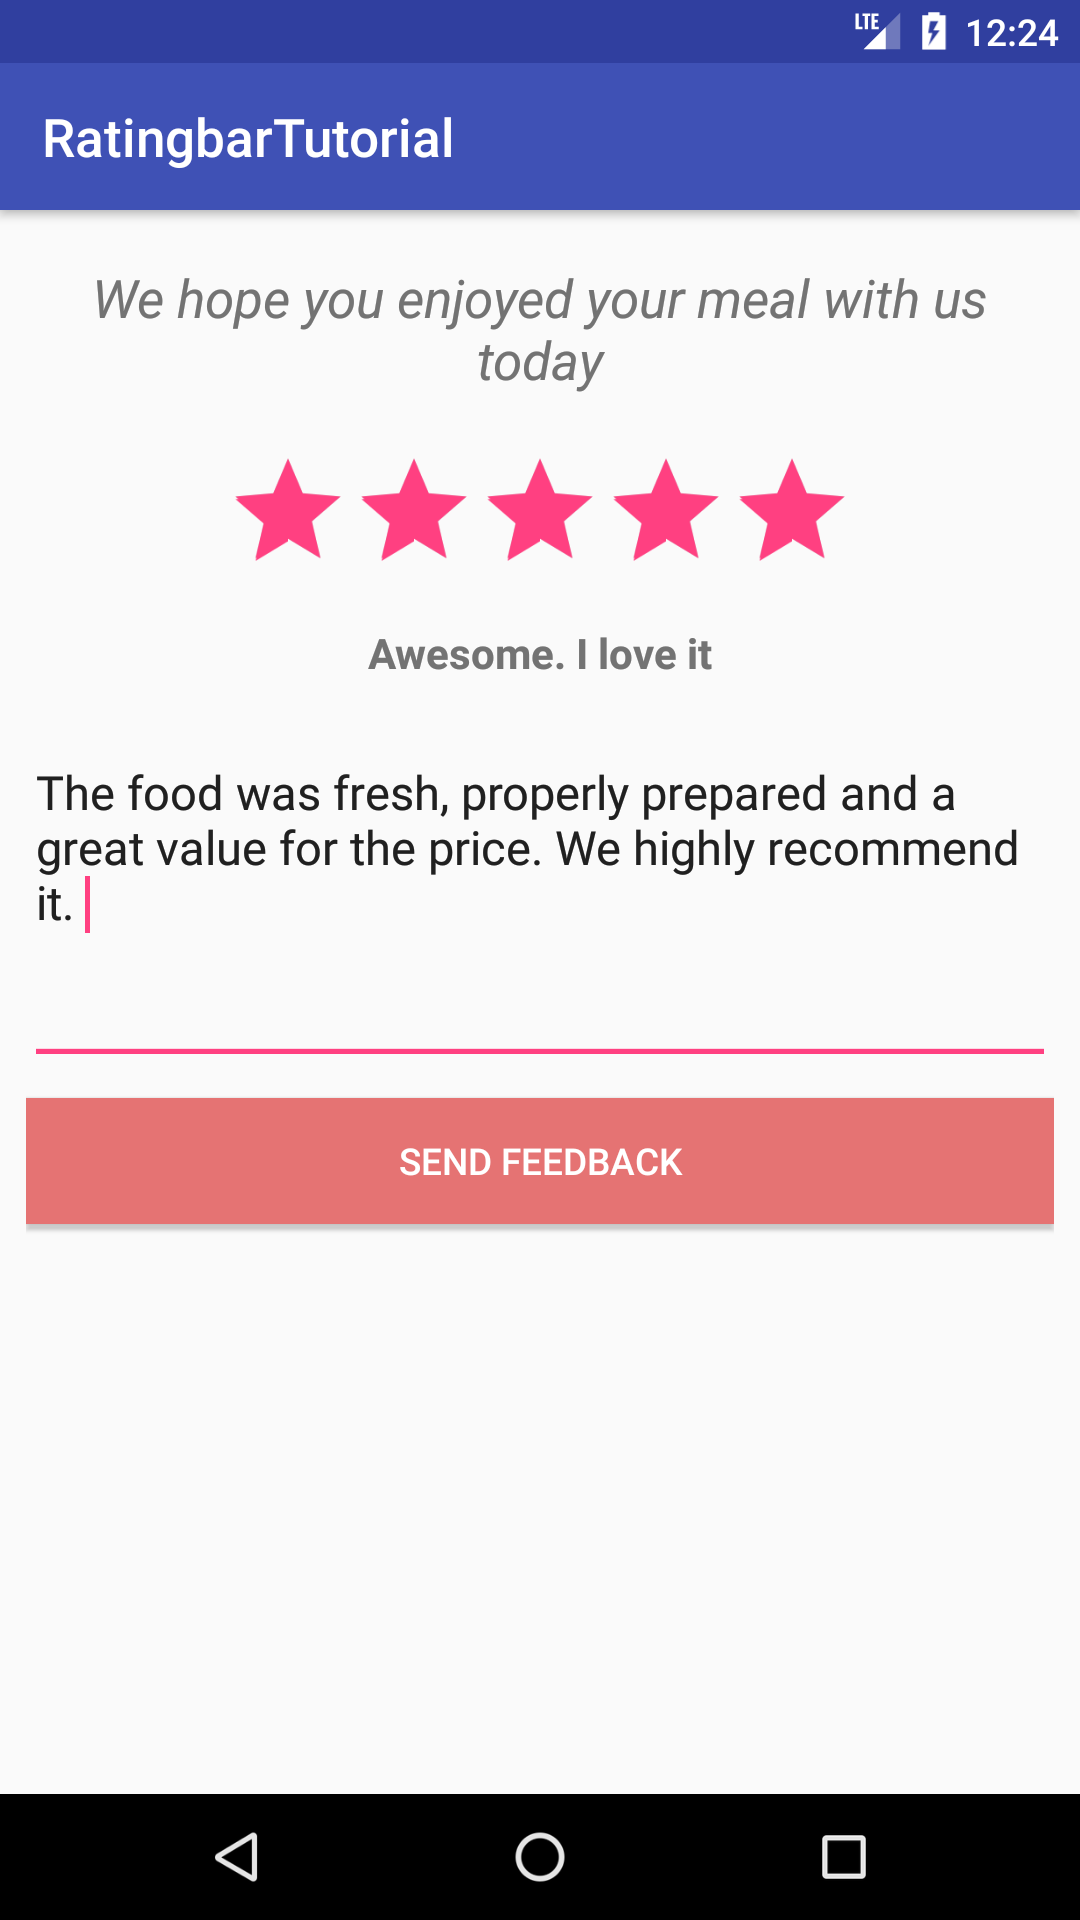
By the end of this article, we will have an app that looks like this. (Large preview)
In this tutorial we will be using the following:
-
– Android studio version 3.0
– Android emulator Nexus 5X with API 24
– Minimum SDK API 16
1- Open up Android Studio and create a new project and give it a name, in our case we’ve named it (RatingbarTutorial), choose API 16 as the minimum SDK, then choose a blank activity, click “Finish” and wait for Android Studio to build your project.
2- Open up activity_main.xml file, here we need to add Android TextView. This TextView will have this label “We hope you enjoyed your meal with us today”
< TextView
        android:id="@+id/textView2"
        android:layout_width="match_parent"
        android:layout_height="wrap_content"
        android:layout_marginTop="10dp"
        android:gravity="center_horizontal"
        android:text="We hope you enjoyed your meal with us today"
        android:textSize="20sp"
        android:textStyle="italic" />
3- Next we will add Android RatingBar
< RatingBar
        android:id="@+id/ratingBar"
        android:layout_width="wrap_content"
        android:layout_height="wrap_content" />
4- We can set the number of stars to be shown inside the RatingBar, in this example we will give it 5 stars
android:numStars="5"
5- We can control how the user can rate whether it’s half star or full. Instead of allowing the user to give half star rating (0.5, 1.5, 2.5, 3.5 and 4.5), we can change that to a full star rating (1, 2, 3, 4 and 5)
android:stepSize="1"
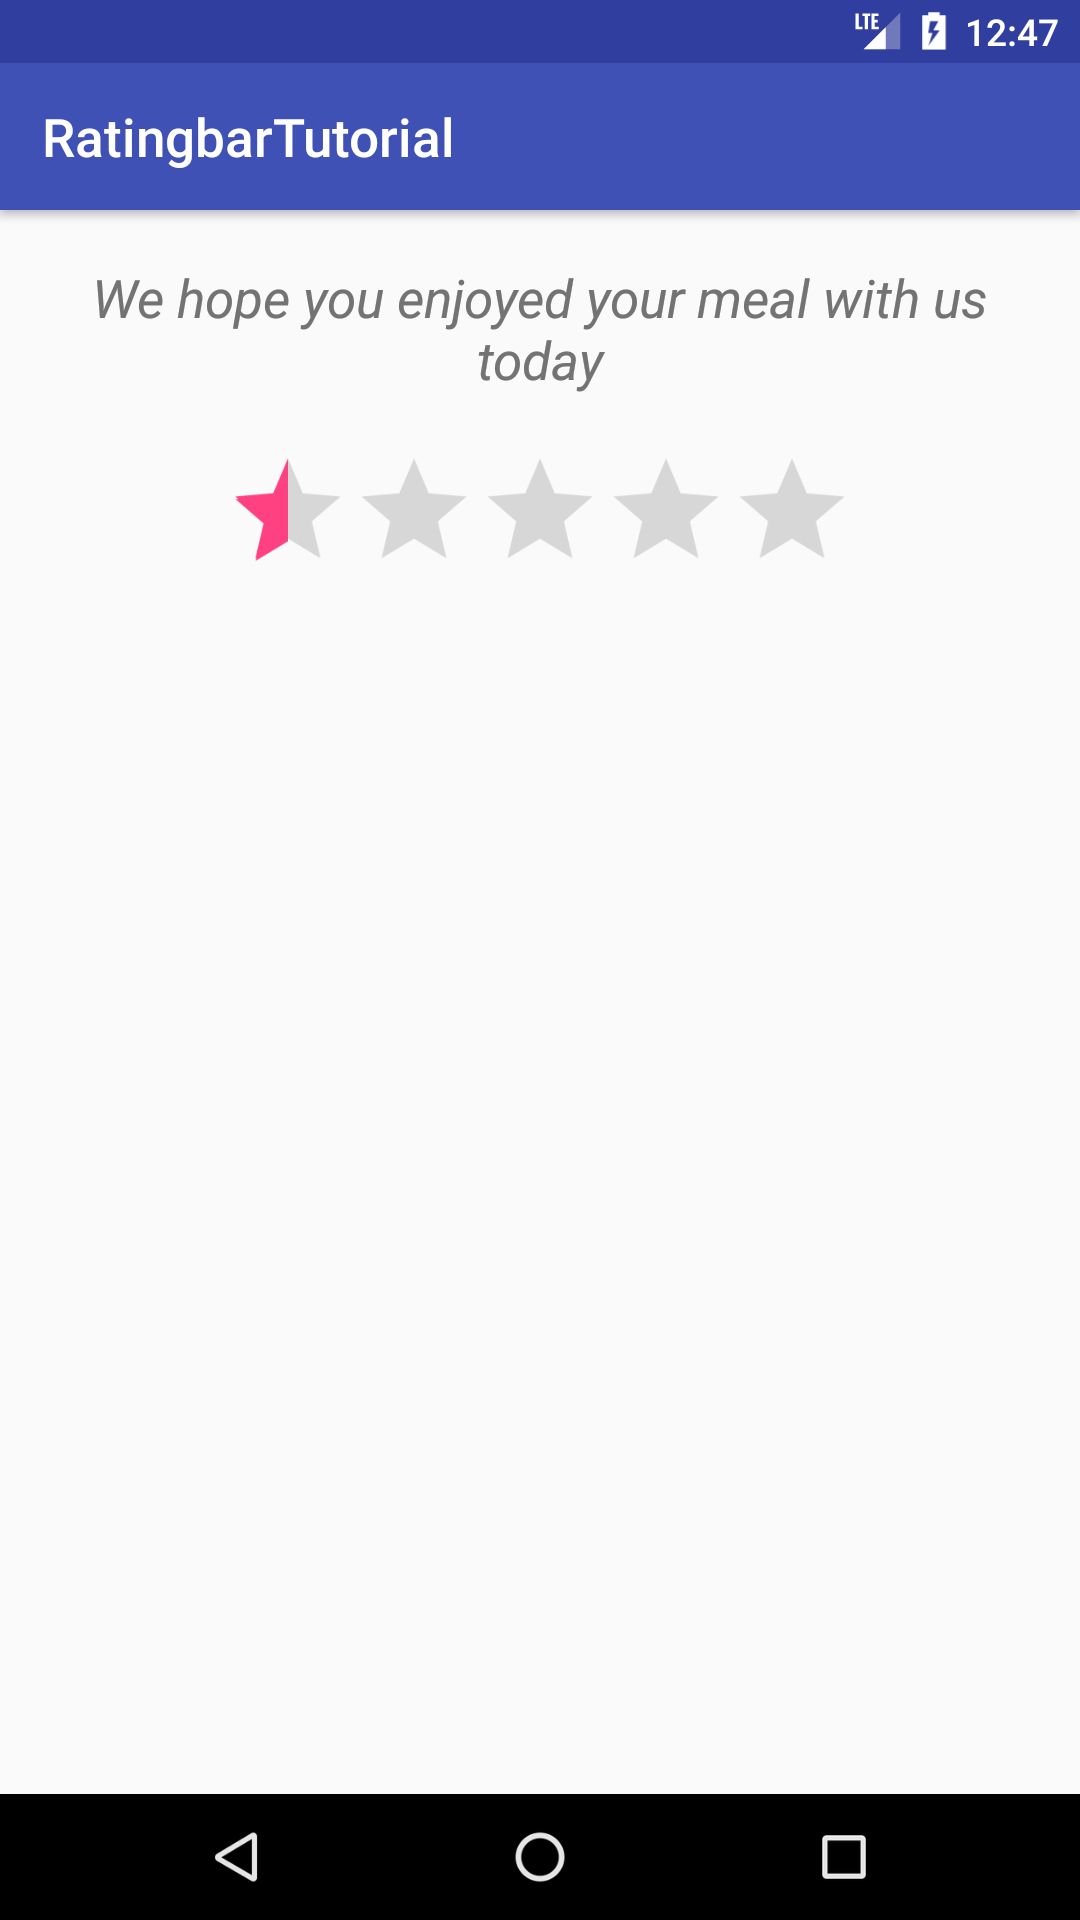
Android ratingbar half star. (Large preview)
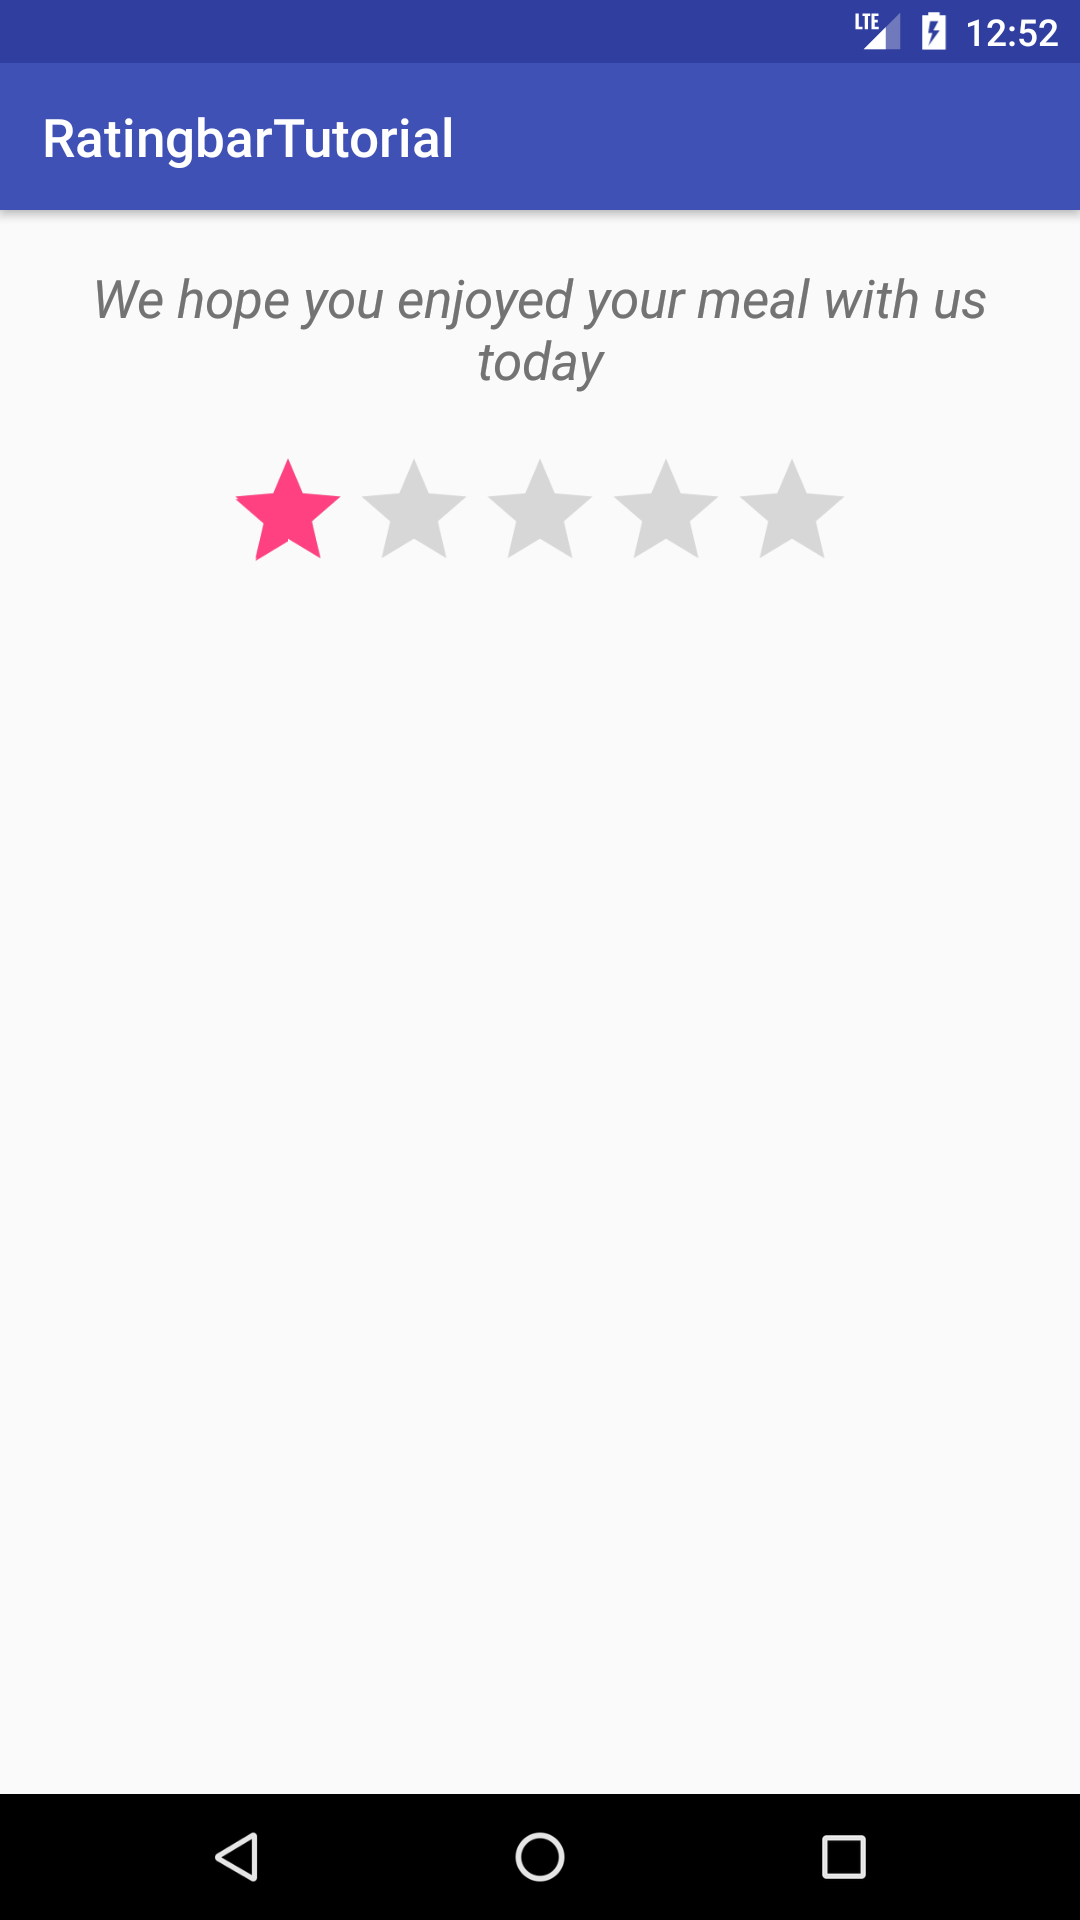
Android ratingbar full star. (Large preview)
6- You can give Android RatingBar a default value. So instead of showing an empty star rating, you can set the number of stars that you want it to be filled in the RatingBar
android:rating="5"
7- Let’s add another Android TextView, this TextView will show rating scale. For example:
– 1 Star rating –> Very bad
– 2 Stars rating –> Need some improvement
– 3 Stars rating –> Good
– 4 Stars rating –> Great
– 5 Stars rating –> Awesome. I love it
< TextView
        android:id="@+id/tvRatingScale"
        android:layout_width="wrap_content"
        android:layout_height="wrap_content"
        android:layout_gravity="center"
        android:layout_marginTop="10dp"
        android:text="Awesome. I love it"
        android:textSize="16sp"
        android:textStyle="bold" />
8- Add Android Multiline EditText. This EditText will allow the user to post their long feedback inside this EditText box
< EditText
        android:layout_width="match_parent"
        android:layout_height="wrap_content"
        android:inputType="textMultiLine" />
9- Let’s give the feedback EditText some lines, so that the user can type freely and be able to scroll through the content
android:lines="5"
10- We need to give the feedback EditText a hint, to show the user that this is the EditText where they can type their feedback
android:hint="Tell us what you loved"
One thing you will notice is the hint appears in the middle of the feedback Android EditText. Let’s fix it by specifying the gravity
android:gravity="top"
11- Last view that we need to add is Android Button. This button will be used to send the user’s feedback
 < Button
        android:id="@+id/btnSubmit"
        android:layout_width="match_parent"
        android:layout_height="wrap_content"
        android:layout_marginTop="10dp"
        android:background="#e57373"
        android:text="Send feedback"
        android:textColor="@android:color/white" />
12- Great, now we are done editing activity_main.xml file. Let’s work on declaring and initializing our views
RatingBar mRatingBar = (RatingBar) findViewById(R.id.ratingBar);
TextView mRatingScale = (TextView) findViewById(R.id.tvRatingScale);
EditText mFeedback = (EditText) findViewById(R.id.etFeedback);
Button mSendFeedback = (Button) findViewById(R.id.btnSubmit);
13- To be able to interact and give rating with Android RatingBar, we need to use mRatingBar.setOnRatingBarChangeListener
mRatingBar.setOnRatingBarChangeListener(new RatingBar.OnRatingBarChangeListener() {
            @Override
            public void onRatingChanged(RatingBar ratingBar, float v, boolean b) {

            }
        });
14- Next we need to show rating scale whenever the user gives a rating.
mRatingBar.setOnRatingBarChangeListener(new RatingBar.OnRatingBarChangeListener() {
            @Override
            public void onRatingChanged(RatingBar ratingBar, float v, boolean b) {
                mRatingScale.setText(String.valueOf(v));
                switch ((int) ratingBar.getRating()) {
                    case 1:
                        mRatingScale.setText("Very bad");
                        break;
                    case 2:
                        mRatingScale.setText("Need some improvement");
                        break;
                    case 3:
                        mRatingScale.setText("Good");
                        break;
                    case 4:
                        mRatingScale.setText("Great");
                        break;
                    case 5:
                        mRatingScale.setText("Awesome. I love it");
                        break;
                    default:
                        mRatingScale.setText("");
                }
            }
        });
15- Last thing we need to do is make Android Button clickable. if the user didn’t fill-in the feedback form, a warning Android Toast message will appear on the screen, otherwise show a success Toast message and reset all views to an empty state.
mSendFeedback.setOnClickListener(new View.OnClickListener() {
            @Override
            public void onClick(View view) {
                if (mFeedback.getText().toString().isEmpty()) {
                    Toast.makeText(MainActivity.this, "Please fill in feedback text box", Toast.LENGTH_LONG).show();
                } else {
                    mFeedback.setText("");
                    mRatingBar.setRating(0);
                    Toast.makeText(MainActivity.this, "Thank you for sharing your feedback", Toast.LENGTH_SHORT).show();
                }
            }
        });
16- Compile and run the app, you will be able to give rating by clicking on the stars, you can use multiline EditText to share the full review/feedback about the food service and overall experience. The source code for this tutorial is available on GitHub, I hope you find this tutorial helpful and if you have any question please post them in the comment below.
Thank you for the simple, well laid out tutorial.
let me know how this feedback will apply or submit on google play? is there any api calls ?
How ratingbar. Float v, and boolion value will get amd where its function in 14