
Last Updated on February 6, 2018
Hi and welcome to another tutorial from Codingdemos, in this tutorial you will learn how to use Android strikethrough text to crossed out the text in the TextView and the Button. You can crossed out a text when you want to show the current and discount price or while you are editing some text in a notepad.
We will build a demo app that will have a TextView with text and 2 Buttons. When you tap on the button, the text inside the TextView and the Button will have strikethrough text, when you tap again for the second time Android strikethrough text will be removed.
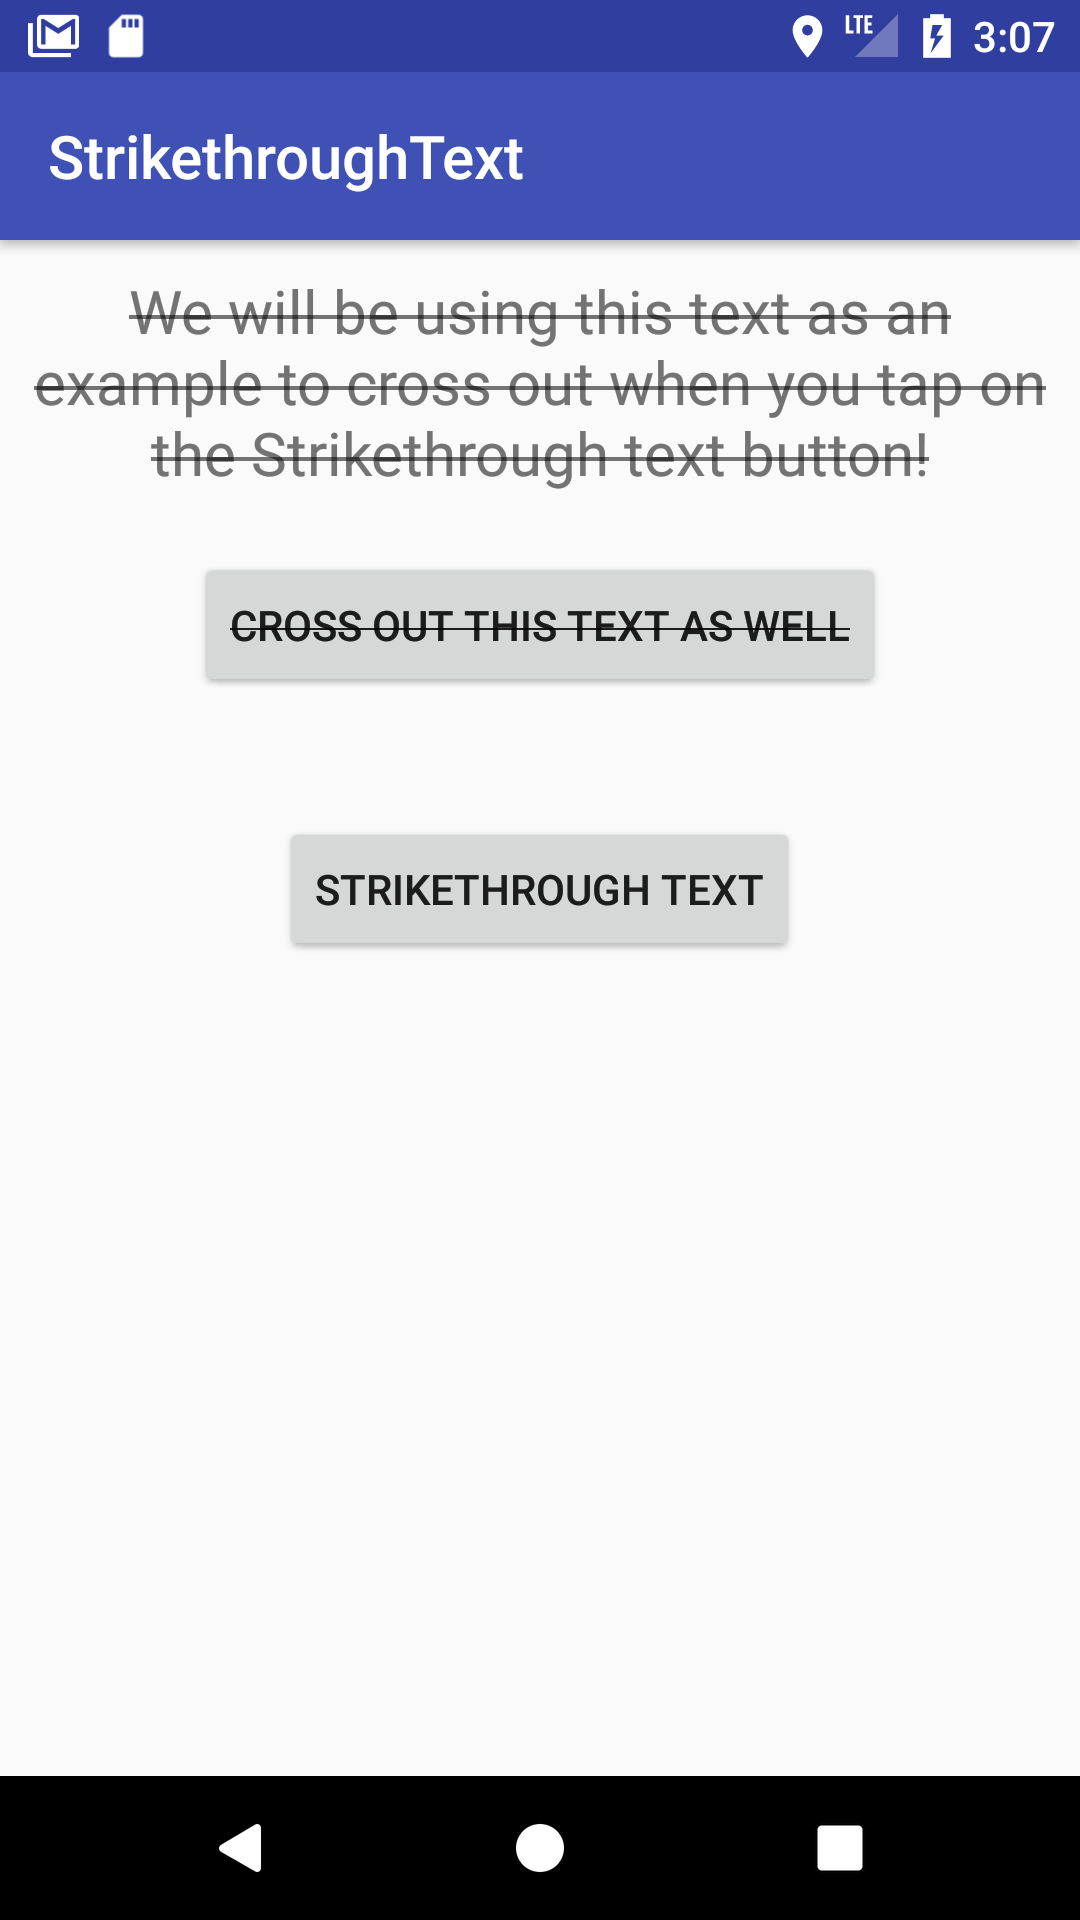
By the end of this article, we will have an app that looks like this. (Large preview)
In this tutorial we will be using the following:
-
– Android studio version 3.0
– Android emulator Nexus 5X with API 26
– Minimum SDK API 16
1- Open up Android Studio and create a new project and give it a name, in our case we’ve named it (StrikethroughText), choose API 16 as the minimum SDK, then choose a blank activity, click “Finish” and wait for Android Studio to build your project.
2- Open up activity_main.xml file, here we will add a TextView and 2 Buttons.
3- First we will add the TextView.
< TextView
        android:id="@+id/myText"
        android:layout_width="wrap_content"
        android:layout_height="wrap_content"/>
4- Let’s make some changes to the TextView by giving it a label, some padding, change the text size and lastly make it center.
< TextView
        android:id="@+id/myText"
        android:layout_width="wrap_content"
        android:layout_height="wrap_content"
        android:gravity="center"
        android:padding="10dp"
        android:text="We will be using this text as an example to cross out when you tap on the Strikethrough text button!"
        android:textSize="20sp" />
5- Next we need to add a Button. We will give it a label, position it in the center of the screen and add some margin-top, so that there is a space between the TextView and the Button.
< Button
        android:id="@+id/btnText"
        android:layout_width="wrap_content"
        android:layout_height="wrap_content"
        android:layout_gravity="center"
        android:layout_marginTop="10dp"
        android:text="Cross out this text as well" />
6- Now we add the final Button, this Button will be used to strikethrough text in the TextView and Button.
< Button
        android:id="@+id/btnStrikeText"
        android:layout_width="wrap_content"
        android:layout_height="wrap_content"
        android:layout_gravity="center"
        android:layout_marginTop="40dp"
        android:text="Strikethrough text" />
7- Here is the full code for activity_main.xml file
< ?xml version="1.0" encoding="utf-8"?>
< LinearLayout xmlns:android="http://schemas.android.com/apk/res/android"
    xmlns:tools="http://schemas.android.com/tools"
    android:layout_width="match_parent"
    android:layout_height="match_parent"
    android:orientation="vertical"
    tools:context="com.codingdemos.strikethroughtext.MainActivity">

    < TextView
        android:id="@+id/myText"
        android:layout_width="wrap_content"
        android:layout_height="wrap_content"
        android:gravity="center"
        android:padding="10dp"
        android:text="We will be using this text as an example to cross out when you tap on the Strikethrough text button!"
        android:textSize="20sp" />

    < Button
        android:id="@+id/btnText"
        android:layout_width="wrap_content"
        android:layout_height="wrap_content"
        android:layout_gravity="center"
        android:layout_marginTop="10dp"
        android:text="Cross this text as well" />

    < Button
        android:id="@+id/btnStrikeText"
        android:layout_width="wrap_content"
        android:layout_height="wrap_content"
        android:layout_gravity="center"
        android:layout_marginTop="40dp"
        android:text="Strikethrough text" />

< /LinearLayout>
8- Now we are done with adding those views inside activity_main.xml file, next let’s open MainActivity.java file and initialize our views.
EditText mText = findViewById(R.id.myText);
Button mButtonText = findViewById(R.id.btnText);
Button mStrikeText = findViewById(R.id.btnStrikeText);
9- When you tap on mStrikeText Button we want to cross out the text on both the TextView and the Button. So let’s first make the Button clickable by calling setOnClickListener.
mStrikeText.setOnClickListener(new View.OnClickListener() {
            @Override
            public void onClick(View view) {

            }
        });
10- Inside the Button onClick method is where we are going to strikethrough text for both TextView and Button. To cross out the text we use Android setPaintFlags method, this method accept flag as a parameter and the flag that we want is called Paint.STRIKE_THRU_TEXT_FLAG . Here is how we can use that flag on TextView to strikethrough text:
mText.setPaintFlags(mText.getPaintFlags() | Paint.STRIKE_THRU_TEXT_FLAG);
11- Here is how you can remove the Android strikethrough text:
mText.setPaintFlags(mText.getPaintFlags() & (~Paint.STRIKE_THRU_TEXT_FLAG));
12- If you want to check whether the TextView text is crossed out or not you do it like this:
if(!mText.getPaint().isStrikeThruText()){
//Text is not crossed out
}else{
//Text is crossed out
}
13- Here is the full code for MainActivity.java file:
package com.codingdemos.strikethroughtext;

import android.graphics.Paint;
import android.os.Bundle;
import android.support.v7.app.AppCompatActivity;
import android.view.View;
import android.widget.Button;
import android.widget.TextView;

public class MainActivity extends AppCompatActivity {

    TextView mText;
    Button mStrikeText;
    Button mButtonText;

    @Override
    protected void onCreate(Bundle savedInstanceState) {
        super.onCreate(savedInstanceState);
        setContentView(R.layout.activity_main);

        mText = findViewById(R.id.myText);
        mStrikeText = findViewById(R.id.btnStrikeText);
        mButtonText = findViewById(R.id.btnText);
        mStrikeText.setOnClickListener(new View.OnClickListener() {
            @Override
            public void onClick(View view) {
                if (!mText.getPaint().isStrikeThruText() && !mButtonText.getPaint().isStrikeThruText()) {
                    mText.setPaintFlags(mText.getPaintFlags() | Paint.STRIKE_THRU_TEXT_FLAG);
                    mButtonText.setPaintFlags(mButtonText.getPaintFlags() | Paint.STRIKE_THRU_TEXT_FLAG);
                } else {
                    mText.setPaintFlags(mText.getPaintFlags() & (~Paint.STRIKE_THRU_TEXT_FLAG));
                    mButtonText.setPaintFlags(mButtonText.getPaintFlags() & (~Paint.STRIKE_THRU_TEXT_FLAG));
                }
            }
        });
    }
}
14- Compile and run the app, tap on (Strikethrough text) Button to strikethrough text in the TextView and the Button. The source code for this tutorial is available on GitHub, I hope you find this tutorial helpful and if you have any question please post them in the comment below.
i am using it in listview adapter, when i remove the Android strikethrough it changes the font too. how to fix this. i did exactly as you have done.