
Last Updated on February 6, 2018
Hi and welcome to another tutorial of codingdemos, in this tutorial you will learn how to change language programmatically in your app, then save that selected language later in android sharedpreference so that when you launch the app next time you don’t have to set the language again for the app, instead it will be preloaded from sharedpreference.
In this tutorial we will be using the following:
- Android studio version 2.3.3
- Android emulator Nexus 5X with API 24
- Minimum SDK API 17
The final result will look something like this:
- Open up Android Studio and create a new project and give it a name, in our case we’ve named it (TranslationTutorial), choose API 17 as the minimum SDK, then choose blank activity and click on finish and wait for Android Studio to build your project.
- Open up (activity_main.xml) file and here we will need to add android spinner to allow the user to choose the language, then we add android textview and set some text to show how the translation work whenever you make any selection from the spinner. Here is the code:
<?xml version="1.0" encoding="utf-8"?>
<LinearLayout xmlns:android="http://schemas.android.com/apk/res/android"
    xmlns:app="http://schemas.android.com/apk/res-auto"
    xmlns:tools="http://schemas.android.com/tools"
    android:layout_width="match_parent"
    android:layout_height="match_parent"
    android:orientation="vertical"
    tools:context="com.codingdemos.translationtutorial.MainActivity">


    <Spinner
        android:id="@+id/spLanguage"
        android:layout_width="match_parent"
        android:layout_height="wrap_content"
        android:layout_marginTop="20dp" />

    <TextView
        android:id="@+id/textView"
        android:layout_width="match_parent"
        android:layout_height="match_parent"
        android:gravity="center"
        android:text="@string/text_translation"
        android:textColor="@color/colorAccent"
        android:textSize="25sp" />
</LinearLayout>
Note: We need to extract the string inside the textview so that later we can use that for translation
- Now open up (strings.xml) file and here we need to add a string array that we will use it for android spinner, this string array will have 3 string items and they are: (English, Indonesian and Spanish)
- Here is the full code for (strings.xml) file:
<resources>
    <string name="app_name" translatable="false">TranslationTutorial</string>
    <string name="text_translation">Hi and welcome to codingdemos,
        here you will learn how to develop android app. Thank you for watching</string>

    <string-array name="language_option">
    <item>English</item>
    <item>Indonesian</item>
    <item>Spanish</item>
    </string-array>
</resources>
- Since our app will have to support 3 languages (English, Indonesian and Spanish), so we need to create 2 (strings.xml) file for each language. To do that we need to open up (strings.xml) file and then click on (Open Editor) option as shown in figure (1).
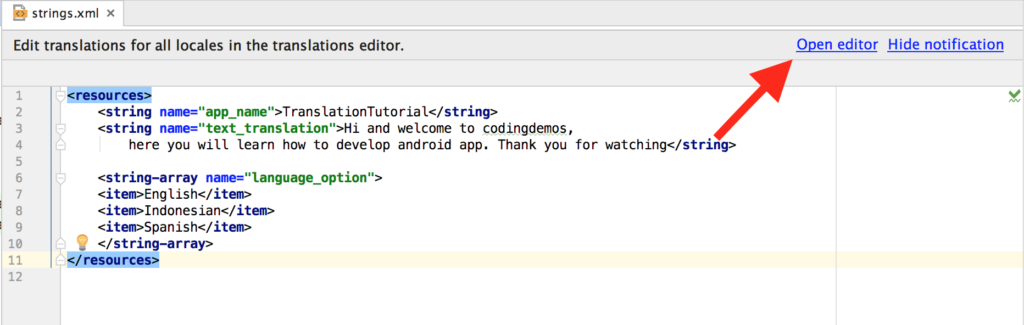
Figure (1): Android Studio translation editor
- Next click on the global icon thats says (Add Locale) as shown in figure (2)

Figure (2): Android Studio add locale
- Once you click on the global icon as shown in figure (2), android studio will then prompt you with a list of languages that you can choose from to be able to create a specific (strings.xml) file for that language as shown in figure (3).
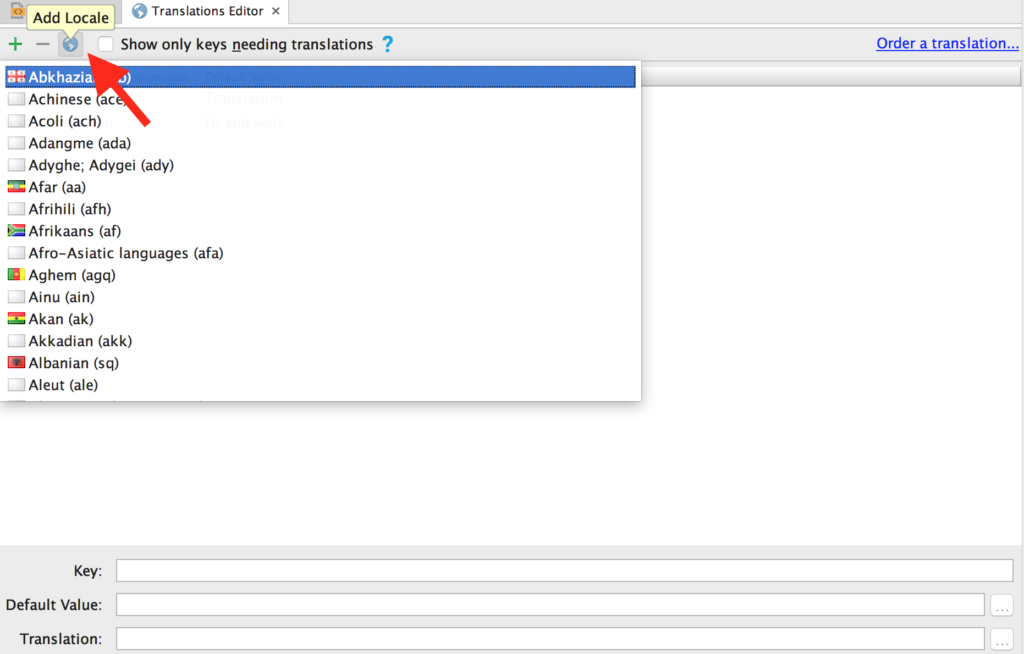
Figure (3): Android Studio strings.xml languages
- Now search for (Indonesian and Spanish) From the list that is shown in figure (3), once you found those languages you will need to click on them so that they will be added to (strings.xml) folder as shown in figure (4).

Figure (4): Android Studio language translation
Note: Sometimes you don’t want to translate everything inside (strings.xml) for example the name of the app, so what you can do is click on (Untranslatable) checkbox next to the string item that you don’t want to translate.
- I have translated a sample text to Spanish and Indonesian using Google Translator as shown in figure (5)
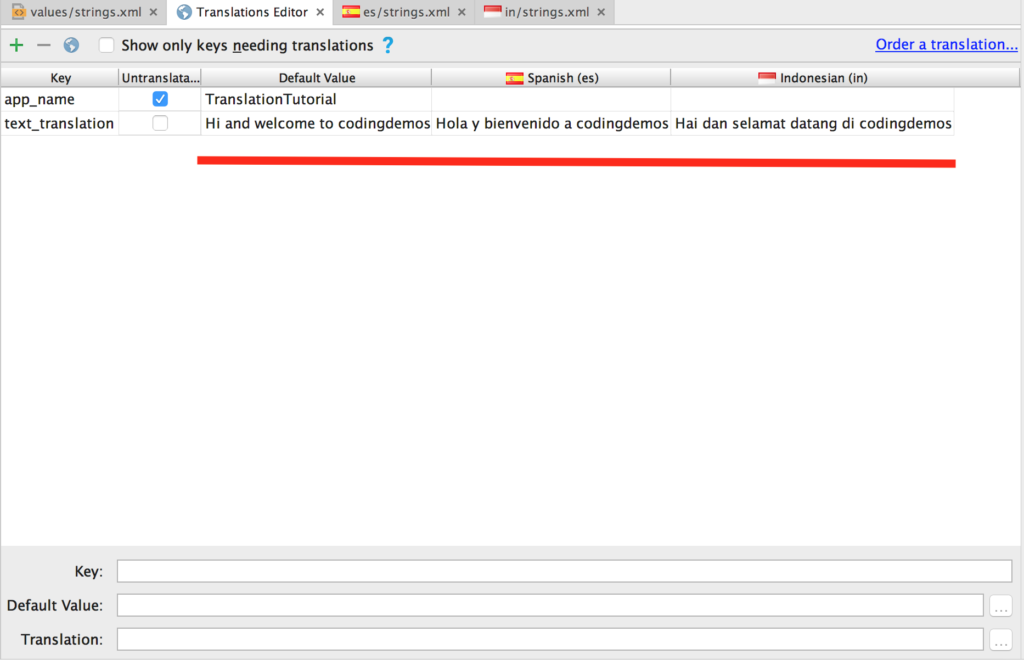
Figure (5): strings.xml file translation to Indonesian and Spanish
- Here is the full code for (strings.xml) file Indonesian translation:
<?xml version="1.0" encoding="utf-8"?>
<resources>
    <string name="text_translation">Hai dan selamat datang di codingdemos, disini anda akan belajar bagaimana mengembangkan aplikasi android. Terima kasih telah menonton</string>
</resources>
- And here is the full code for (strings.xml) file Spanish translation:
<?xml version="1.0" encoding="utf-8"?>
<resources>
    <string name="text_translation">Hola y bienvenido a codingdemos, aquí aprenderás cómo desarrollar la aplicación para Android. Gracias por ver</string>
</resources>
- Now we are done with translating (strings.xml) file for different languages, next is we need to open (MainActivity.java) file to declare android spinner and textview like this:
Spinner mLanguage = (Spinner) findViewById(R.id.spLanguage);
TextView mTextView = (TextView) findViewById(R.id.textView);
- Next we need to initialize the array adapter that will hold the string array for our spinner like this:
ArrayAdapter mAdapter = new ArrayAdapter<String>(MainActivity.this, android.R.layout.simple_spinner_dropdown_item, getResources().getStringArray(R.array.language_option));
mLanguage.setAdapter(mAdapter);
– Then we need to call android spinner setOnItemSelectedListener to allow the user to select the language from the spinner like this:
        mLanguage.setOnItemSelectedListener(new AdapterView.OnItemSelectedListener() {

            @Override
            public void onItemSelected(AdapterView<?> adapterView, View view, int i, long l) {

            }

            @Override
            public void onNothingSelected(AdapterView<?> adapterView) {

            }
        });
- When the user select a language from spinner, we will store that selected language inside android sharedpreference, so that when you exit the app and launch it again you will still see the text translated in the previously selected language.
Note: If you are new to Android sharedpreference, then i suggest you to watch my tutorial where i show how to use android sharedpreference
- To make the app translate the text immediatly after the user select a language, we will use a 3rd party code that will help us do that.
Note: 3rd party code is a java class named (LocaleHelper.java) created by a developer named (Gunhan Sancar). You can read more about it: Change language programmatically
- Let’s create an application class and we name it (Home.java) and inside this class we will override attachBaseContext so that we can set the selected language to the app from sharedpreference, if sharedpreference is empty and it doesn’t have any saved language so we will just launch the app in the default language as english like this:
public class Home extends Application {
    @Override
    protected void attachBaseContext(Context base) {
        super.attachBaseContext(LocaleHelper.onAttach(base, "en"));
    }
}
- Next we need to make some changes inside (AndroidManifest.xml) file in order to add (Home.java) application class like this:
<?xml version="1.0" encoding="utf-8"?>
<manifest xmlns:android="http://schemas.android.com/apk/res/android"
    package="com.codingdemos.translationtutorial">

    <application
        android:allowBackup="true"
        android:name=".Home"
        android:icon="@mipmap/ic_launcher"
        android:label="@string/app_name"
        android:roundIcon="@mipmap/ic_launcher_round"
        android:supportsRtl="true"
        android:theme="@style/AppTheme">
        <activity android:name=".MainActivity">
            <intent-filter>
                <action android:name="android.intent.action.MAIN" />

                <category android:name="android.intent.category.LAUNCHER" />
            </intent-filter>
        </activity>
    </application>

</manifest>
- Now let’s go back to (MainActivity.java) file and make some changes inside spinner setOnItemSelectedListener, what we want to do is when the user select a language, we store that in android sharedpreference and we will use a method from (LocaleHelper.java) called setLocale in order to set the language of the app, setLocale will take 2 arguments(Context and language code) like this:
- First we save the selected language in sharedpreference like this:
Context context = LocalHelper.setLocale(MainActivity.this, "en");
- After that we declare a Resources, this will be used to access the string resource from (strings.xml) file through the context that we declared above because that context holds the language code and it looks like this:
Resources resources = context.getResources();
- Finally we apply the translated text into our textview like this:
mTextView.setText(resources.getString(R.string.text_translation));
- The whole code for the spinner setOnItemSelectedListener will look like this:
        mLanguage.setOnItemSelectedListener(new AdapterView.OnItemSelectedListener() {

            @Override
            public void onItemSelected(AdapterView<?> adapterView, View view, int i, long l) {
                Context context;
                Resources resources;
                switch (i) {
                    case 0:
                        context = LocaleHelper.setLocale(MainActivity.this, "en");
                        resources = context.getResources();
                        mTextView.setText(resources.getString(R.string.text_translation));
                        break;
                    case 1:
                        context = LocaleHelper.setLocale(MainActivity.this, "in");
                        resources = context.getResources();
                        mTextView.setText(resources.getString(R.string.text_translation));
                        break;
                    case 2:
                        context = LocaleHelper.setLocale(MainActivity.this, "es");
                        resources = context.getResources();
                        mTextView.setText(resources.getString(R.string.text_translation));
                        break;
                }
            }

            @Override
            public void onNothingSelected(AdapterView<?> adapterView) {

            }
        });
- One last thing which we shouldn’t forget is to override (attachBaseContext) inside (MainActivity.java) like this:
@Override
    protected void attachBaseContext(Context newBase) {
        super.attachBaseContext(LocalHelper.onAttach(newBase));
    }
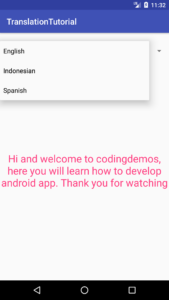 Figure (6): Final output
- Now run the app and when you select a language from the spinner it will translate the text to that language…Cool 😀
- One thing that is acting a bit weird is when you select the language the text will change and it works fine, but when you exist the app and launch it back again you will notice the text is translated back to english even though the language selection is already saved in sharedpreference!! Another thing is the spinner doesn’t show the previously selected language, it will just revert back to the first option as english…Hmmm
- Thankfully there is a SOLUTION!! yay
- To be able to show the selected language in android spinner even after you exist the app and launch it back again, we need to use one method from spinner called spinner setSelection.
- Spinner setSelection takes a int position as an argument, and we can get that position through array adapter that originally holds the string array for the spinner like this:
if (LocaleHelper.getLanguage(MainActivity.this).equalsIgnoreCase("en")) {
            mLanguage.setSelection(mAdapter.getPosition("English"));
        } else if (LocaleHelper.getLanguage(MainActivity.this).equalsIgnoreCase("in")) {
            mLanguage.setSelection(mAdapter.getPosition("Indonesian"));
        } else {
            mLanguage.setSelection(mAdapter.getPosition("Spanish"));
        }
- Now run the app again and you will see the text translation is working and when you exist and launch the app again you can see the previously selected language inside spinner.
- Here is the whole code for (MainActivity.java) file:
package com.codingdemos.translationtutorial;

import android.content.Context;
import android.content.res.Resources;
import android.os.Bundle;
import android.support.v7.app.AppCompatActivity;
import android.view.View;
import android.widget.AdapterView;
import android.widget.ArrayAdapter;
import android.widget.Spinner;
import android.widget.TextView;

public class MainActivity extends AppCompatActivity {

    TextView mTextView;
    Spinner mLanguage;
    ArrayAdapter<String> mAdapter;

    @Override
    protected void onCreate(Bundle savedInstanceState) {
        super.onCreate(savedInstanceState);
        setContentView(R.layout.activity_main);

        mLanguage = (Spinner) findViewById(R.id.spLanguage);
        mTextView = (TextView) findViewById(R.id.textView);
        mAdapter = new ArrayAdapter<String>(MainActivity.this, android.R.layout.simple_spinner_dropdown_item, getResources().getStringArray(R.array.language_option));
        mLanguage.setAdapter(mAdapter);

        if (LocaleHelper.getLanguage(MainActivity.this).equalsIgnoreCase("en")) {
            mLanguage.setSelection(mAdapter.getPosition("English"));
        } else if (LocaleHelper.getLanguage(MainActivity.this).equalsIgnoreCase("in")) {
            mLanguage.setSelection(mAdapter.getPosition("Indonesian"));
        } else {
            mLanguage.setSelection(mAdapter.getPosition("Spanish"));
        }

        mLanguage.setOnItemSelectedListener(new AdapterView.OnItemSelectedListener() {

            @Override
            public void onItemSelected(AdapterView<?> adapterView, View view, int i, long l) {
                Context context;
                Resources resources;
                switch (i) {
                    case 0:
                        context = LocaleHelper.setLocale(MainActivity.this, "en");
                        resources = context.getResources();
                        mTextView.setText(resources.getString(R.string.text_translation));
                        break;
                    case 1:
                        context = LocaleHelper.setLocale(MainActivity.this, "in");
                        resources = context.getResources();
                        mTextView.setText(resources.getString(R.string.text_translation));
                        break;
                    case 2:
                        context = LocaleHelper.setLocale(MainActivity.this, "es");
                        resources = context.getResources();
                        mTextView.setText(resources.getString(R.string.text_translation));
                        break;
                }
            }

            @Override
            public void onNothingSelected(AdapterView<?> adapterView) {

            }
        });

    }

    @Override
    protected void attachBaseContext(Context newBase) {
        super.attachBaseContext(LocaleHelper.onAttach(newBase));
    }
}
- That’s it we are done for this tutorial 😀
- The source code for this tutorial is available on this link:
https://github.com/codingdemos/TranslationTutorial - For more cool video please check out the YouTube channel on this link: https://www.youtube.com/c/CodingDemos
This is for single text.. I wanna convert the language of whole app.. and it has over two thousand strings.. and it is not possible to write this code for every one of them.. isn’t there a single code for whole app!!