
Last Updated on June 29, 2024
Hello and welcome to another tutorial from Codingdemos, today you will learn how to create an Android custom dialog, this dialog will have animation, background color, ImageView and Button. You can use this Alertdialog as an indicator when something good or bad occur while the user uses your app.
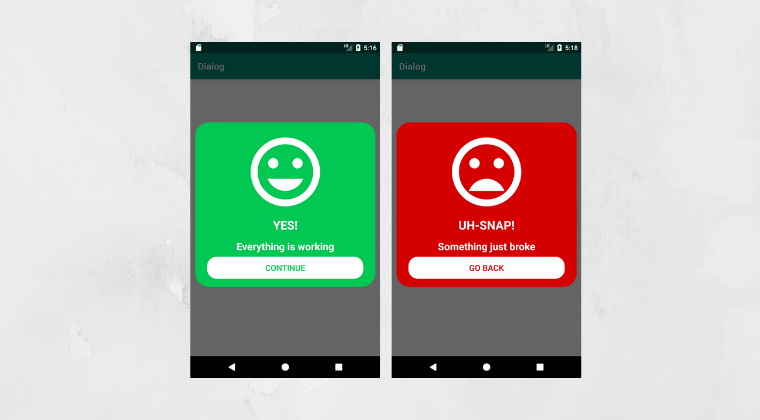
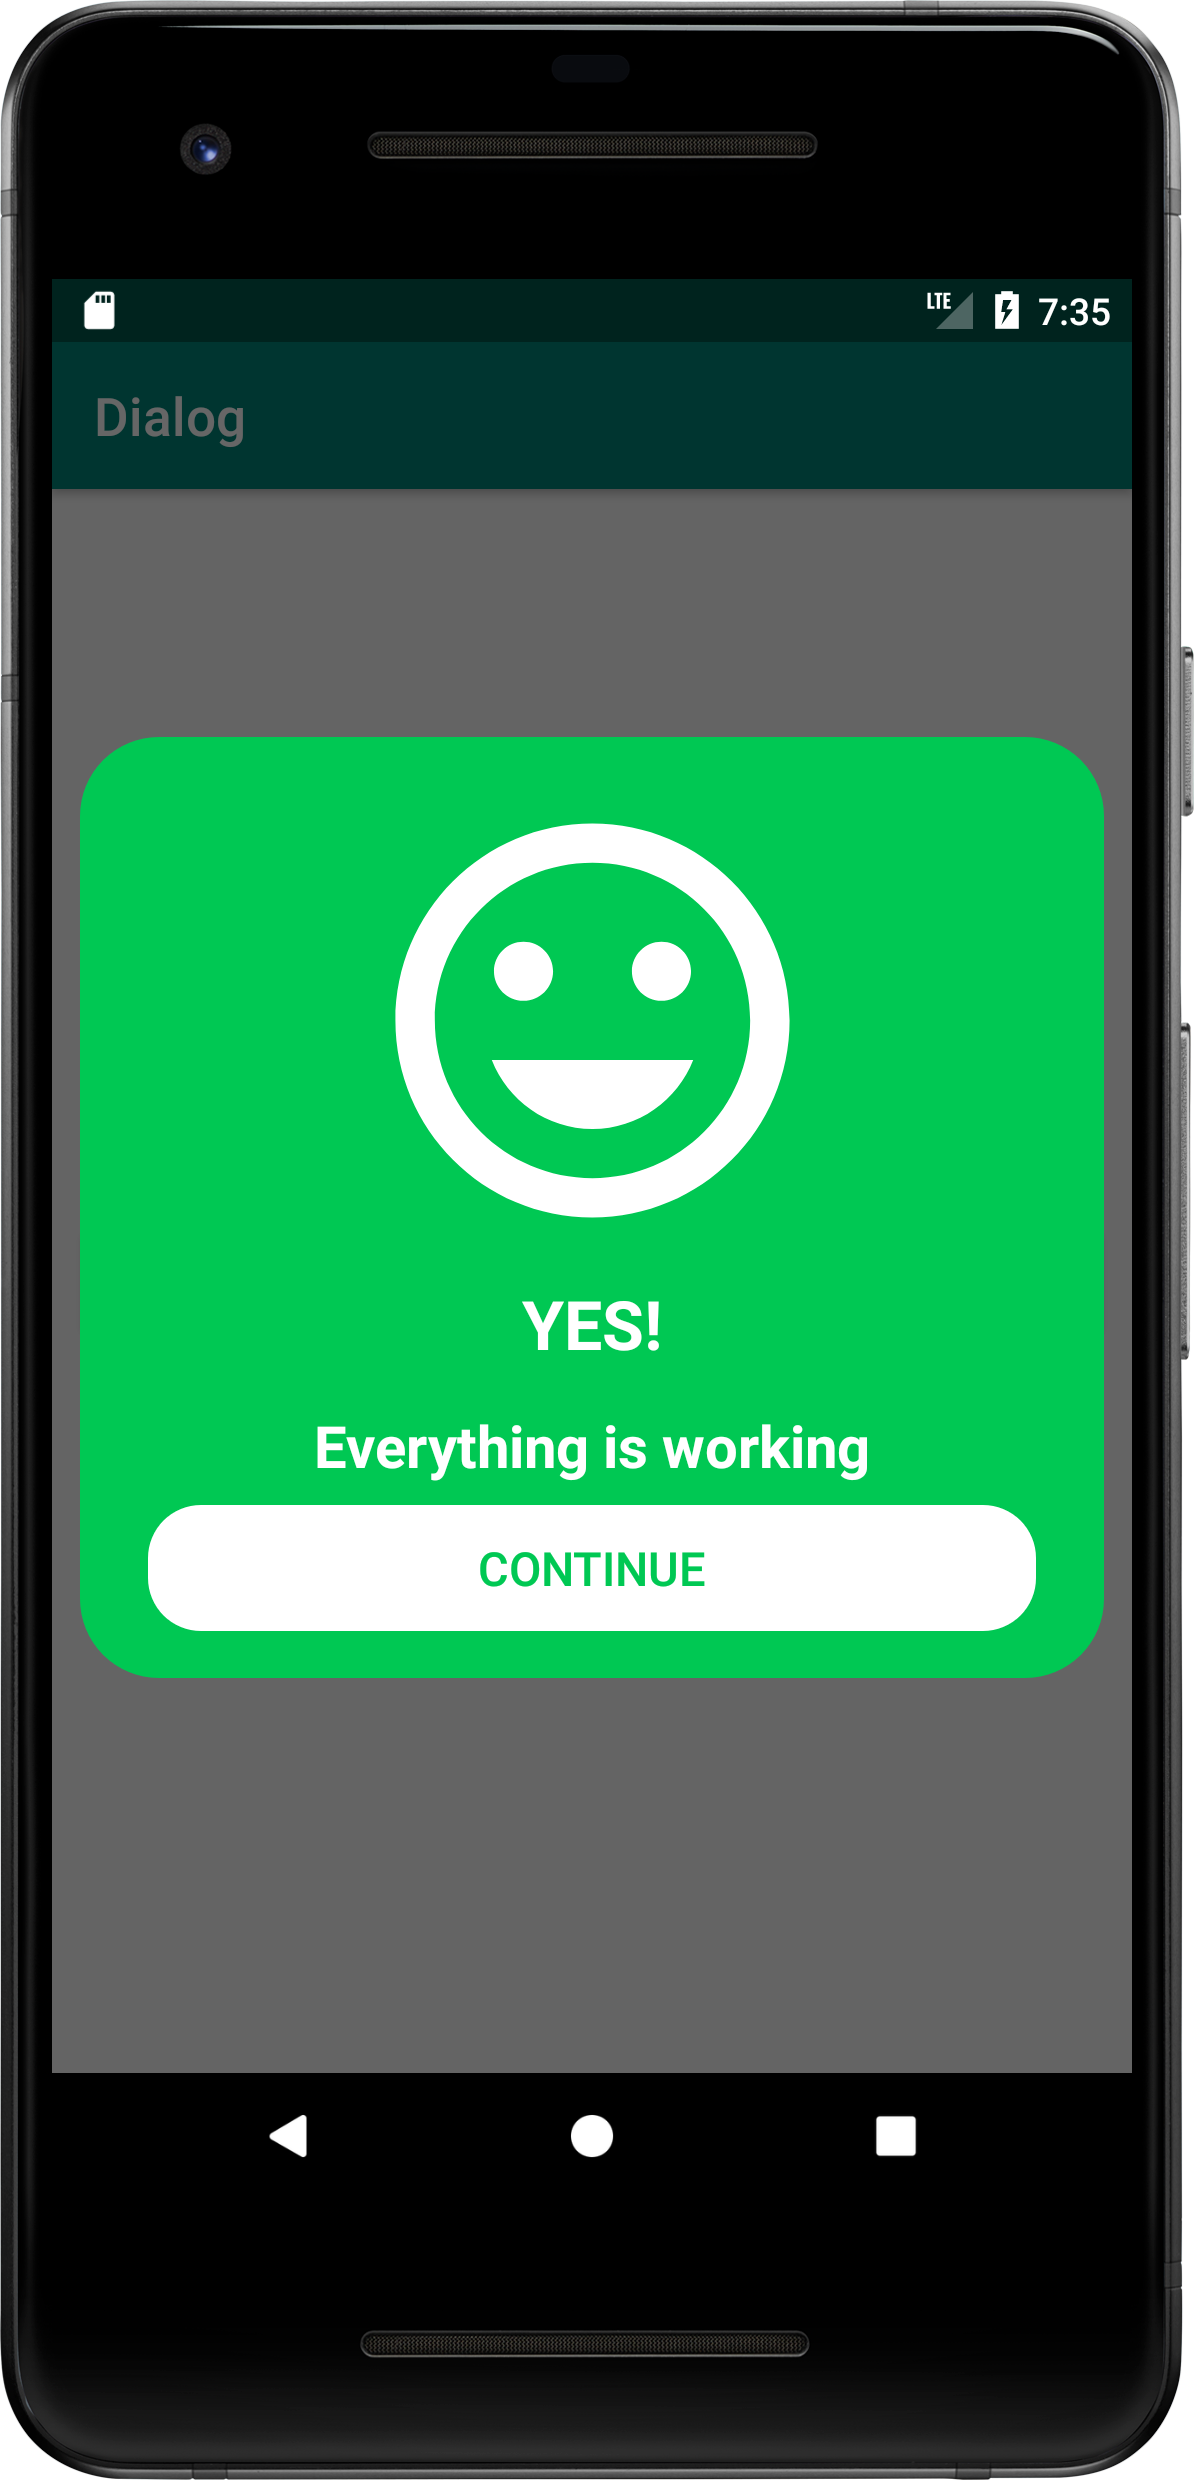
By the end of this tutorial, you will have an app that looks like this. (Large preview)
This tutorial has been updated using the following:
- Android Studio Koala version 2024.1.1
- Minimum SDK API 24
Changing App Appearance
1- Open Android Studio.

Create new Android Studio project or open existing project. (Large preview)
2- Open colors.xml file to change the colors of the main app.
<?xml version="1.0" encoding="utf-8"?>
<resources>
    <color name="black">#FF000000</color>
    <color name="white">#FFFFFFFF</color>
    <color name="colorPrimary">#008577</color>
    <color name="colorPrimaryDark">#00574B</color>
    <color name="colorAccent">#D81B60</color>
    <color name="colorGreen">#00C854</color>
    <color name="colorRed">#D60001</color>
</resources>
3- Build and run the app to see the new colors.
New colors for the app. (Large preview)
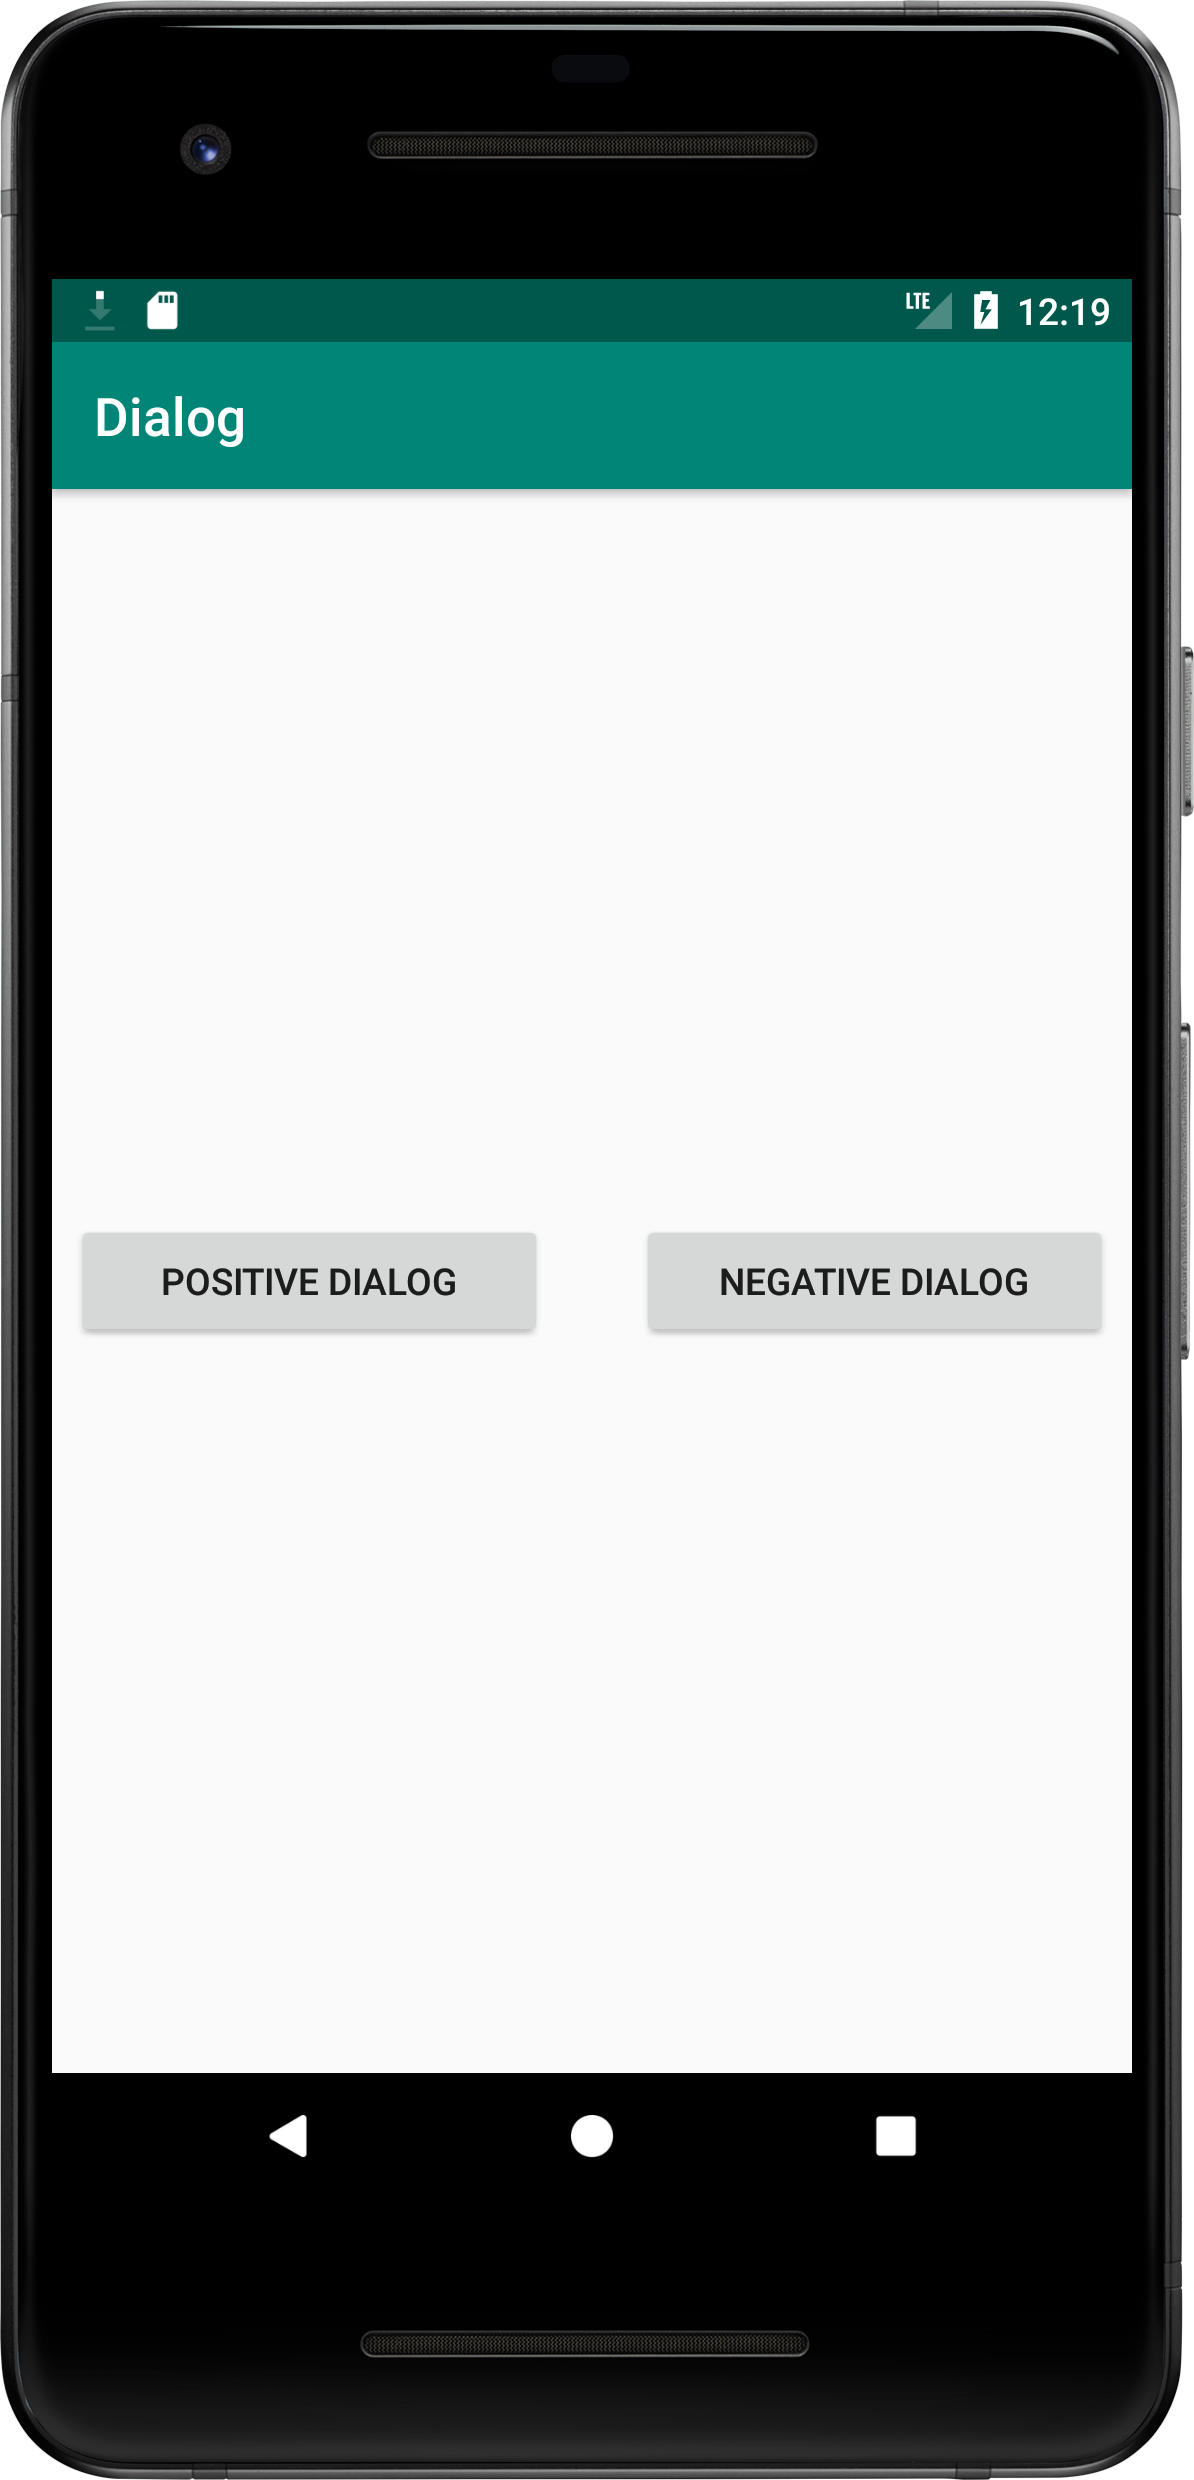
4- Open activity_main.xml file. Here, you need to add 2 Android Buttons. These 2 buttons will be placed on the same line in the center of the screen.
<Button
android:id="@+id/btnPositiveDialog"
android:layout_width="180dp"
android:layout_height="wrap_content"
android:layout_marginStart="8dp"
android:layout_marginLeft="8dp"
android:layout_marginTop="8dp"
android:layout_marginEnd="8dp"
android:layout_marginRight="8dp"
android:layout_marginBottom="8dp"
android:text="Positive dialog"
app:layout_constraintBottom_toBottomOf="parent"
app:layout_constraintStart_toStartOf="parent"
app:layout_constraintTop_toTopOf="parent" />

<Button
android:id="@+id/btnNegativeDialog"
android:layout_width="180dp"
android:layout_height="wrap_content"
android:layout_marginTop="8dp"
android:layout_marginEnd="8dp"
android:layout_marginRight="8dp"
android:layout_marginBottom="8dp"
android:text="Negative dialog"
app:layout_constraintBottom_toBottomOf="parent"
app:layout_constraintEnd_toEndOf="parent"
app:layout_constraintTop_toTopOf="parent" />
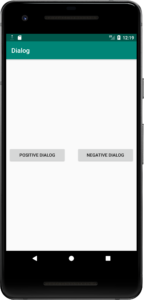
Android Buttons. (Large preview)
5- Create a new xml layout file and name it dialog_postive_layout, you will use this as the layout for Positive Dialog.
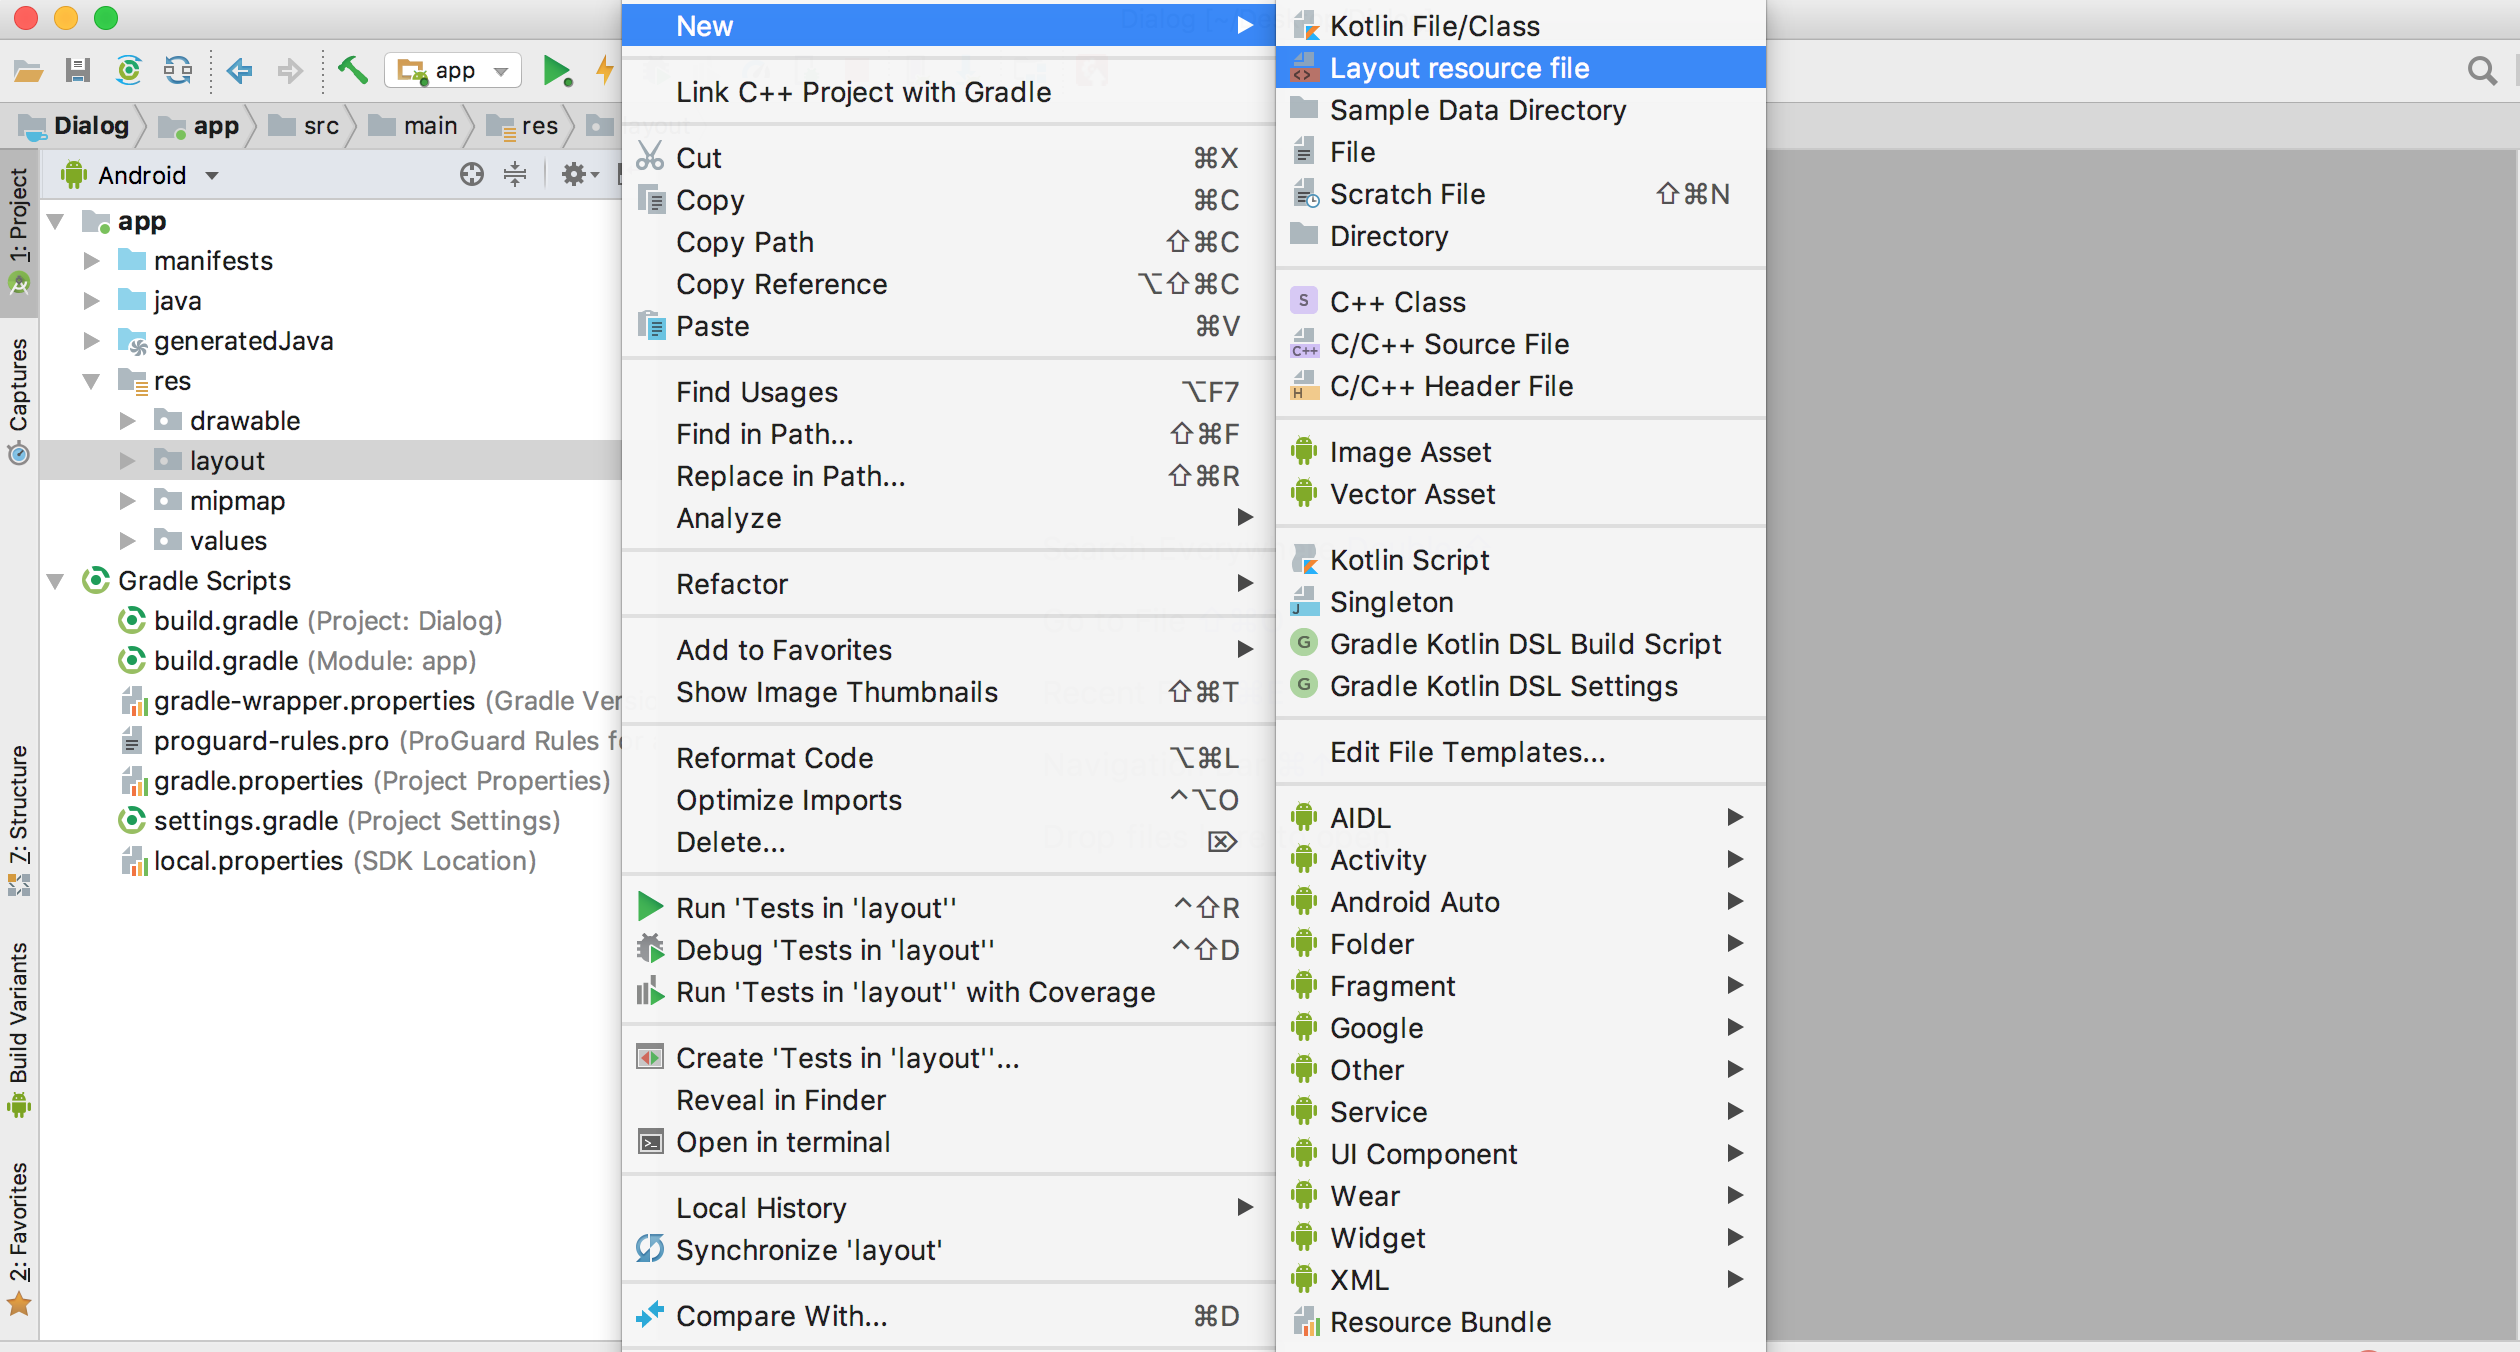
Create layout resource file in Android Studio. (Large preview)
6- Create an icon that you will use for Android ImageView.
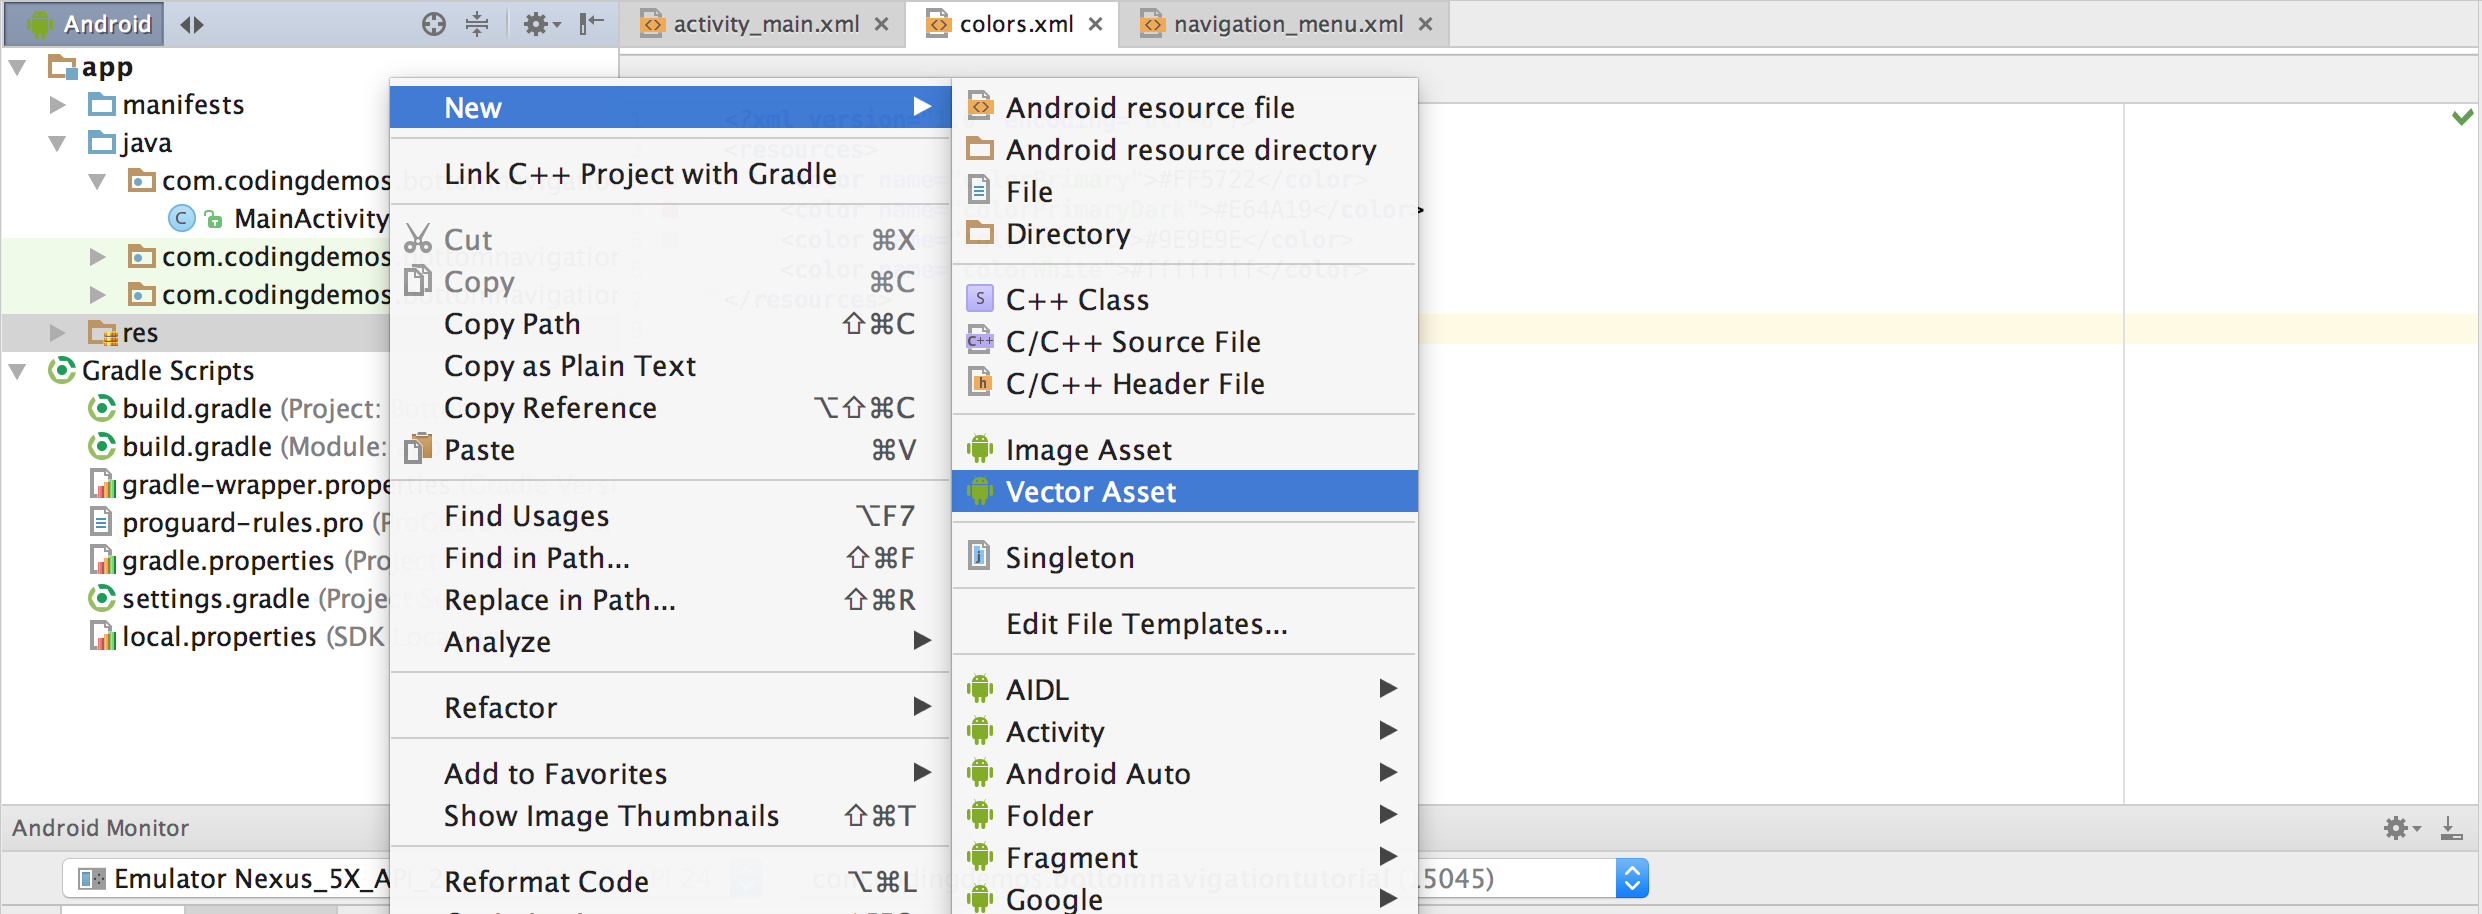
Create vector assets in Android Studio. (Large preview)
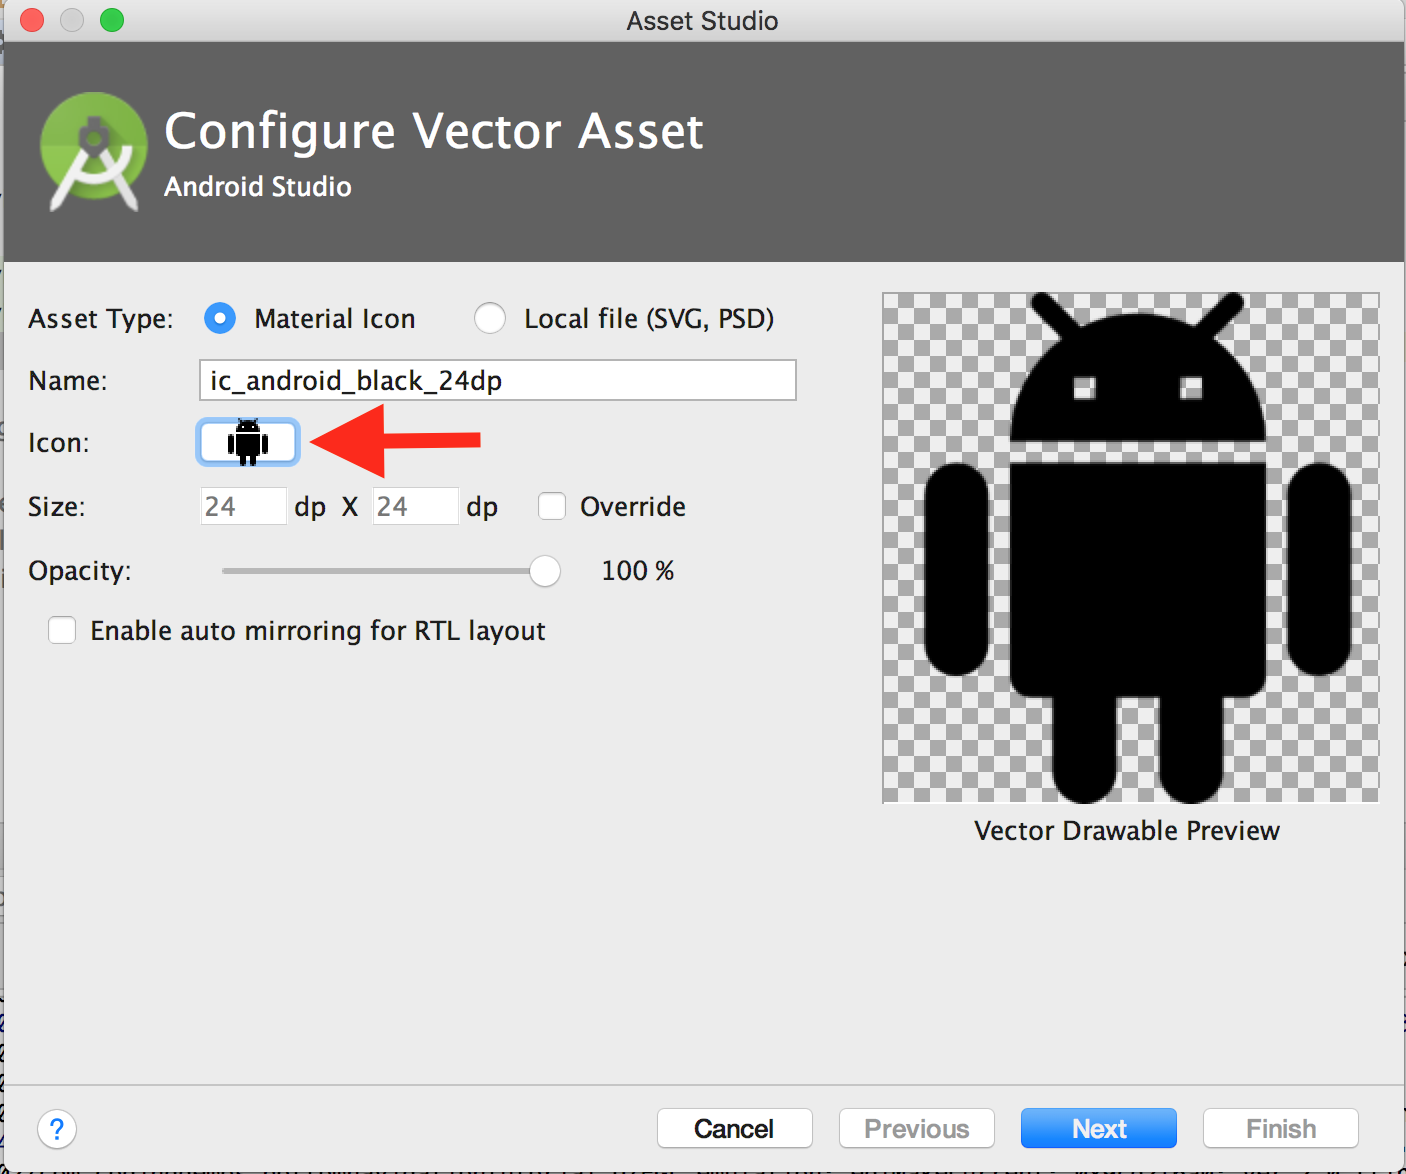
Choose an icon inside the Android Studio asset studio. (Large preview)
7- Add the following code inside dialog_postive_layout.xml file.
<ImageView
android:id="@+id/imageView"
android:layout_width="180dp"
android:layout_height="180dp"
android:layout_marginStart="8dp"
android:layout_marginLeft="8dp"
android:layout_marginTop="8dp"
android:layout_marginEnd="8dp"
android:layout_marginRight="8dp"
app:layout_constraintEnd_toEndOf="parent"
app:layout_constraintStart_toStartOf="parent"
app:layout_constraintTop_toTopOf="parent"
app:srcCompat="@drawable/ic_mood_black_46dp" />

<TextView
android:id="@+id/textView"
android:layout_width="wrap_content"
android:layout_height="wrap_content"
android:layout_marginStart="8dp"
android:layout_marginLeft="8dp"
android:layout_marginTop="8dp"
android:layout_marginEnd="8dp"
android:layout_marginRight="8dp"
android:text="YES!"
android:textColor="@android:color/white"
android:textSize="26sp"
android:textStyle="bold"
app:layout_constraintEnd_toEndOf="parent"
app:layout_constraintStart_toStartOf="parent"
app:layout_constraintTop_toBottomOf="@+id/imageView"/>

<TextView
android:id="@+id/textView2"
android:layout_width="wrap_content"
android:layout_height="wrap_content"
android:layout_marginStart="8dp"
android:layout_marginLeft="8dp"
android:layout_marginTop="14dp"
android:layout_marginEnd="8dp"
android:layout_marginRight="8dp"
android:text="Everything is working"
android:textColor="@android:color/white"
android:textSize="22sp"
android:textStyle="bold"
app:layout_constraintEnd_toEndOf="parent"
app:layout_constraintStart_toStartOf="parent"
app:layout_constraintTop_toBottomOf="@+id/textView"/>

<Button
android:id="@+id/btnDialog"
android:layout_width="match_parent"
android:layout_height="wrap_content"
android:layout_marginStart="16dp"
android:layout_marginLeft="16dp"
android:layout_marginTop="8dp"
android:layout_marginEnd="16dp"
android:layout_marginRight="16dp"
android:layout_marginBottom="8dp"
android:background="@drawable/round_button"
android:text="Continue"
android:textColor="@color/colorGreen"
android:textSize="18sp"
app:backgroundTint="@android:color/white"
app:layout_constraintBottom_toBottomOf="parent"
app:layout_constraintEnd_toEndOf="parent"
app:layout_constraintStart_toStartOf="parent"
app:layout_constraintTop_toBottomOf="@+id/textView2" />
In this layout, you’ve added an Android ImageView, which will show the icon you created using Android Asset Studio, 2 Android Textviews, which will show the title and a message, and finally, an Android Button, which you will use later to dismiss the Android dialog box.
8- Here is how the layout looks like in Android Studio preview tab.
Android popup dialog. (Large preview)
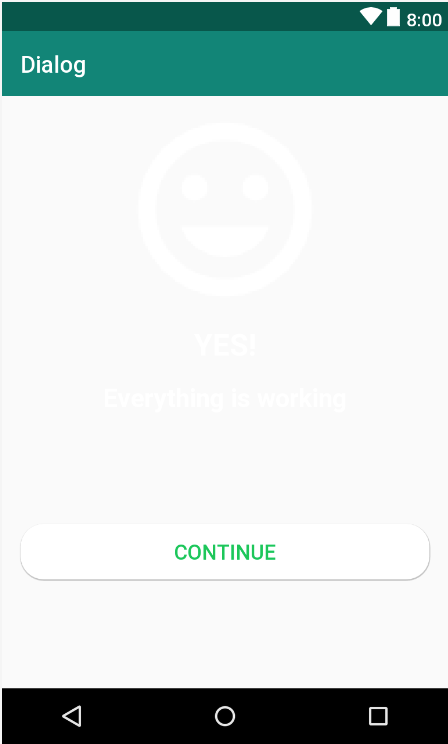
9- I’m sure you’ve noticed that you literally can’t see the text, let’s fix it by giving a green background color for the layout.
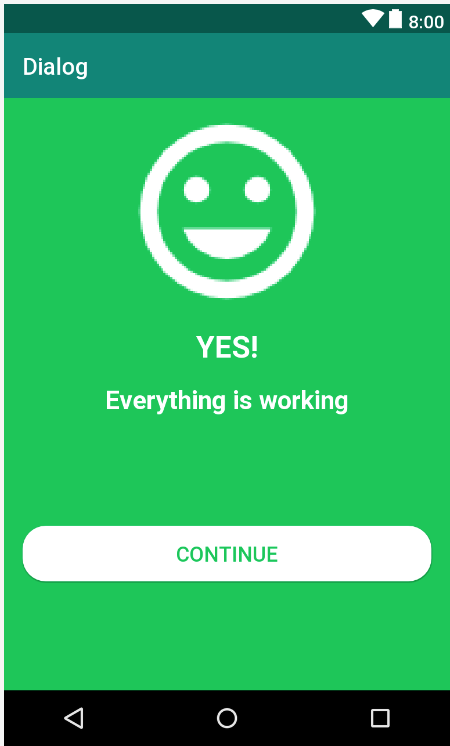
Here is what the Android custom dialog looks like. (Large preview)
10- Here is the full code for the dialog_postive_layout.xml file.
<?xml version="1.0" encoding="utf-8"?> <androidx.constraintlayout.widget.ConstraintLayout
xmlns:android="http://schemas.android.com/apk/res/android"
xmlns:app="http://schemas.android.com/apk/res-auto"
android:layout_width="match_parent"
android:layout_height="match_parent"
android:background="@color/colorGreen">

<ImageView
android:id="@+id/imageView"
android:layout_width="180dp"
android:layout_height="180dp"
android:layout_marginStart="8dp"
android:layout_marginLeft="8dp"
android:layout_marginTop="8dp"
android:layout_marginEnd="8dp"
android:layout_marginRight="8dp"
app:layout_constraintEnd_toEndOf="parent"
app:layout_constraintStart_toStartOf="parent"
app:layout_constraintTop_toTopOf="parent"
app:srcCompat="@drawable/ic_mood_black_46dp"/>

<TextView
android:id="@+id/textView"
android:layout_width="wrap_content"
android:layout_height="wrap_content"
android:layout_marginStart="8dp"
android:layout_marginLeft="8dp"
android:layout_marginTop="8dp"
android:layout_marginEnd="8dp"
android:layout_marginRight="8dp"
android:text="YES!"
android:textColor="@android:color/white"
android:textSize="26sp"
android:textStyle="bold"
app:layout_constraintEnd_toEndOf="parent"
app:layout_constraintStart_toStartOf="parent"
app:layout_constraintTop_toBottomOf="@+id/imageView"/>

<TextView
android:id="@+id/textView2"
android:layout_width="wrap_content"
android:layout_height="wrap_content"
android:layout_marginStart="8dp"
android:layout_marginLeft="8dp"
android:layout_marginTop="14dp"
android:layout_marginEnd="8dp"
android:layout_marginRight="8dp"
android:text="Everything is working"
android:textColor="@android:color/white"
android:textSize="22sp"
android:textStyle="bold"
app:layout_constraintEnd_toEndOf="parent"
app:layout_constraintStart_toStartOf="parent"
app:layout_constraintTop_toBottomOf="@+id/textView"/>

<Button
android:id="@+id/btnDialog"
android:layout_width="match_parent"
android:layout_height="wrap_content"
android:layout_marginStart="16dp"
android:layout_marginLeft="16dp"
android:layout_marginTop="8dp"
android:layout_marginEnd="16dp"
android:layout_marginRight="16dp"
android:layout_marginBottom="8dp"
android:background="@drawable/round_button"
android:text="Continue"
android:textColor="@color/colorGreen"
android:textSize="18sp"
app:backgroundTint="@android:color/white"
app:layout_constraintBottom_toBottomOf="parent"
app:layout_constraintEnd_toEndOf="parent"
app:layout_constraintStart_toStartOf="parent"
app:layout_constraintTop_toBottomOf="@+id/textView2"/>
</androidx.constraintlayout.widget.ConstraintLayout>
11- Create a new Android layout resource file and name it dialog_negative_layout.
12- Add the following code inside dialog_negative_layout.xml file.
<ImageView
android:id="@+id/imageView"
android:layout_width="180dp"
android:layout_height="180dp"
android:layout_marginStart="8dp"
android:layout_marginLeft="8dp"
android:layout_marginTop="8dp"
android:layout_marginEnd="8dp"
android:layout_marginRight="8dp"
app:layout_constraintEnd_toEndOf="parent"
app:layout_constraintStart_toStartOf="parent"
app:layout_constraintTop_toTopOf="parent"
app:srcCompat="@drawable/ic_mood_bad_black_46dp"/>

<TextView
android:id="@+id/textView"
android:layout_width="wrap_content"
android:layout_height="wrap_content"
android:layout_marginStart="8dp"
android:layout_marginLeft="8dp"
android:layout_marginTop="8dp"
android:layout_marginEnd="8dp"
android:layout_marginRight="8dp"
android:text="UH-SNAP!"
android:textColor="@android:color/white"
android:textSize="26sp"
android:textStyle="bold"
app:layout_constraintEnd_toEndOf="parent"
app:layout_constraintStart_toStartOf="parent"
app:layout_constraintTop_toBottomOf="@+id/imageView"/>

<TextView
android:id="@+id/textView2"
android:layout_width="wrap_content"
android:layout_height="wrap_content"
android:layout_marginStart="8dp"
android:layout_marginLeft="8dp"
android:layout_marginTop="14dp"
android:layout_marginEnd="8dp"
android:layout_marginRight="8dp"
android:text="Something just broke"
android:textColor="@android:color/white"
android:textSize="22sp"
android:textStyle="bold"
app:layout_constraintEnd_toEndOf="parent"
app:layout_constraintStart_toStartOf="parent"
app:layout_constraintTop_toBottomOf="@+id/textView"/>

<Button
android:id="@+id/btnDialog"
android:layout_width="match_parent"
android:layout_height="wrap_content"
android:layout_marginStart="16dp"
android:layout_marginLeft="16dp"
android:layout_marginTop="8dp"
android:layout_marginEnd="16dp"
android:layout_marginRight="16dp"
android:layout_marginBottom="8dp"
android:background="@drawable/round_button"
android:text="Go back"
android:textColor="@color/colorRed"
android:textSize="18sp"
app:backgroundTint="@android:color/white"
app:layout_constraintBottom_toBottomOf="parent"
app:layout_constraintEnd_toEndOf="parent"
app:layout_constraintStart_toStartOf="parent"
app:layout_constraintTop_toBottomOf="@+id/textView2"/>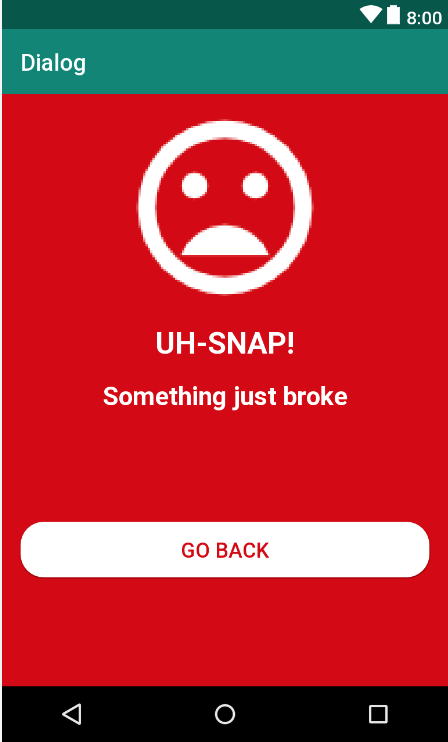
Here is how Android custom dialog look like. (Large preview)
13- Here is the full code for dialog_negative_layout.xml file.
<?xml version="1.0" encoding="utf-8"?>
<androidx.constraintlayout.widget.ConstraintLayout
xmlns:android="http://schemas.android.com/apk/res/android"
xmlns:app="http://schemas.android.com/apk/res-auto"
android:layout_width="match_parent"
android:layout_height="match_parent"
android:background="@color/colorRed">

<ImageView
android:id="@+id/imageView"
android:layout_width="180dp"
android:layout_height="180dp"
android:layout_marginStart="8dp"
android:layout_marginLeft="8dp"
android:layout_marginTop="8dp"
android:layout_marginEnd="8dp"
android:layout_marginRight="8dp"
app:layout_constraintEnd_toEndOf="parent"
app:layout_constraintStart_toStartOf="parent"
app:layout_constraintTop_toTopOf="parent"
app:srcCompat="@drawable/ic_mood_bad_black_46dp"/>

<TextView
android:id="@+id/textView"
android:layout_width="wrap_content"
android:layout_height="wrap_content"
android:layout_marginStart="8dp"
android:layout_marginLeft="8dp"
android:layout_marginTop="8dp"
android:layout_marginEnd="8dp"
android:layout_marginRight="8dp"
android:text="UH-SNAP!"
android:textColor="@android:color/white"
android:textSize="26sp"
android:textStyle="bold"
app:layout_constraintEnd_toEndOf="parent"
app:layout_constraintStart_toStartOf="parent"
app:layout_constraintTop_toBottomOf="@+id/imageView"/>

<TextView
android:id="@+id/textView2"
android:layout_width="wrap_content"
android:layout_height="wrap_content"
android:layout_marginStart="8dp"
android:layout_marginLeft="8dp"
android:layout_marginTop="14dp"
android:layout_marginEnd="8dp"
android:layout_marginRight="8dp"
android:text="Something just broke"
android:textColor="@android:color/white"
android:textSize="22sp"
android:textStyle="bold"
app:layout_constraintEnd_toEndOf="parent"
app:layout_constraintStart_toStartOf="parent"
app:layout_constraintTop_toBottomOf="@+id/textView"/>

<Button
android:id="@+id/btnDialog"
android:layout_width="match_parent"
android:layout_height="wrap_content"
android:layout_marginStart="16dp"
android:layout_marginLeft="16dp"
android:layout_marginTop="8dp"
android:layout_marginEnd="16dp"
android:layout_marginRight="16dp"
android:layout_marginBottom="8dp"
android:background="@drawable/round_button"
android:text="Go back"
android:textColor="@color/colorRed"
android:textSize="18sp"
app:backgroundTint="@android:color/white"
app:layout_constraintBottom_toBottomOf="parent"
app:layout_constraintEnd_toEndOf="parent"
app:layout_constraintStart_toStartOf="parent"
app:layout_constraintTop_toBottomOf="@+id/textView2"/>
</androidx.constraintlayout.widget.ConstraintLayout>
14- Open MainActivity.kt file. This is where you will reference those 2 Android Buttons as well as creating Alertdialog box.
val positiveDialog: Button = findViewById(R.id.btnPositiveDialog)
val negativeDialog: Button = findViewById(R.id.btnNegativeDialog)
15- Now you need to work on setting up Android dialog, since you have 2 custom alertdialog, instead of writing duplicate code you will create a function that will handle this work.
private fun showAlertDialog(int layout){
}
As you can see the function name is showAlertDialog that takes an int value which is the custom alertdialog layout ID. Inside this function you will setup alertdialog.
val dialogBuilder:AlertDialog.Builder = AlertDialog.Builder(this)
val view = layoutInflater.inflate(layout, null)
val dialogButton: Button = view.findViewById(R.id.btnDialog)
dialogBuilder.setView(view)
val alertDialog: AlertDialog = dialogBuilder.create()
alertDialog.show()

dialogButton.setOnClickListener {
    alertDialog.dismiss()
}
16- Next you need to make those 2 Buttons clickable by calling setOnClickListener and then you will call showAlertDialog function to show custom alertdialog on the user’s screen.
positiveDialog.setOnClickListener {
     showAlertDialog(R.layout.dialog_postive_layout)
}

negativeDialog.setOnClickListener {
    showAlertDialog(R.layout.dialog_negative_layout)
}
17- Build and run the app to see the output.

Here is Android Custom Alertdialog. (Large preview)
Android Custom Dialog With Rounded Corners
It’s good to finally see that custom alertdialog, it will be really cool if you can have rounded corners around alertdialog! Let’s do it now 🙂
18- Create a new Android drawable resource file, name it dialog_positive_round and add in the following code.
<?xml version="1.0" encoding="utf-8"?>
<shape xmlns:android="http://schemas.android.com/apk/res/android">
<solid android:color="@color/colorGreen"/>
<corners android:radius="30dp"/>
<padding
android:bottom="10dp"
android:left="10dp"
android:right="10dp"
android:top="10dp"/>
</shape>
Here you use shape as the root layout, then you give it a color, set the radius and finally give it some padding around it.
19- Open dialog_postive_layout.xml and change the background value of the root layout.
From this:
android:background="@color/colorGreen"To this:
android:background="@drawable/dialog_positive_round"20- Repeat the same steps (18 & 19) to have rounded corners for dialog_negative_layout.xml.
21- Build and run the app to see the result.
Android custom dialog positive status. (Large preview)

Android custom dialog negative status. (Large preview)
22- One thing you will notice is there is a white background at the corners of the dialog box. You can fix it by adding the following code inside showAlertDialog function.
alertDialog.window?.setBackgroundDrawable(ColorDrawable(Color.TRANSPARENT))
23- Build and run the app to see the result.
Android custom dialog with round corners. (Large preview)
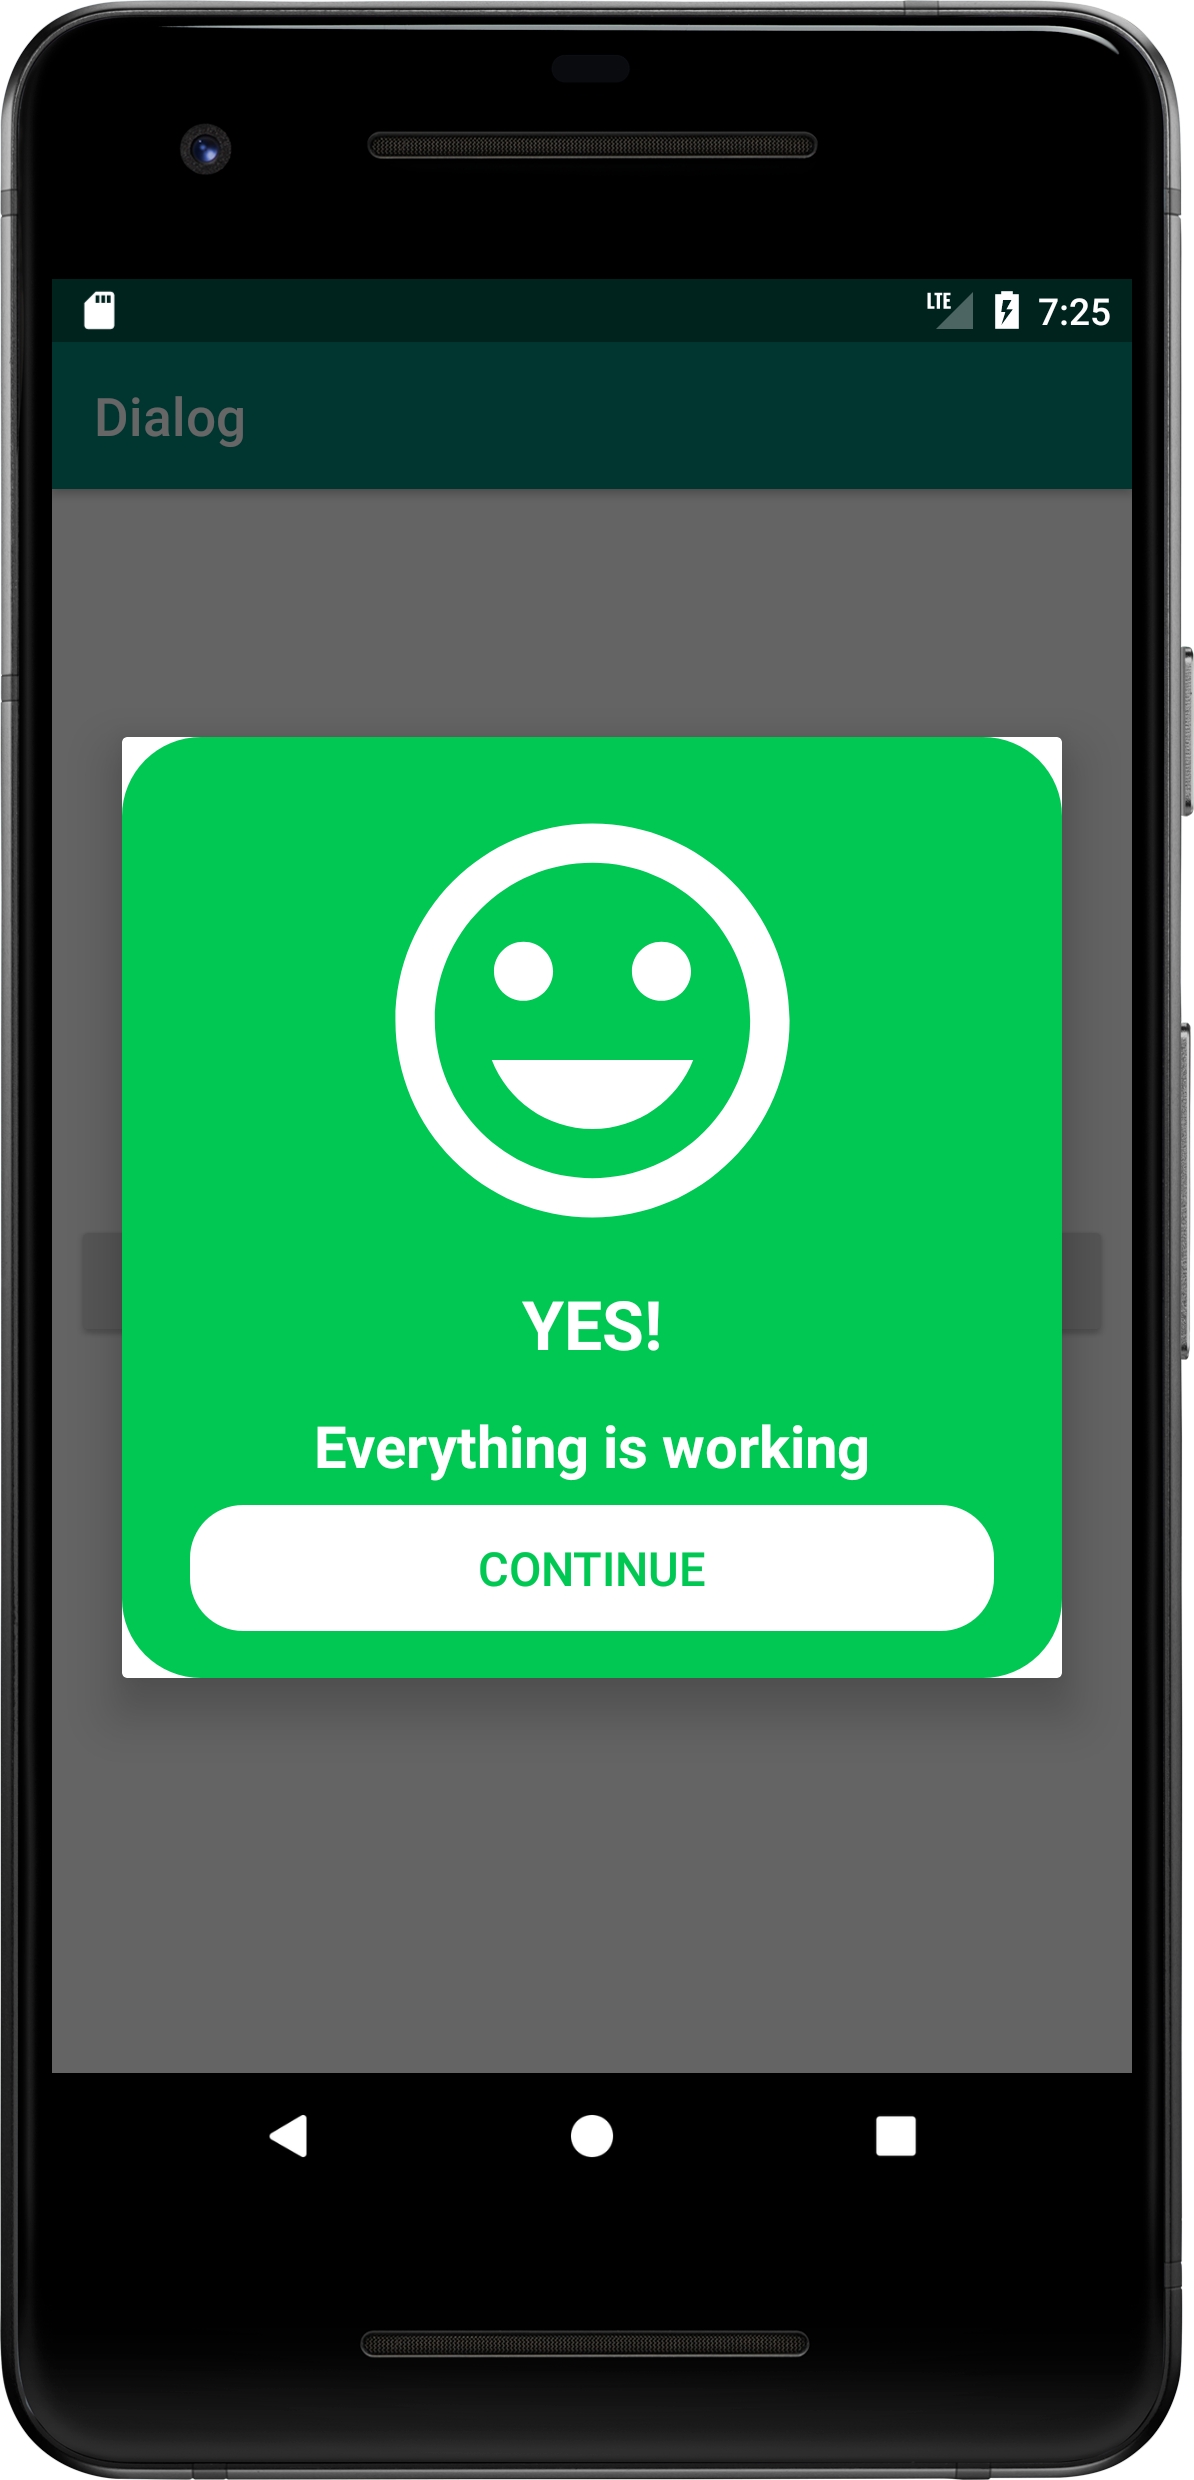
Android Alertdialog With Animation
Let’s transform this boring Alertdialog to something more fun by adding some cool animation to it.
24- Open themes.xml file and add the following code.
<style name="DialogAnimation">
<item name="android:windowEnterAnimation">@android:anim/slide_in_left</item>
<item name="android:windowExitAnimation">@android:anim/slide_out_right</item>
</style>
Android basically has built-in animation resource files that you can directly use.
25- Open MainActivity.kt file and add the following code inside showAlertDialog function.
alertDialog.window?.attributes?.windowAnimations = R.style.DialogAnimation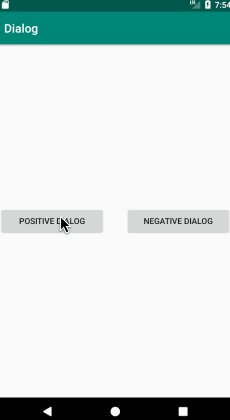
Android alertdialog with animation. (Large preview)
26- Here is the full code for MainActivity.kt file.
package com.codingdemos.dialog

import android.graphics.Color
import android.graphics.drawable.ColorDrawable
import android.os.Bundle
import android.widget.Button
import androidx.appcompat.app.AlertDialog
import androidx.appcompat.app.AppCompatActivity

class MainActivity : AppCompatActivity() {
    override fun onCreate(savedInstanceState: Bundle?) {
        super.onCreate(savedInstanceState)
        setContentView(R.layout.activity_main)

        val positiveDialog: Button = findViewById(R.id.btnPositiveDialog)
        val negativeDialog: Button = findViewById(R.id.btnNegativeDialog)
        positiveDialog.setOnClickListener {
            showAlertDialog(R.layout.dialog_postive_layout)
        }
        negativeDialog.setOnClickListener {
            showAlertDialog(R.layout.dialog_negative_layout)
        }
    }
    private fun showAlertDialog(layout: Int) {
        val dialogBuilder:AlertDialog.Builder = AlertDialog.Builder(this)
        val view = layoutInflater.inflate(layout, null)
        val dialogButton: Button = view.findViewById(R.id.btnDialog)
        dialogBuilder.setView(view)
        val alertDialog: AlertDialog = dialogBuilder.create()
        alertDialog.window?.attributes?.windowAnimations = R.style.DialogAnimation
        alertDialog.window?.setBackgroundDrawable(ColorDrawable(Color.TRANSPARENT))
        alertDialog.show()

        dialogButton.setOnClickListener {
            alertDialog.dismiss()
        }
    }
}
27- I hope you find this tutorial helpful and if you have any question please post them in the comment below.
Please share your source code on github
Beautiful work you have done. Thanks for giving me the inspiration
WHERE IS THE CODE OF ANIM FOLDER??? slide_in_left.xml? slide_out_right.xml?
Thanks
can this method convert to Kotlin?