
Last Updated on February 18, 2018
Hi and welcome to another tutorial from Codingdemos, in this Android credit card form tutorial you will learn how to create a credit card layout for your app. This will make it easier for your app to accept credit card payment from your users when they buy your product or service.
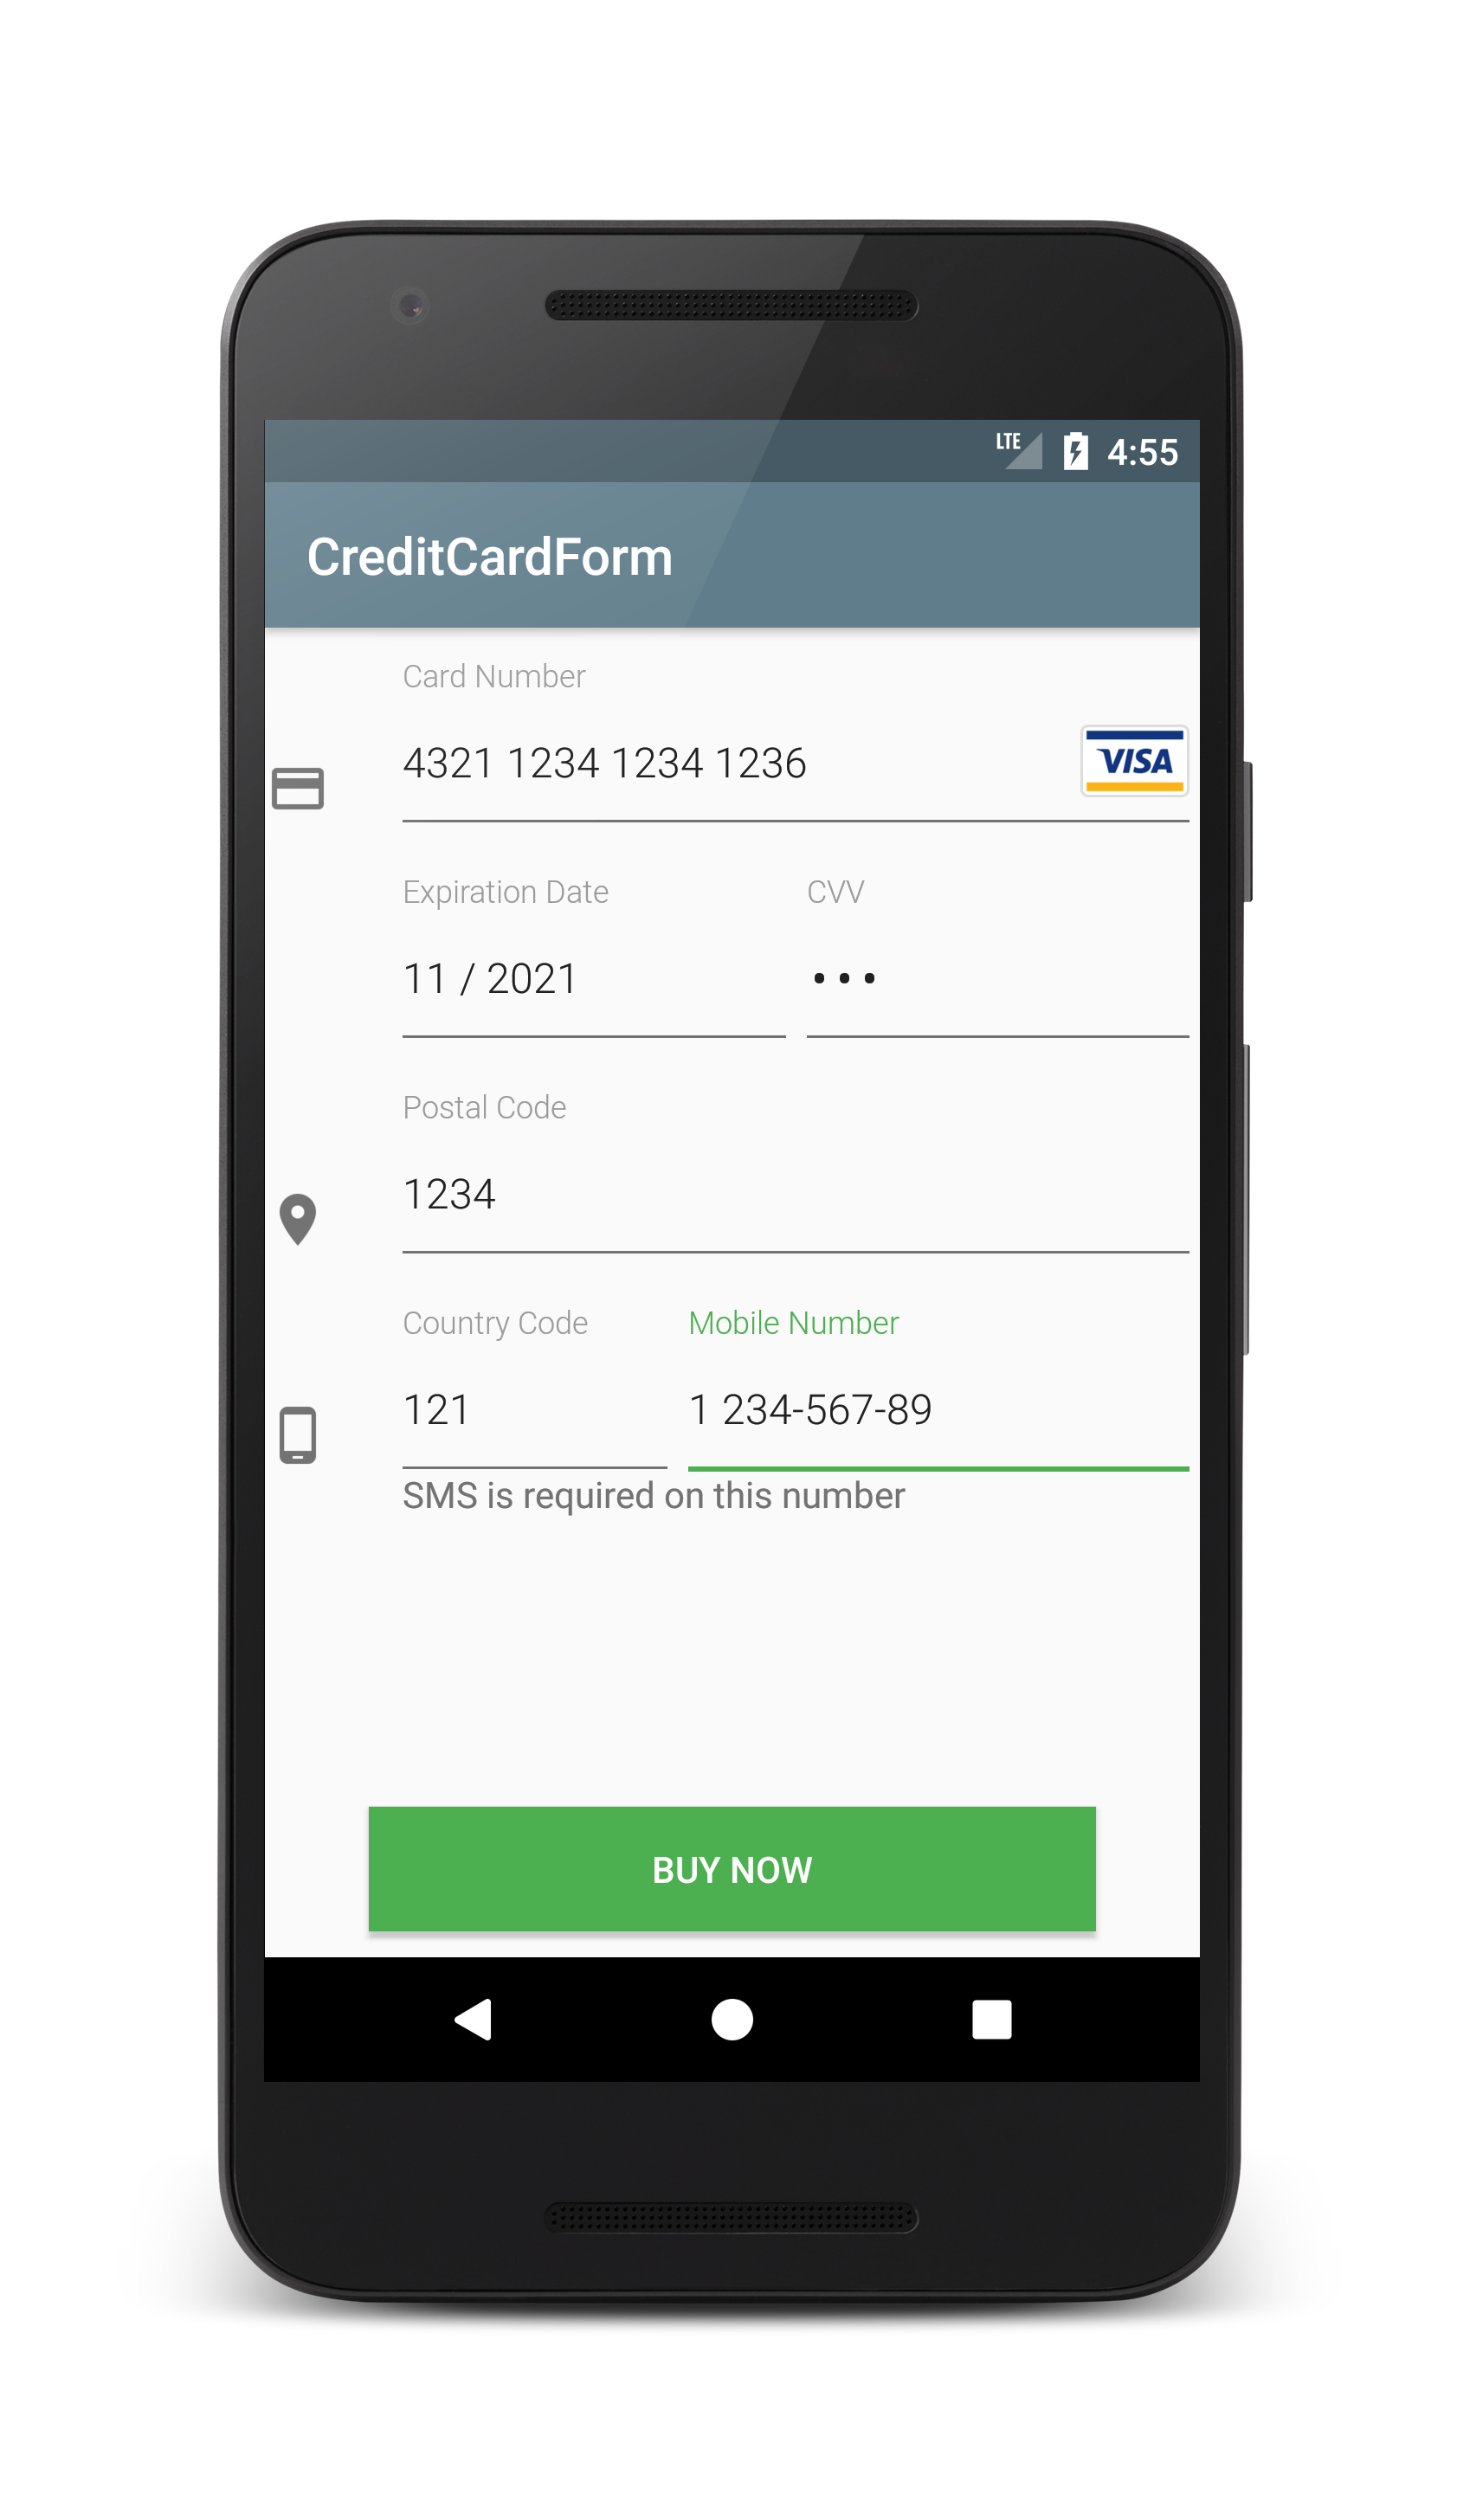
By the end of this tutorial, you will have an app that looks like this. (Large preview)
You will be using a 3rd party library called Android card form inside your project. This library will make it easier for you to add credit and debit card form in your app.
In this tutorial we will be using the following:
– Android studio version 3.0.1
– Android emulator Nexus 5 with API 26
– Minimum SDK API 16
How to create Android credit card form
1- Open up Android Studio and create a new project and give it a name, in our case we’ve named it (CreditCardForm), choose API 16 as the minimum SDK, then choose a blank activity, click “Finish” and wait for Android Studio to build your project.

Create new Android Studio project. (Large preview)
2- Open up build.gradle (Module:app) file and add the following dependency library inside dependencies.
dependencies {
compile 'com.braintreepayments:card-form:3.1.1'
}
Sync your project by clicking on Sync Now.

Android Studio sync project. (Large preview)
3- Open up colors.xml file to change the main colors of the app.
< color name="colorPrimary">#607D8B< /color>
< color name="colorPrimaryDark">#455A64< /color>
< color name="colorAccent">#4CAF50< /color>
4- Build and run the app to see the new colors.
New colors for the app. (Large preview)
5- Open up activity_main.xml file and add the following code.
< com.braintreepayments.cardform.view.CardForm
    android:id="@+id/card_form"
    android:layout_width="match_parent"
    android:layout_height="wrap_content" />
This view contains Android credit card layout where you will be able to add credit card number, expiry date, card cvv, postal code and phone number.
6- Next you need to add a button below the form.
< Button
    android:id="@+id/btnBuy"
    android:layout_width="match_parent"
    android:layout_height="wrap_content"
    android:layout_alignParentBottom="true"
    android:layout_marginBottom="10dp"
    android:layout_marginLeft="40dp"
    android:layout_marginRight="40dp"
    android:layout_marginTop="10dp"
    android:background="@color/colorAccent"
    android:text="@string/label_buy_now"
    android:textColor="@android:color/white" />
You will use this button as a way to confirm purchase of your product or service. You will name this as BUY NOW which will have a green background with white color text, will be placed at the bottom of the screen and with some margin around the button.
7- Here is the full code for activity_main.xml file.
< ?xml version="1.0" encoding="utf-8"?>
< RelativeLayout xmlns:android="http://schemas.android.com/apk/res/android"
  xmlns:tools="http://schemas.android.com/tools"
  android:layout_width="match_parent"
  android:layout_height="match_parent"
  tools:context="com.codingdemos.creditcardform.MainActivity">

  < com.braintreepayments.cardform.view.CardForm
    android:id="@+id/card_form"
    android:layout_width="match_parent"
    android:layout_height="wrap_content" />

  < Button
    android:id="@+id/btnBuy"
    android:layout_width="match_parent"
    android:layout_height="wrap_content"
    android:layout_alignParentBottom="true"
    android:layout_marginBottom="10dp"
    android:layout_marginLeft="40dp"
    android:layout_marginRight="40dp"
    android:layout_marginTop="10dp"
    android:background="@color/colorAccent"
    android:text="@string/label_buy_now"
    android:textColor="@android:color/white" />

< /RelativeLayout>
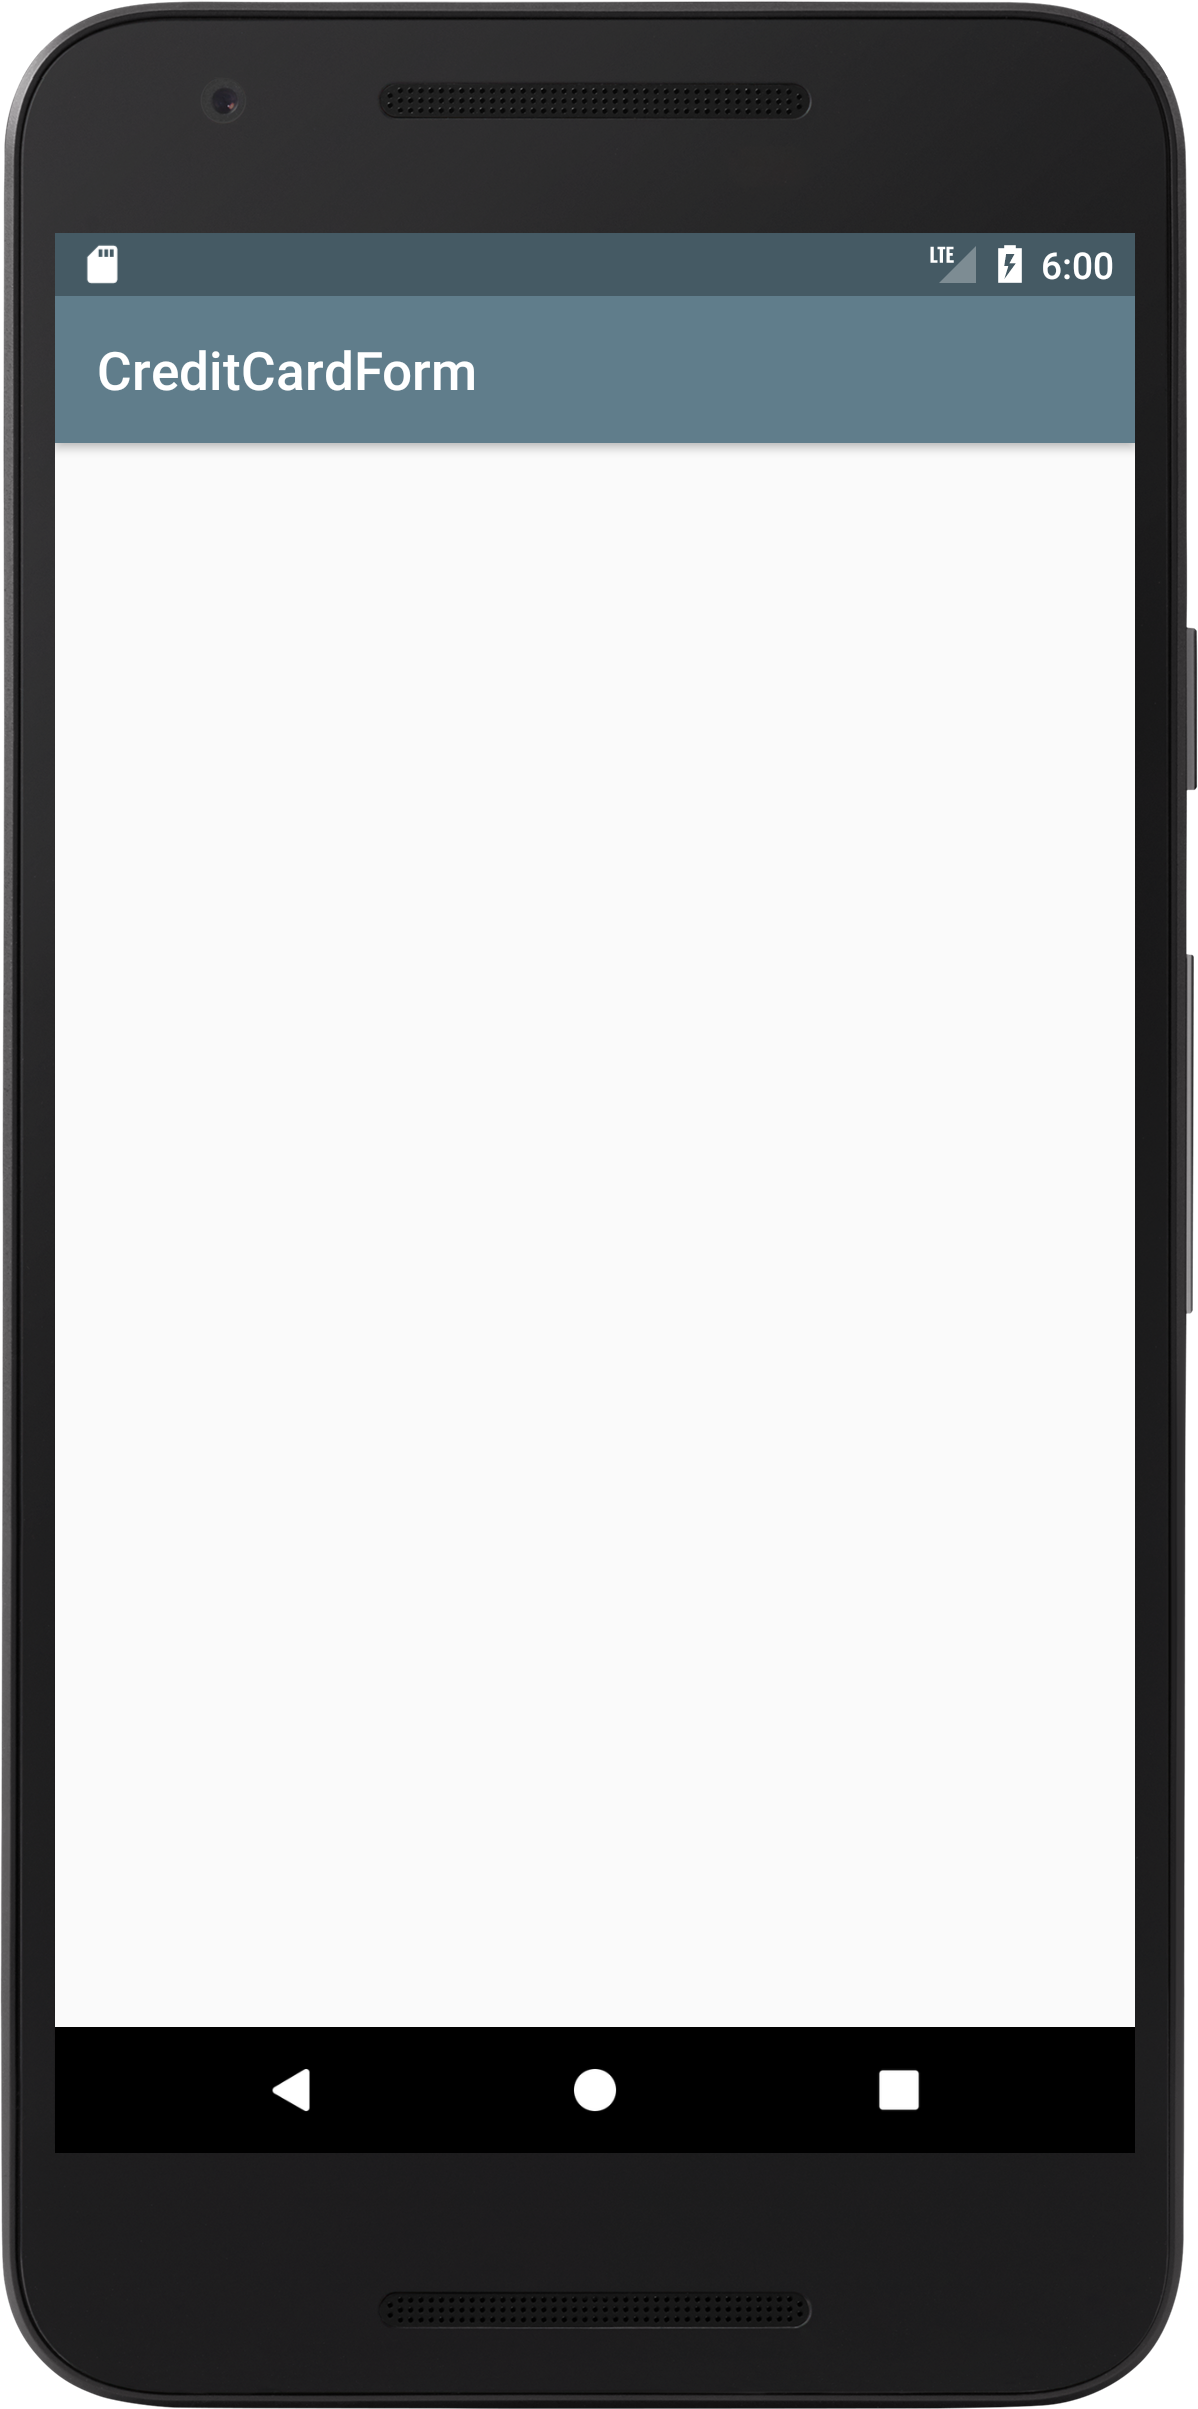
8- When you build and run the app you will only see the green BUY NOW button without Android credit card layout.
Android BUY NOW button. (Large preview)
9- Open up MainActivity.java file and define Android Button and Android credit card form.
CardForm cardForm = findViewById(R.id.card_form);
Button buy = findViewById(R.id.btnBuy);
10- Next you need to setup the credit card form by adding the following code.
cardForm.cardRequired(true)
                .expirationRequired(true)
                .cvvRequired(true)
                .postalCodeRequired(true)
                .mobileNumberRequired(true)
                .mobileNumberExplanation("SMS is required on this number")
                .setup(MainActivity.this);
Here you are setting all the fields of Android credit card form as required, then you gave an explanation of why you want the user to provide the phone and finally you want the form to be shown inside this activity.
11- Build and run the app to see the progress.
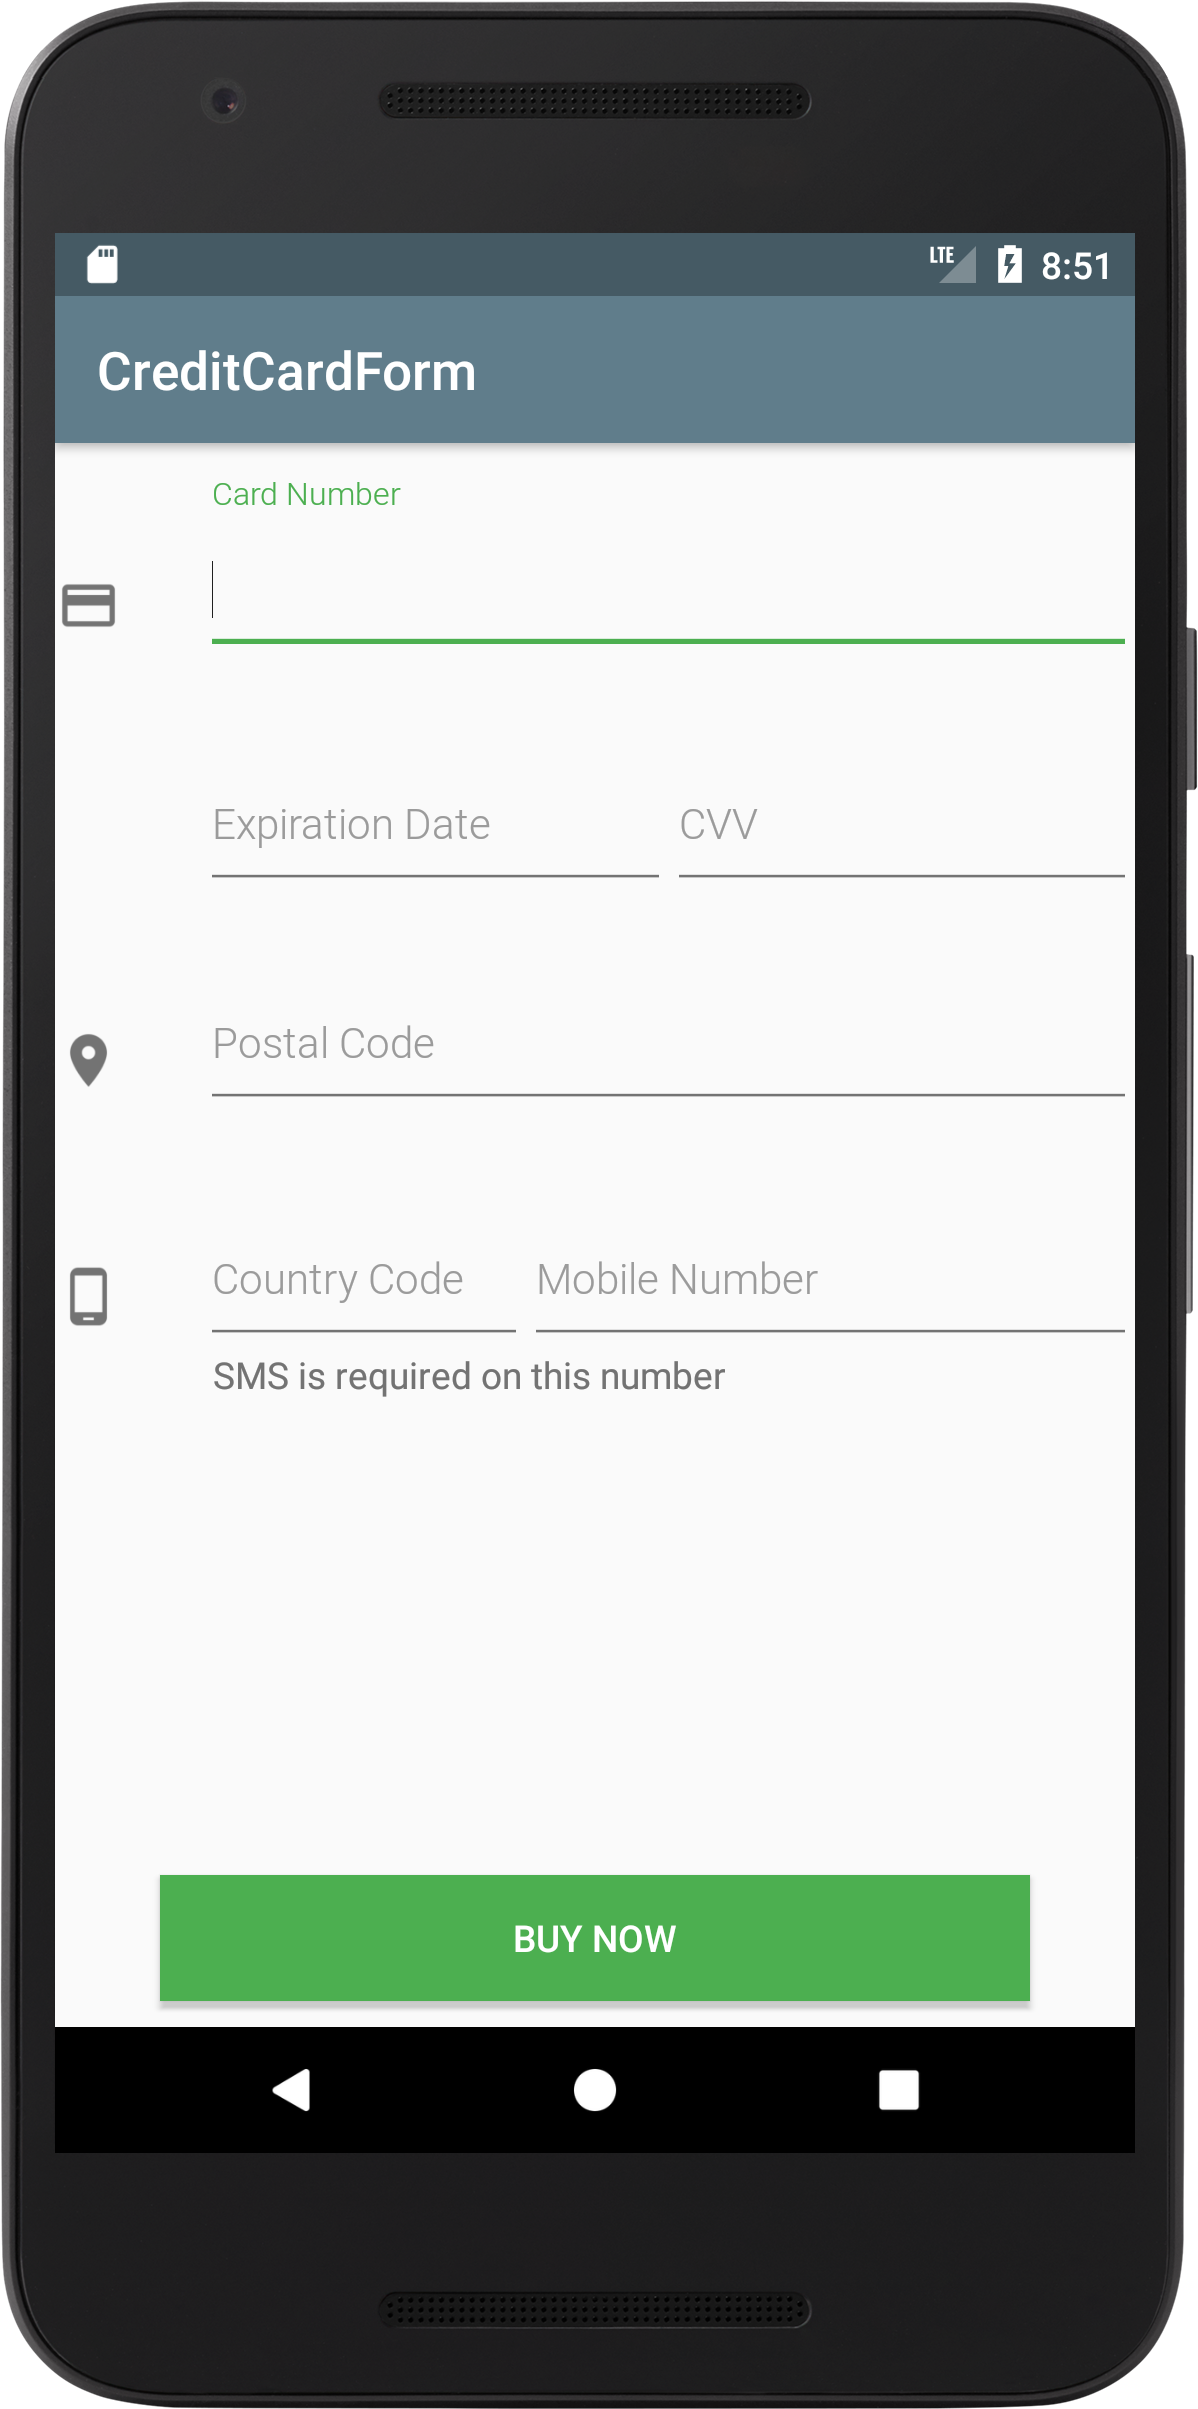
Android credit card layout. (Large preview)
12- When you fill the credit card form and you pay close attention to card cvv field you will see the number is visible, you know this number is very important and shouldn’t be visible on the screen right!
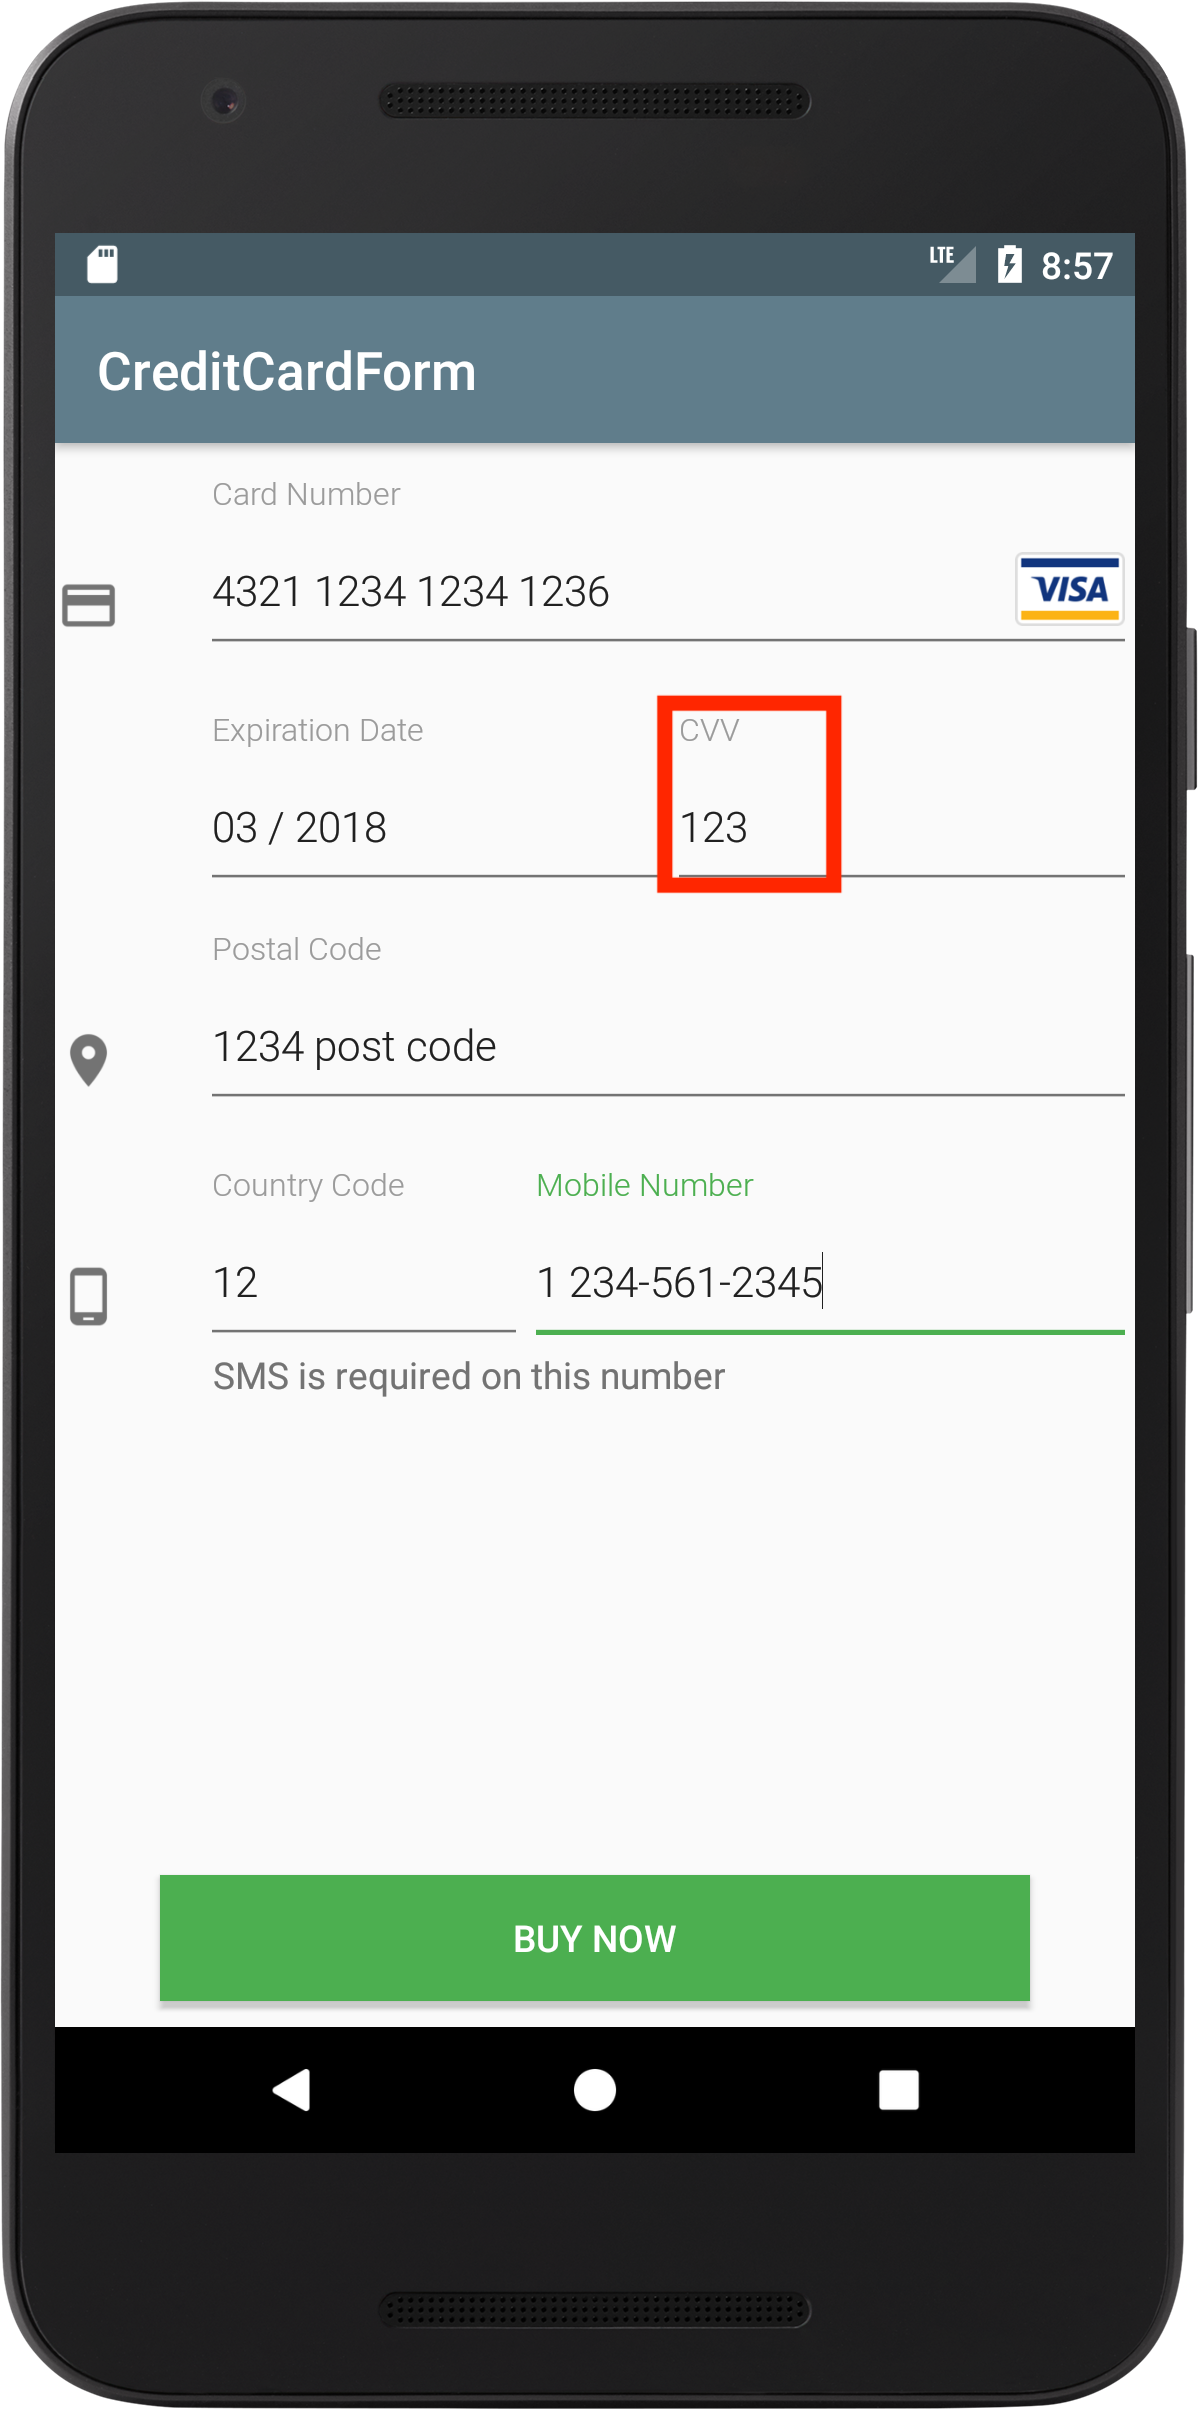
Card cvv number is visible. (Large preview)
13- Well there is a solution, add the following code inside MainActivity.java below card form.
cardForm.getCvvEditText().setInputType(InputType.TYPE_CLASS_NUMBER | InputType.TYPE_NUMBER_VARIATION_PASSWORD);
Here you set the input type of the card cvv field as a password so that you will only see black dots instead of the real number.
14- Build and run the app to see how it looks like.
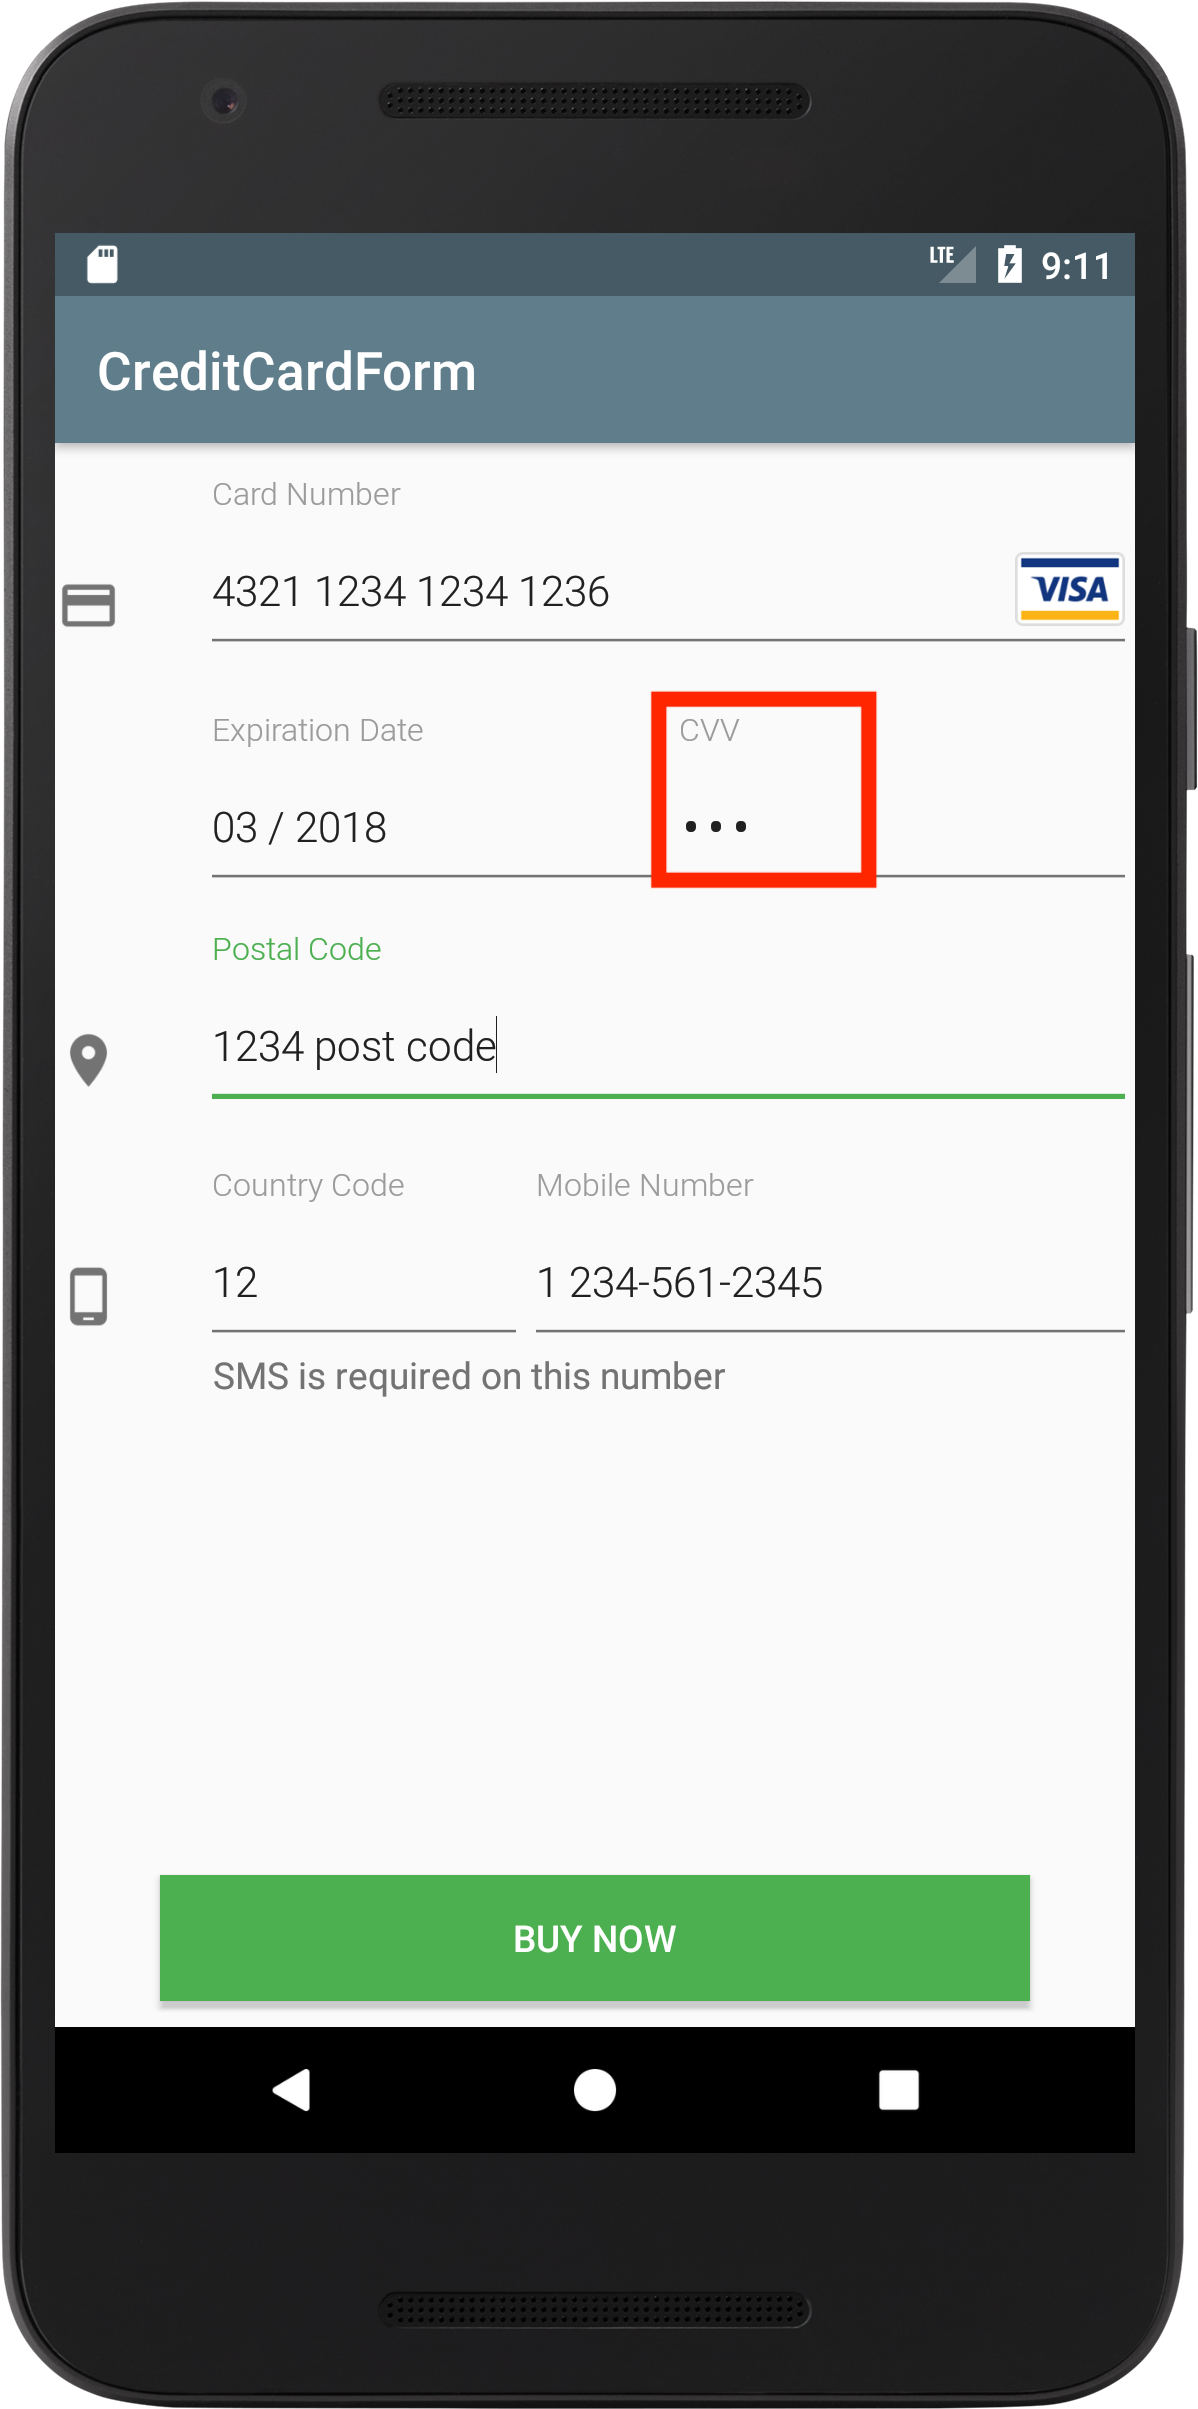
Card cvv number is replaced with black dots. (Large preview)
15- Now you need to work on the button to make it clickable.
buy.setOnClickListener(new View.OnClickListener() {
            @Override
            public void onClick(View view) {
               }
        });
16- Add the following code inside button onClick.
if (cardForm.isValid()) {

}else {
      Toast.makeText(MainActivity.this, "Please complete the form", Toast.LENGTH_LONG).show();
  }
Here when you tap on the button, first you check if you have successfully filed all the fields inside Android credit card form. Otherwise an Android Toast message will appear on the screen asking you to fill the form completely.
If you have filled the form successfully, an Alertdialog will appear on the screen to confirm the card details before making a purchase.
17- Now you can define Alertdialog by adding the following code.
AlertDialog.Builder alertBuilder = new AlertDialog.Builder(MainActivity.this);
                    alertBuilder.setTitle("Confirm before purchase");
                    alertBuilder.setMessage("Card number: " + cardForm.getCardNumber() + "\n" +
                            "Card expiry date: " + cardForm.getExpirationDateEditText().getText().toString() + "\n" +
                            "Card CVV: " + cardForm.getCvv() + "\n" +
                            "Postal code: " + cardForm.getPostalCode() + "\n" +
                            "Phone number: " + cardForm.getMobileNumber());
                    alertBuilder.setPositiveButton("Confirm", new DialogInterface.OnClickListener() {
                        @Override
                        public void onClick(DialogInterface dialogInterface, int i) {
                            dialogInterface.dismiss();
                            Toast.makeText(MainActivity.this, "Thank you for purchase", Toast.LENGTH_LONG).show();
                        }
                    });
                    alertBuilder.setNegativeButton("Cancel", new DialogInterface.OnClickListener() {
                        @Override
                        public void onClick(DialogInterface dialogInterface, int i) {
                            dialogInterface.dismiss();
                        }
                    });
                    AlertDialog alertDialog = alertBuilder.create();
                    alertDialog.show();
Here you gave Alertdialog a title, a message which contain the card details that you’ve input inside credit card layout, a positive button once you tap will show a Toast with success message and a negative button to dismiss Alertdialog.
18- Here is the full code for MainActivity.java.
public class MainActivity extends AppCompatActivity {

    CardForm cardForm;
    Button buy;
    AlertDialog.Builder alertBuilder;

    @Override
    protected void onCreate(Bundle savedInstanceState) {
        super.onCreate(savedInstanceState);
        setContentView(R.layout.activity_main);

        cardForm = findViewById(R.id.card_form);
        buy = findViewById(R.id.btnBuy);
        cardForm.cardRequired(true)
                .expirationRequired(true)
                .cvvRequired(true)
                .postalCodeRequired(true)
                .mobileNumberRequired(true)
                .mobileNumberExplanation("SMS is required on this number")
                .setup(MainActivity.this);
        cardForm.getCvvEditText().setInputType(InputType.TYPE_CLASS_NUMBER | InputType.TYPE_NUMBER_VARIATION_PASSWORD);
        buy.setOnClickListener(new View.OnClickListener() {
            @Override
            public void onClick(View view) {
                if (cardForm.isValid()) {
                    alertBuilder = new AlertDialog.Builder(MainActivity.this);
                    alertBuilder.setTitle("Confirm before purchase");
                    alertBuilder.setMessage("Card number: " + cardForm.getCardNumber() + "\n" +
                            "Card expiry date: " + cardForm.getExpirationDateEditText().getText().toString() + "\n" +
                            "Card CVV: " + cardForm.getCvv() + "\n" +
                            "Postal code: " + cardForm.getPostalCode() + "\n" +
                            "Phone number: " + cardForm.getMobileNumber());
                    alertBuilder.setPositiveButton("Confirm", new DialogInterface.OnClickListener() {
                        @Override
                        public void onClick(DialogInterface dialogInterface, int i) {
                            dialogInterface.dismiss();
                            Toast.makeText(MainActivity.this, "Thank you for purchase", Toast.LENGTH_LONG).show();
                        }
                    });
                    alertBuilder.setNegativeButton("Cancel", new DialogInterface.OnClickListener() {
                        @Override
                        public void onClick(DialogInterface dialogInterface, int i) {
                            dialogInterface.dismiss();
                        }
                    });
                    AlertDialog alertDialog = alertBuilder.create();
                    alertDialog.show();

                } else {
                    Toast.makeText(MainActivity.this, "Please complete the form", Toast.LENGTH_LONG).show();
                }
            }
        });
    }
}
19- Build and run the app to see the result.

Credit card information inside Alertdialog. (Large preview)
20- The source code for this tutorial is available on GitHub, I hope you find this tutorial helpful and if you have any question please post them in the comment below.
hi man how i can accept the mony when hi pay
Where do you specified the account number that receive the money paid
Where do you specified the account number that receive the money paid??
Hi Anton, this is a library that will help you to add a payment form to your app. In order to receive payment and handle monetary transactions, you may need to integrate with payment providers such as Paypal or Stripe.