
Last Updated on February 18, 2018
Hi and welcome to another tutorial from Codingdemos, today you will learn how to use Android share intent to share content from the app to other apps. You will build an Android app that uses Recyclerview & Cardview to show a list of beach pictures, with 2 buttons that will allow you to share content and open a URL in a browser.
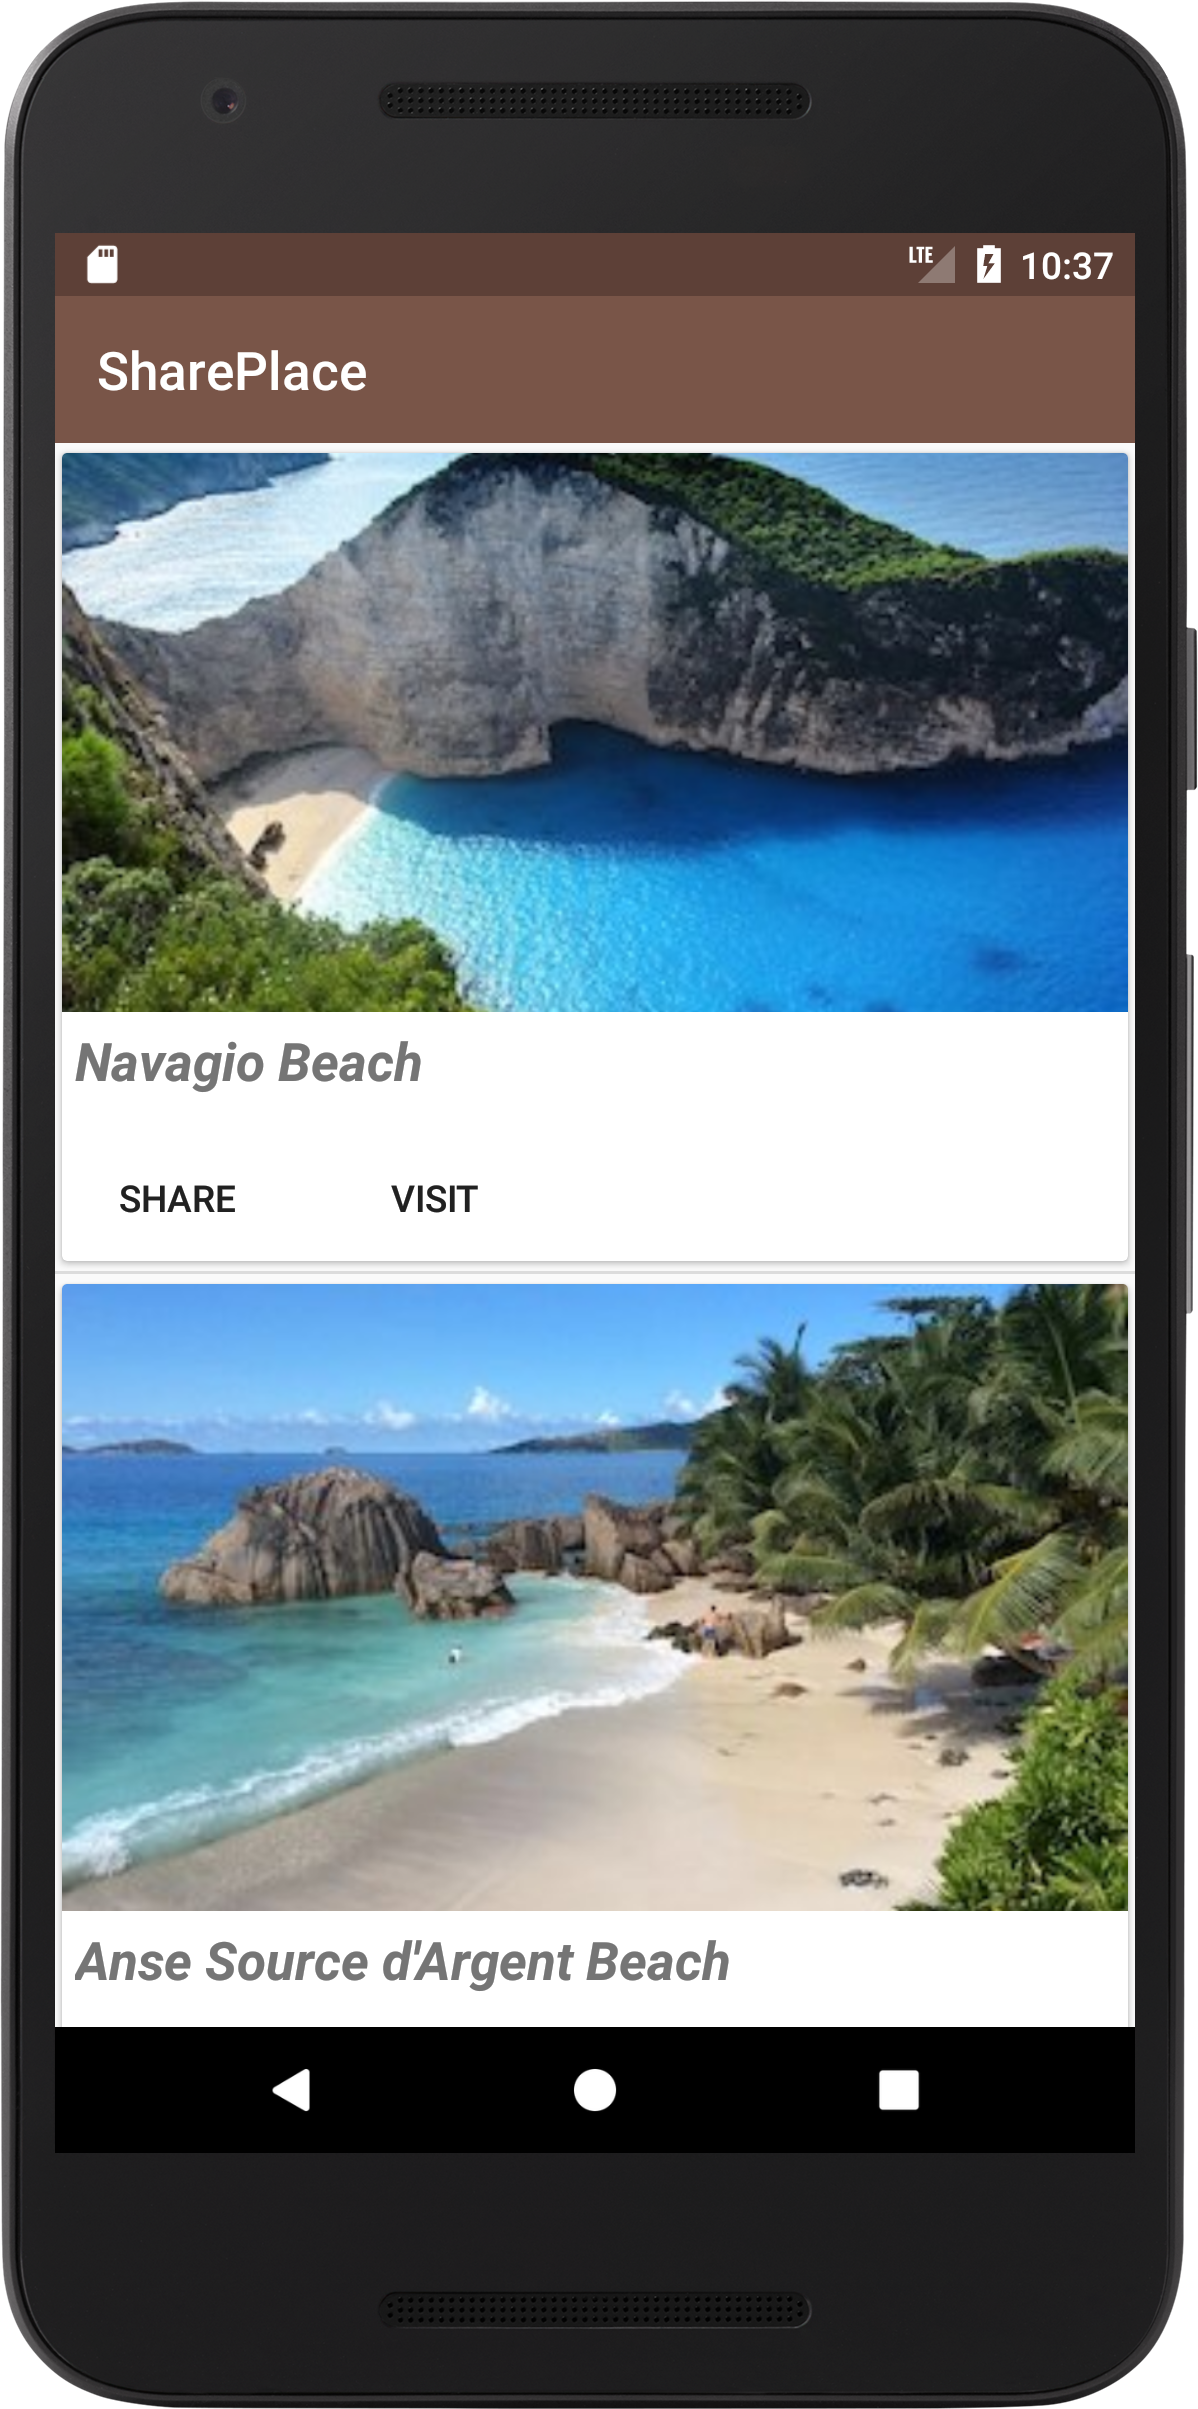
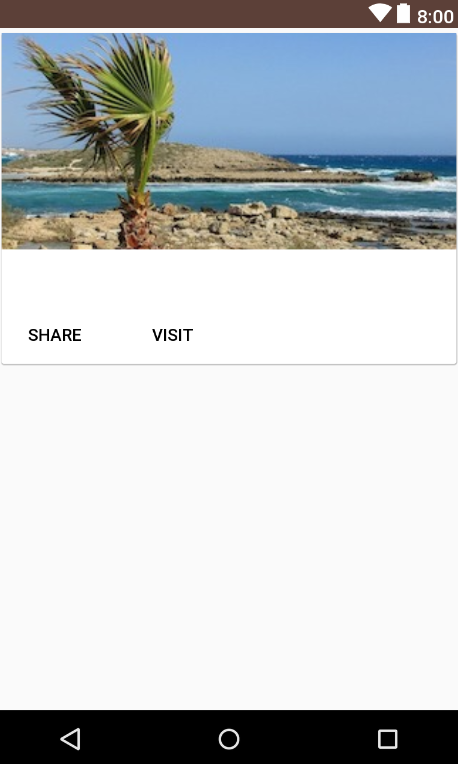
By the end of this tutorial, you will have an app that looks like this. (Large preview)
In this tutorial we will be using the following:
– Android studio version 3.0.1
– Android emulator Nexus 5X with API 26
– Minimum SDK API 16
1- Open up Android Studio and create a new project and give it a name, in our case we’ve named it (SharePlace), choose API 16 as the minimum SDK, then choose a blank activity, click “Finish” and wait for Android Studio to build your project.
2- Open up build.gradle (Module:app) file and add the following code.
implementation 'com.android.support:recyclerview-v7:26.1.0'
implementation 'com.android.support:cardview-v7:26.1.0'
You will be using Android Recyclerview and Cardview, so you have to add these libraries inside the file.
Sync your project by clicking on Sync Now.

Android Studio sync project. (Large preview)
If you are new to Android Recyclerview and Cardview, be sure to check out these following tutorials:
3- Open up colors.xml file and add the following code.
< color name="colorPrimary">#795548< /color>
< color name="colorPrimaryDark">#5D4037< /color>
< color name="colorAccent">#CDDC39< /color>
Here you want to change the app main colors.
4- Build and run the app to see the progress.
New colors for the app. (Large preview)
5- Open up styles.xml file and change the parent theme so that you can use Android Toolbar.
style name="AppTheme" parent="Theme.AppCompat.Light.NoActionBar"
6- Open up activity_main.xml file to add Android Toolbar and Recyclerview codes.
< android.support.v7.widget.Toolbar
    android:id="@+id/toolbar"
    android:layout_width="match_parent"
    android:layout_height="wrap_content"
    android:background="?attr/colorPrimary"
    android:minHeight="?attr/actionBarSize"
    android:theme="?attr/actionBarTheme"
    app:popupTheme="@style/ThemeOverlay.AppCompat.Light"
    app:theme="@style/ThemeOverlay.AppCompat.Dark" />

  < android.support.v7.widget.RecyclerView
    android:id="@+id/recyclerView"
    android:layout_width="match_parent"
    android:layout_height="wrap_content"
    android:scrollbars="vertical" />
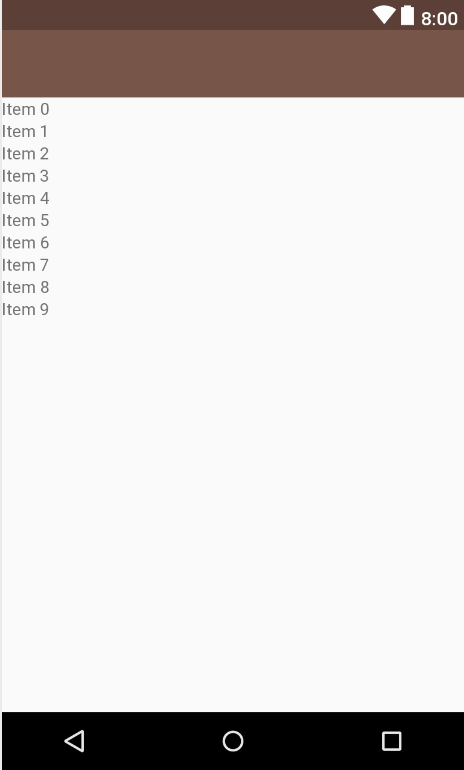
Android Toolbar with Recyclerview. (Large preview)
7- Navigate to res\drawable and add the images that will appear inside Android Recyclerview.
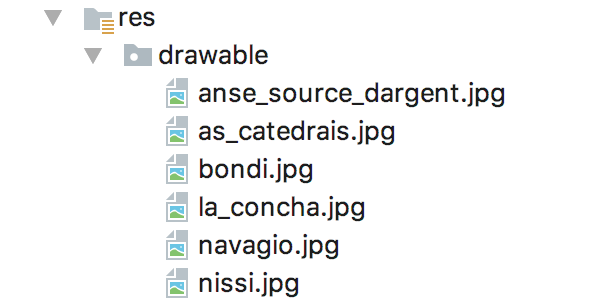
Images inside Android Studio drawable folder. (Large preview)
8- Create a new resource file and name it recyclerview_item_row, inside this file you need to add Android CardView, RelativeLayout, ImageView, TextView and 2 Buttons.
< android.support.v7.widget.CardView
    android:layout_width="match_parent"
    android:layout_height="wrap_content"
    app:cardUseCompatPadding="true">

    < RelativeLayout
      android:layout_width="wrap_content"
      android:layout_height="match_parent">

      < ImageView
        android:id="@+id/ivPlace"
        android:layout_width="match_parent"
        android:layout_height="wrap_content"
        android:layout_alignParentLeft="true"
        android:layout_alignParentStart="true"
        android:layout_alignParentTop="true"
        android:scaleType="centerCrop"
        android:src="@drawable/nissi" />

      < TextView
        android:id="@+id/tvPlaceName"
        android:layout_width="wrap_content"
        android:layout_height="wrap_content"
        android:layout_below="@+id/ivPlace"
        android:padding="5dp"
        android:textSize="20sp"
        android:textStyle="bold|italic" />

      < Button
        android:id="@+id/btnShare"
        style="?android:attr/borderlessButtonStyle"
        android:layout_width="wrap_content"
        android:layout_height="wrap_content"
        android:layout_alignParentLeft="true"
        android:layout_alignParentStart="true"
        android:layout_below="@+id/tvPlaceName"
        android:layout_marginTop="10dp"
        android:text="Share" />

      < Button
        android:id="@+id/btnVisit"
        style="?android:attr/borderlessButtonStyle"
        android:layout_width="wrap_content"
        android:layout_height="wrap_content"
        android:layout_below="@+id/tvPlaceName"
        android:layout_marginLeft="10dp"
        android:layout_marginStart="10dp"
        android:layout_marginTop="10dp"
        android:layout_toEndOf="@+id/btnShare"
        android:layout_toRightOf="@+id/btnShare"
        android:text="Visit" />
    < /RelativeLayout>
  < /android.support.v7.widget.CardView>
Android Cardview with imageview, textview and 2 buttons. (Large preview)
9- Create a new java class and name it (MyAdapter), make it extends RecyclerView.Adapter
10- Make sure to implement Recyclerview required methods (onCreateViewHolder(), onBindViewHolder(), and getItemCount()) and create a constructor for PlaceViewHolder class to fix the error.
11- Here is the code for MyAdapter.java.
public class MyAdapter extends RecyclerView.Adapter<PlaceViewHolder> {

    @Override
    public PlaceViewHolder onCreateViewHolder(ViewGroup parent, int viewType) {
        return null;
    }

    @Override
    public void onBindViewHolder(final PlaceViewHolder holder, int position) {

    }

    @Override
    public int getItemCount() {
        return 0;
    }
}

class PlaceViewHolder extends RecyclerView.ViewHolder {

    PlaceViewHolder(View itemView) {
        super(itemView);

    }
}
12- Define the following variables and create a constructor inside MyAdapter.java.
private Context context;
    private int[] images;
    private String[] placeNames;
    private String[] placeGuide;

    MyAdapter(Context context, int[] images, String[] placeNames, String[] placeGuide) {
        this.context = context;
        this.images = images;
        this.placeNames = placeNames;
        this.placeGuide = placeGuide;
    }
Here you have created an array to hold the images, an array for the name of the images and another array for web urls. You will be initializing these variables later inside MainActivity.java.
13- Now you need to inflate recyclerview_item_row.xml layout inside onCreateViewHolder.
View view = LayoutInflater.from(parent.getContext())
                .inflate(R.layout.recyclerview_item_row, parent, false);
        return new PlaceViewHolder(view);
14- Next you need to define the views which you have created them inside recyclerview_item_row.xml file inside PlaceViewHolder.
ImageView place = itemView.findViewById(R.id.ivPlace);
TextView placeName = itemView.findViewById(R.id.tvPlaceName);
Button share = itemView.findViewById(R.id.btnShare);
Button visit = itemView.findViewById(R.id.btnVisit);
15- Initialize place and placeName inside onBindViewHolder.
holder.placeName.setText(placeNames[position]);
holder.place.setImageResource(images[position]);
16- Change the return value of (getItemCount()) to the actual size of the images instead of null value.
return images.length;
17- The full code for MyAdapter.java will look like this.
public class MyAdapter extends RecyclerView.Adapter<PlaceViewHolder> {

    private Context context;
    private int[] images;
    private String[] placeNames;
    private String[] placeGuide;

    MyAdapter(Context context, int[] images, String[] placeNames, String[] placeGuide) {
        this.context = context;
        this.images = images;
        this.placeNames = placeNames;
        this.placeGuide = placeGuide;
    }

    @Override
    public PlaceViewHolder onCreateViewHolder(ViewGroup parent, int viewType) {
        View view = LayoutInflater.from(parent.getContext())
                .inflate(R.layout.recyclerview_item_row, parent, false);
        return new PlaceViewHolder(view);
    }

    @Override
    public void onBindViewHolder(final PlaceViewHolder holder, int position) {
        holder.placeName.setText(placeNames[position]);
        holder.place.setImageResource(images[position]);
    }

    @Override
    public int getItemCount() {
        return images.length;
    }
}

class PlaceViewHolder extends RecyclerView.ViewHolder {

    ImageView place;
    TextView placeName;
    Button share;
    Button visit;

    PlaceViewHolder(View itemView) {
        super(itemView);

        place = itemView.findViewById(R.id.ivPlace);
        placeName = itemView.findViewById(R.id.tvPlaceName);
        share = itemView.findViewById(R.id.btnShare);
        visit = itemView.findViewById(R.id.btnVisit);
    }
}
18- Open up MainActivity.java file, here you need to define Android Toolbar, Recyclerview and the real data that will appear later inside Recyclerview.
19- First define Android Toolbar and Recyclerview.
Toolbar toolbar = findViewById(R.id.toolbar);
toolbar.setTitle(getResources().getString(R.string.app_name));
RecyclerView recyclerView = findViewById(R.id.recyclerView);
20- Next define the images array, image names array and urls array.
int[] images = new int[]{R.drawable.navagio, R.drawable.anse_source_dargent,
                R.drawable.as_catedrais, R.drawable.la_concha, R.drawable.bondi, R.drawable.nissi};

String[] placeNames = new String[]{"Navagio Beach", "Anse Source d'Argent Beach", "As Catedrais Beach",
                "La Concha Beach", "Bondi Beach", "Nissi Beach"};

String[] placeGuide = new String[]{"https://www.tripadvisor.com.my/Attraction_Review-g7777607-" +
                "d671779-Reviews-Navagio_Beach_Shipwreck_Beach-Anafonitria_Zakynthos_Ionian_Islands.html",
                "https://www.tripadvisor.com.my/Attraction_Review-g477968-d637885-Reviews-Anse_Source_D_Argent" +
                        "-La_Digue_Island.html",
                "https://www.tripadvisor.com.my/Attraction_Review-g609028-d1547522-Reviews-As_Catedrais_Beach-Ribadeo_" +
                        "Province_of_Lugo_Galicia.html",
                "https://www.tripadvisor.com.my/Attraction_Review-g187457-d675885-Reviews-La_Concha_Beach-San_Sebastian" +
                        "_Donostia_Province_of_Guipuzcoa_Basque_Country.html",
                "https://www.tripadvisor.com.my/Attraction_Review-g255060-d257354-Reviews-Bondi_Beach-Sydney_" +
                        "New_South_Wales.html",
                "https://www.tripadvisor.com.my/Attraction_Review-g262055-d1519581-Reviews-Nissi_Beach-Ayia_" +
                        "Napa_Famagusta_District.html"};
21- Now define LinearLayoutManager and MyAdapter and finally set this adapter to Recyclerview.
LinearLayoutManager linearLayoutManager = new LinearLayoutManager(MainActivity.this,
LinearLayoutManager.VERTICAL, false);
recyclerView.setLayoutManager(linearLayoutManager);
MyAdapter myAdapter = new MyAdapter(MainActivity.this, images, placeNames, placeGuide);
recyclerView.setAdapter(myAdapter);
22- Build and run the app to see the progress.
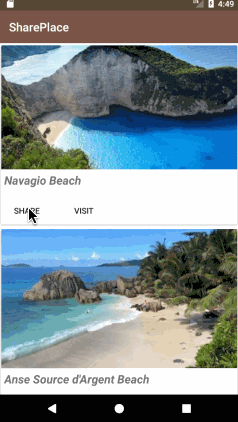
Android Share Intent With Recyclerview. (Large preview)
23- It’s feels great to see Android Recyclerview filled with beautiful beaches, one thing remaining is to have the Share and Visit button fully function.
How to add Android share intent function
24- Open up MyAdapter.java file, inside onBindViewHolder method you need to make the Share button clickable by using Android SetOnClickListener. Once you tap on the button it will allow you to share the name of the beach and a URL to learn more about the beach.
holder.share.setOnClickListener(new View.OnClickListener() {
            @Override
            public void onClick(View view) {

            }
        });
25- Inside Android onClick method is where you will write the code for Android share intent.
Intent intent = new Intent(Intent.ACTION_SEND);
                intent.putExtra(Intent.EXTRA_TEXT, "Let's go for a trip to "
                        + placeNames[holder.getAdapterPosition()] +
                        "\nHere is the link to the full review: " + placeGuide[holder.
                        getAdapterPosition()]);
                intent.setType("text/plain");
                context.startActivity(Intent.createChooser(intent, "Send To"));
Here you first define the type of Android Intent, then you use PutExtra method to pass some data that you want to share, after that you set the share type which is plain text and finally you start the activity with Intent.createChooser.
You use Intent.createChooser to be able to get the list of installed applications which you can use to share the content.
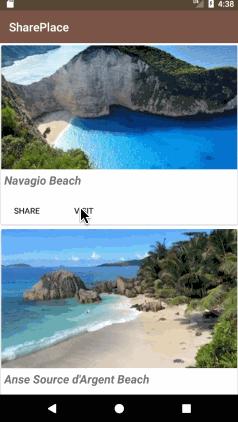
26- Build and run the app to test Android share intent button.
Android Share Intent. (Large preview)
How to open a URL in Android app
27- Now that you got Share button fully working, next you need to work on the Visit button. You will use Android SetOnClickListener to make the button clickable, then inside Android OnClick method is where you will write the code for Android open URL intent.
holder.visit.setOnClickListener(new View.OnClickListener() {
            @Override
            public void onClick(View view) {
                Intent intent = new Intent(Intent.ACTION_VIEW);
                intent.setData(Uri.parse(placeGuide[holder.getAdapterPosition()]));
                context.startActivity(intent);
            }
        });
Here you first start with Android Intent by passing the type of intent, then you will need to use Intent.setData to specify the destination by using Uri.parse and getting the correct link from placeGuide array by passing the item position inside Android Recyclerview, and finally you would start the activity.
28- Build and run the app to see the progress.
How to open url in android app. (Large preview)
29- The source code for this tutorial is available on GitHub, I hope you find this tutorial helpful and if you have any question please post them in the comment below.
Hi.. just a quick question, if the String arrays(images, placeNames & placeGuide) are located in a fragment, instead of the MainActivity, how do you call the intents from the adapter?
Hi, inside that fragment class you need to add the following code:
MyAdapter myAdapter = new MyAdapter(getActivity(), images, placeNames, placeGuide);
where to add this code
LinearLayoutManager linearLayoutManager = new LinearLayoutManager(MainActivity.this,
LinearLayoutManager.VERTICAL, false);
recyclerView.setLayoutManager(linearLayoutManager);
MyAdapter myAdapter = new MyAdapter(MainActivity.this, images, placeNames, placeGuide);
recyclerView.setAdapter(myAdapter);
Hi, you put that code inside MainActivity.java class
how to put admob banner ads
hello sir,
how to put admob banner ads in this project
how to add onitemclick listener in recycler view
plz reply
please tell me how to do the same using Kotllin Language