
Last Updated on February 6, 2018
Hi and welcome to another tutorial from Codingdemos, today you will learn how to use Android Recyclerview to display a list of emails. The app will have 2 pages, the first (main) page will show you the list of emails and each email will have the following data:
– Sender
– Icon
– Title
– Description
– Favorite Button
– Time
When you tap on a specific row (Email), you will be directed to the second page which shows you the full email in details.
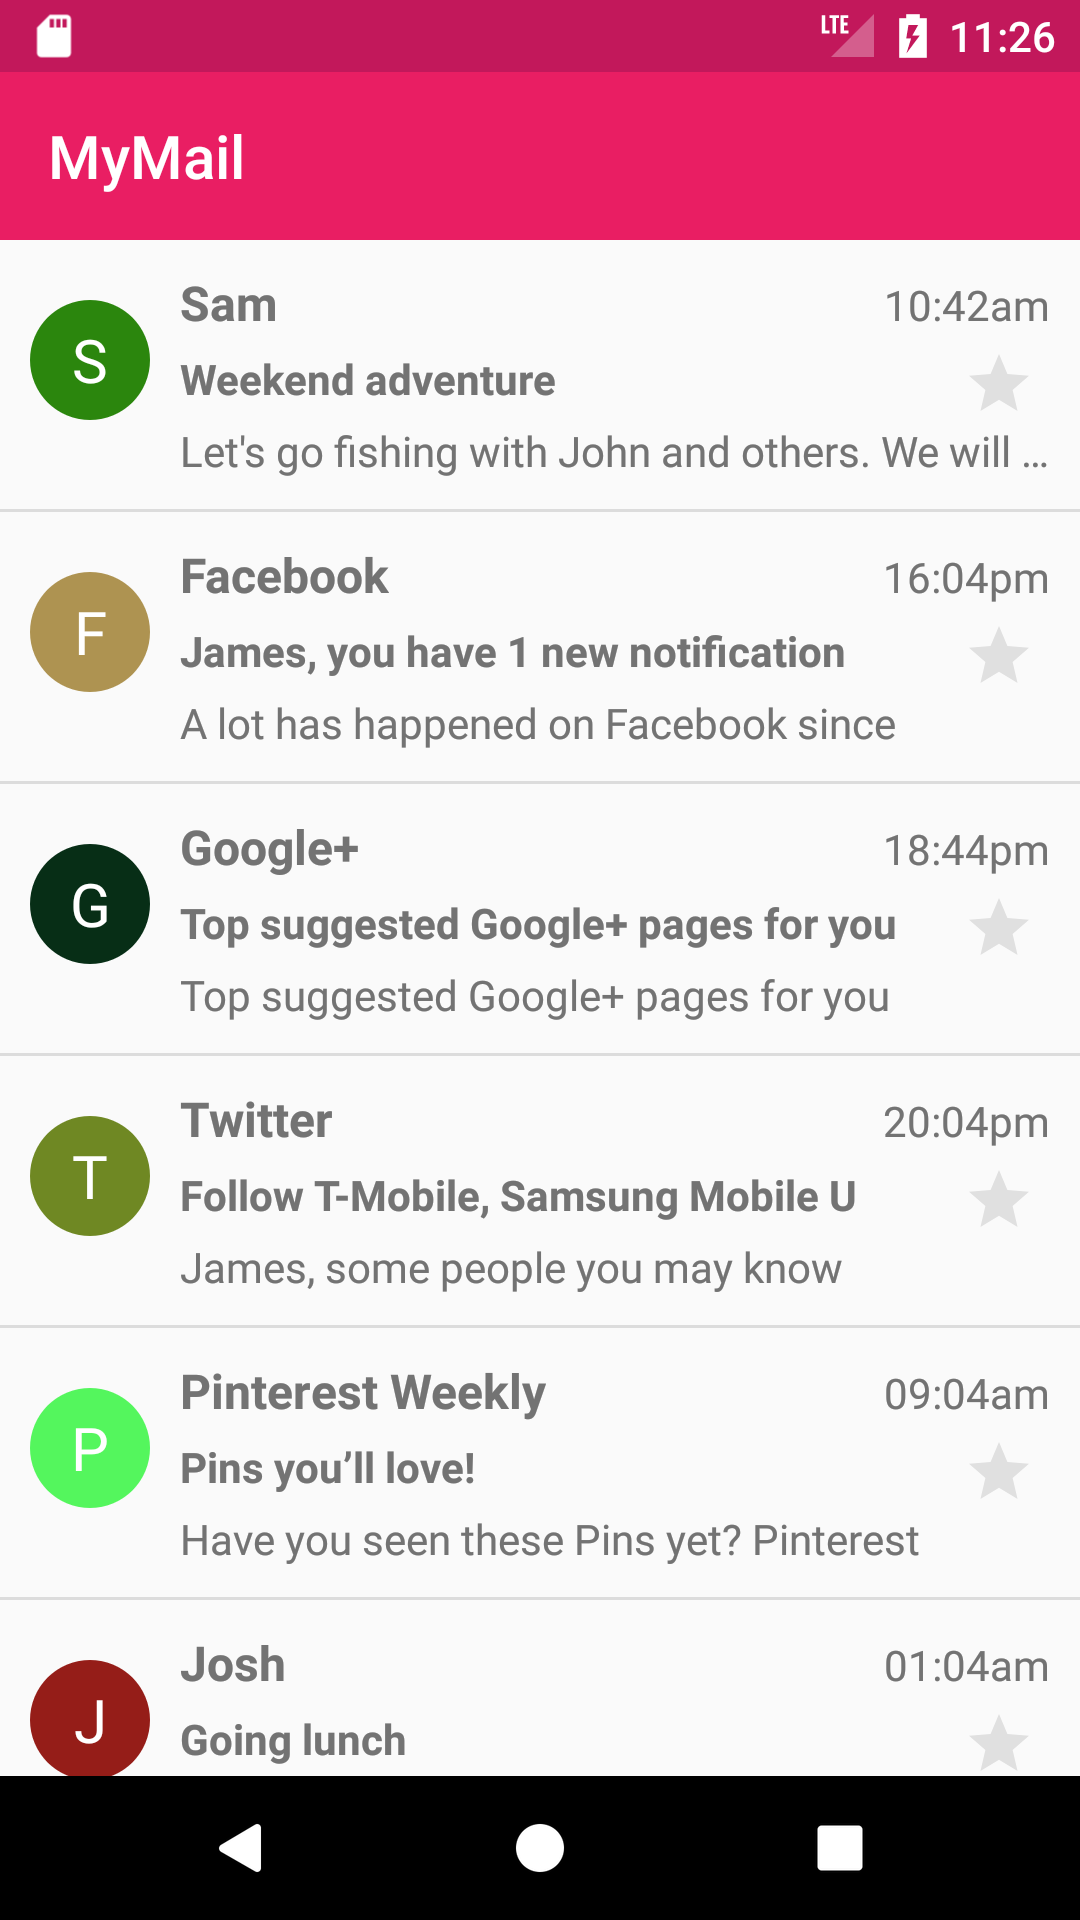
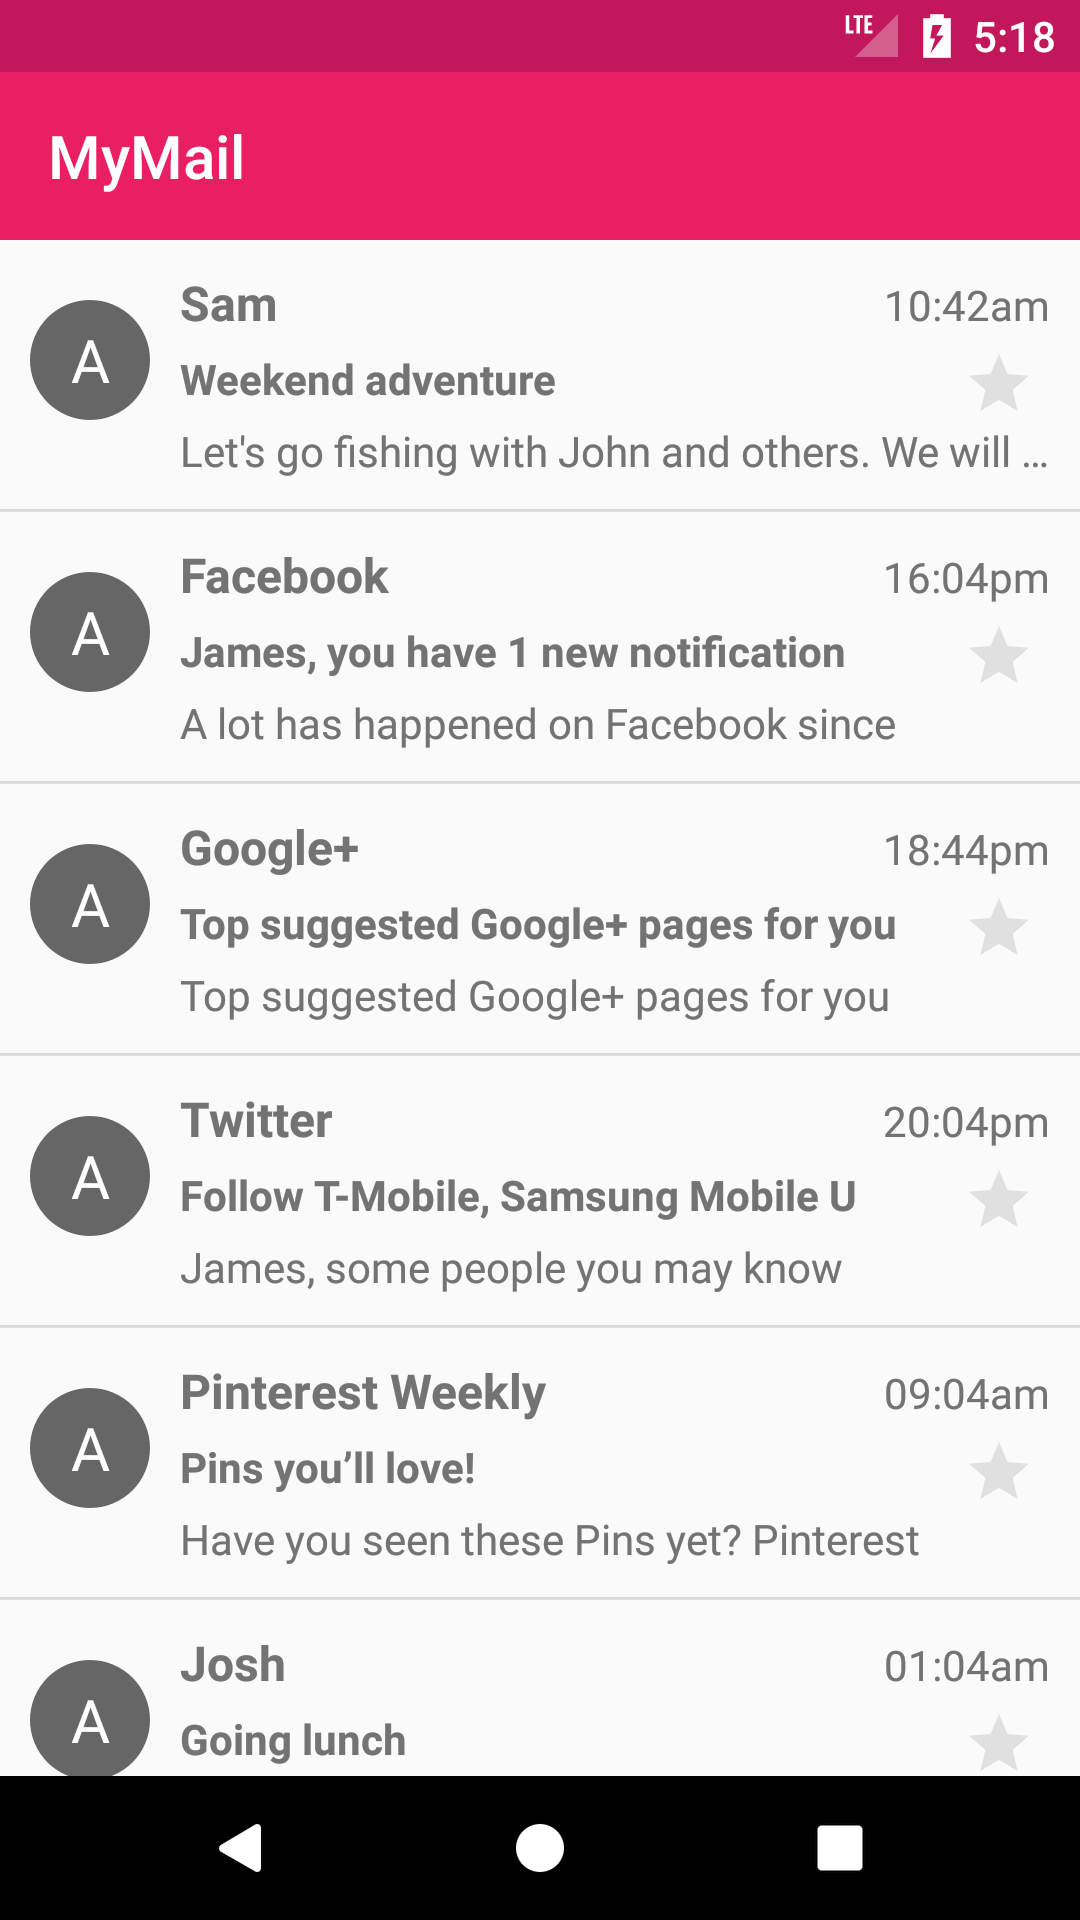
By the end of this article, we will have an app that looks like this. (Large preview)
In this tutorial we will be using the following:
-
– Android studio version 3.0
– Android emulator Nexus 5 with API 26
– Minimum SDK API 16
1- Open up Android Studio and create a new project and give it a name, in our case we’ve named it (MyMail), choose API 16 as the minimum SDK, then choose a blank activity, click “Finish” and wait for Android Studio to build your project.
Create new Android Studio project. (Large preview)
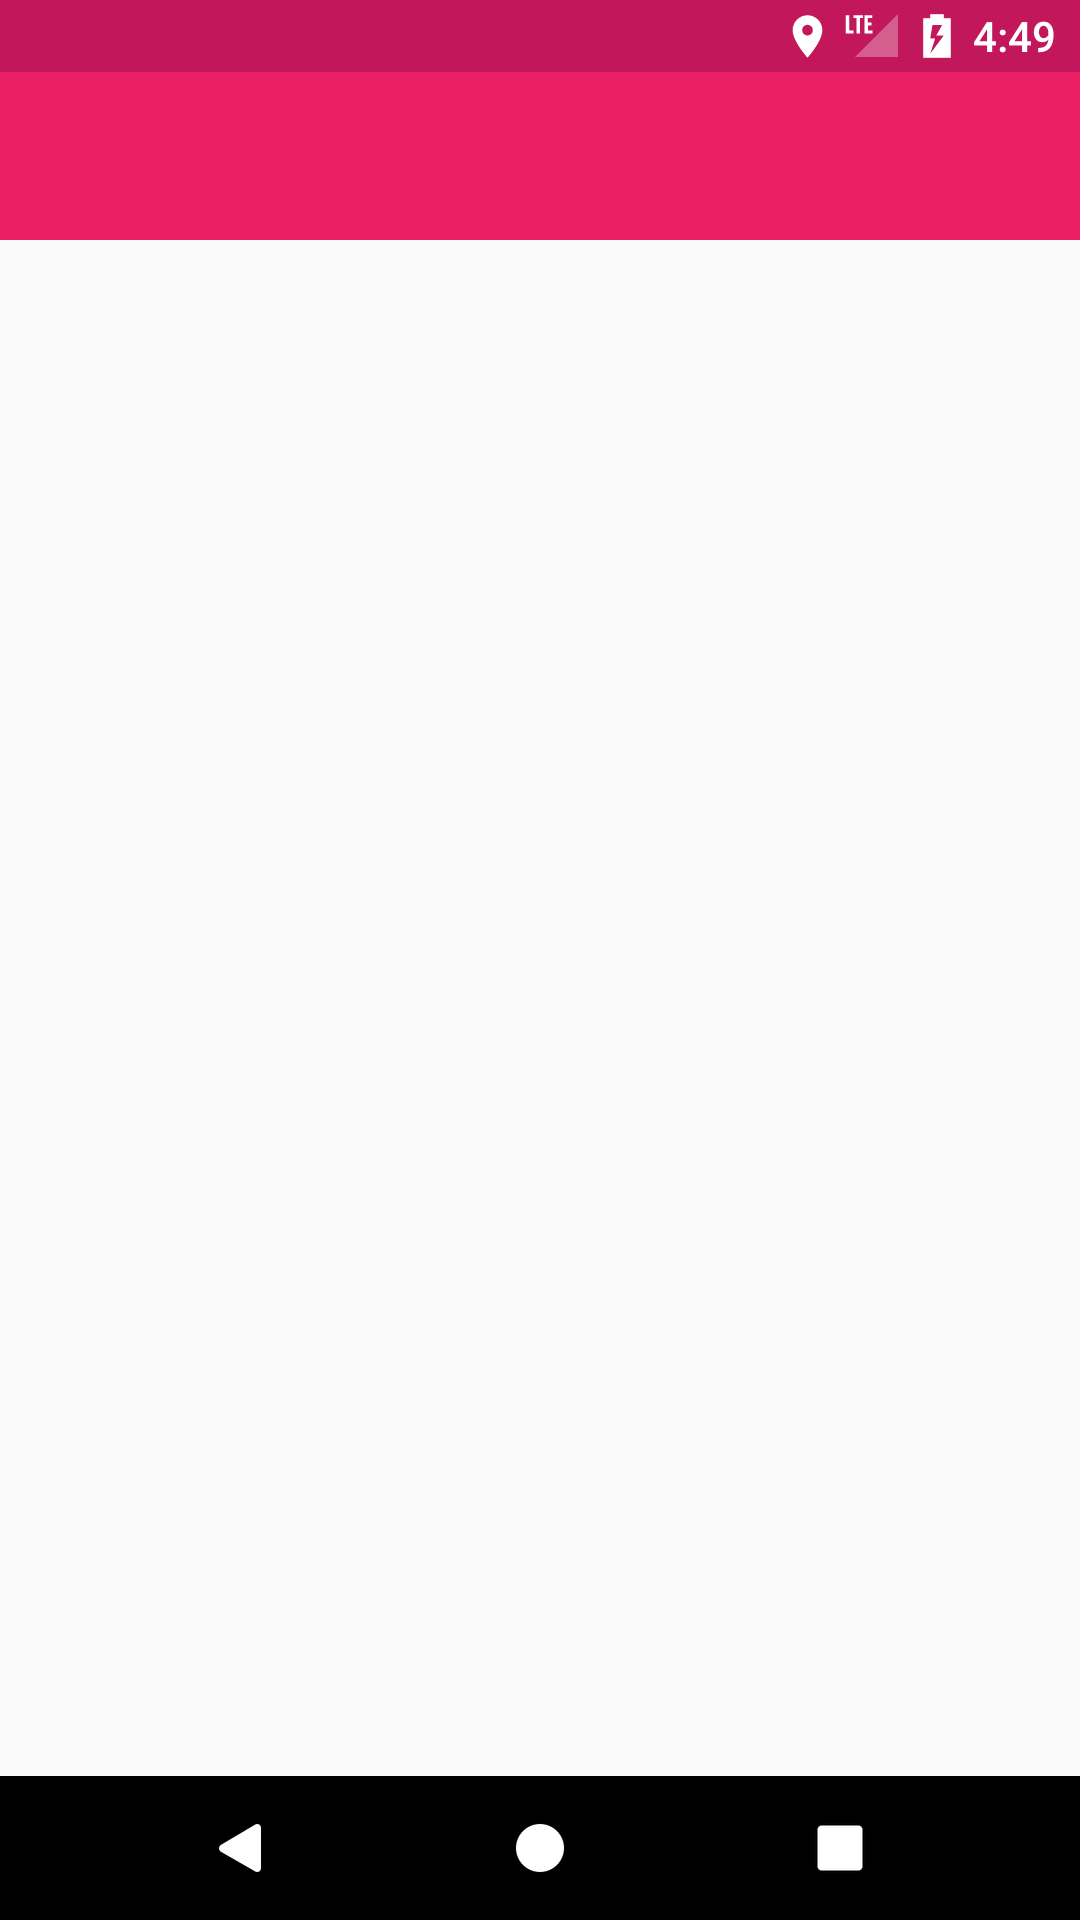
2- To be able to use Android Toolbar you will need to change the parent theme inside styles.xml file, so open up styles.xml file and change the parent theme from Theme.AppCompat.Light.DarkActionBar to Theme.AppCompat.Light.NoActionBar.
3- Next you need to change the app main colors, you can do that by opening colors.xml file and use the following color codes:
  < color name="colorPrimary">#E91E63< /color>
  < color name="colorPrimaryDark">#C2185B< /color>
  < color name="colorAccent">#03A9F4< /color>
  < color name="colorOrange">#F2B32A< /color>
Note: You will use (colorOrange) later for the star favorite icon.
4- Open up activity_main.xml file and add Android Toolbar.
< android.support.v7.widget.Toolbar
    android:id="@+id/toolbar"
    android:layout_width="match_parent"
    android:layout_height="wrap_content"
    android:background="?attr/colorPrimary"
    android:minHeight="?attr/actionBarSize"
    android:theme="?attr/actionBarTheme"
    app:popupTheme="@style/ThemeOverlay.AppCompat.Light"
    app:theme="@style/ThemeOverlay.AppCompat.Dark" />
5- Run the app to see the new colors with Android Toolbar appear in the emulator.
Change Android app main colors. (Large preview)
6- Now you need to add Android Recyclerview inside activity_main.xml file.
< android.support.v7.widget.RecyclerView
    android:id="@+id/recyclerView"
    android:layout_width="match_parent"
    android:layout_height="wrap_content"
    android:scrollbars="vertical" />
Note: You use android:scrollbars inside Android Recyclerview to be able to show the small bar on the right while scrolling through the content. The bar is something similar to what you see when you scroll through a webpage.
You can set the scrollbars to be vertical or horizontal but in this example, you will use vertical because you want to scroll through the content in a vertical orientation.
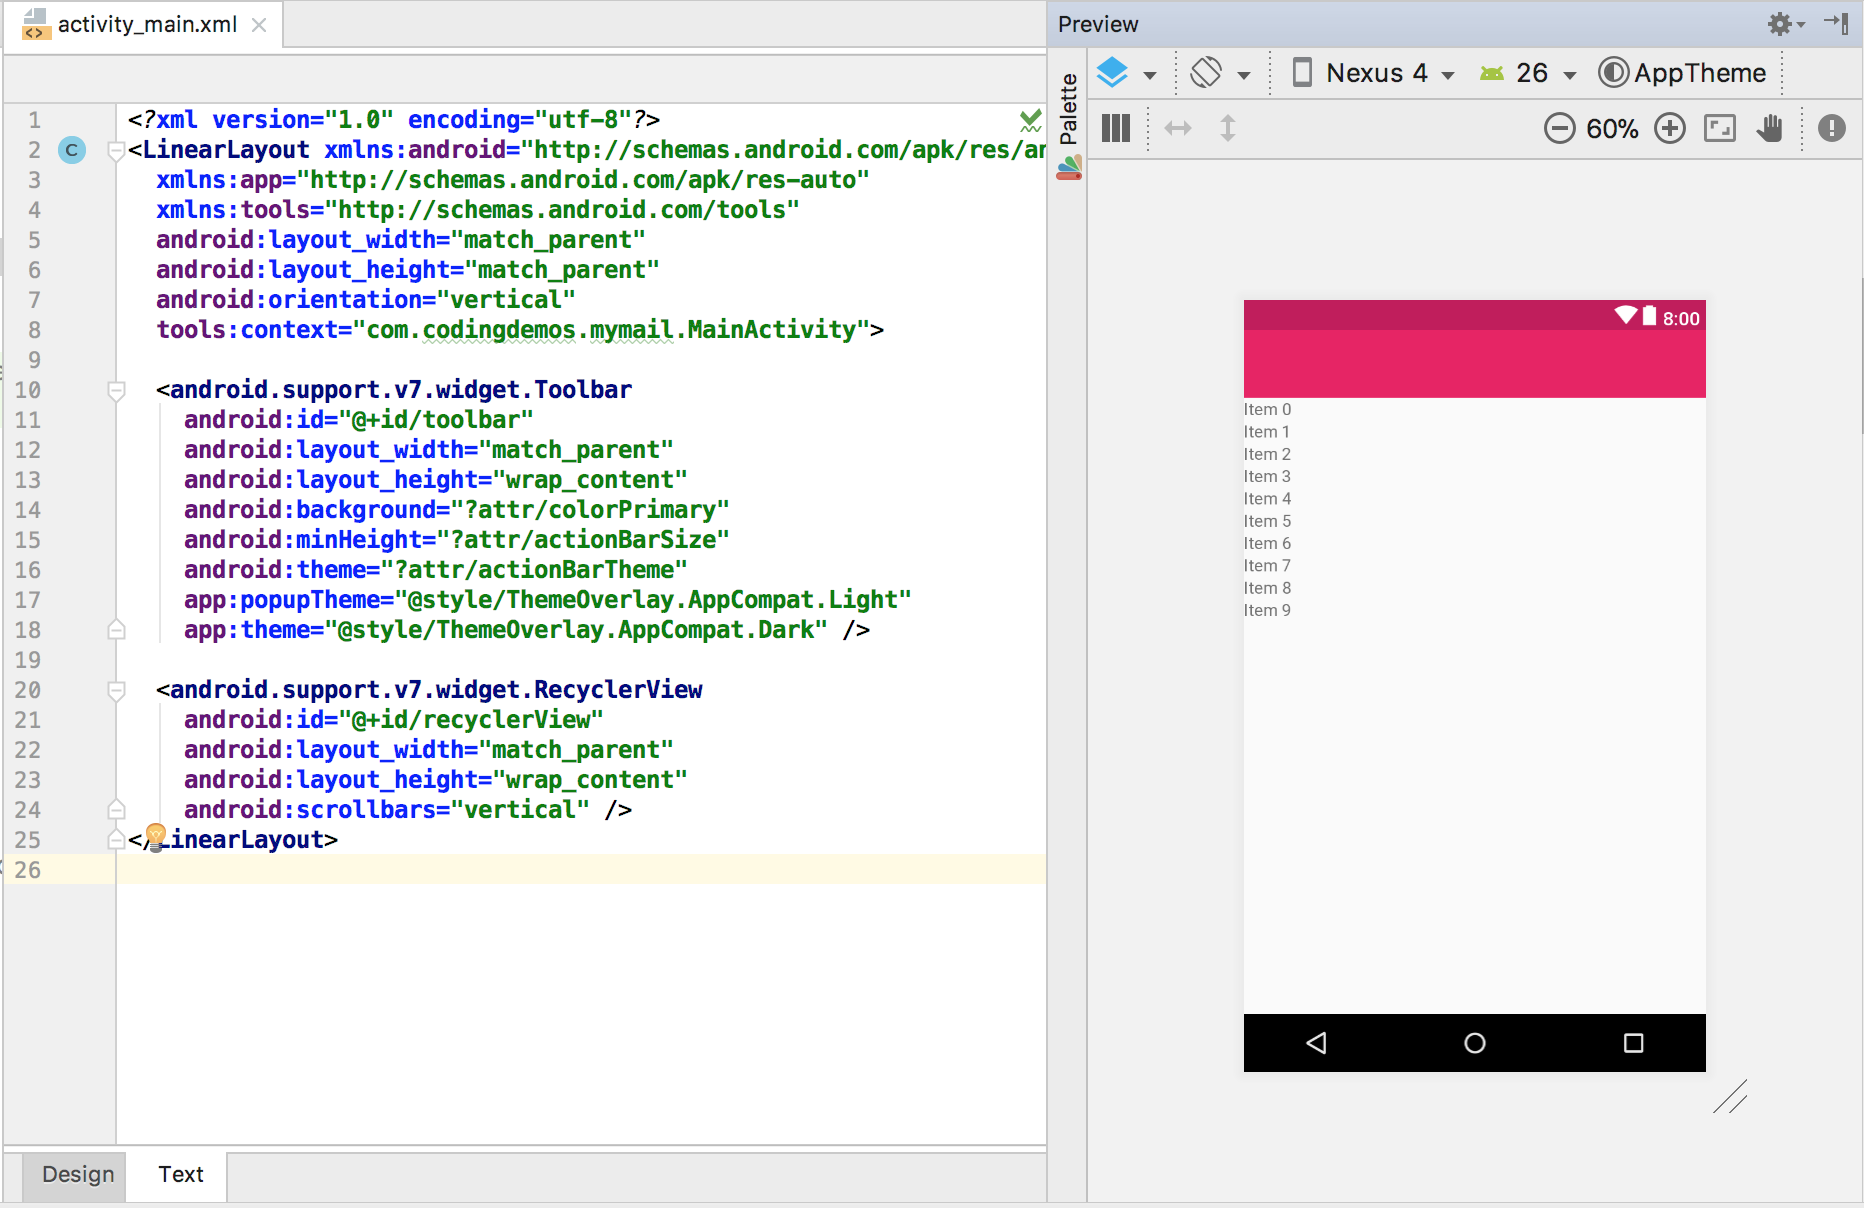
Android Recyclerview in Android Studio. (Large preview)
7- Create a new resource file and name it recyclerview_mail_item.xml, in this file you are going to add views that later will appear in each row inside Android Recyclerview.
8- First view that you are going to add inside recyclerview_mail_item.xml is the email sender icon which is not actually an icon! It’s just an Android Textview with a circle drawable as a background which appear like an actual icon :]
9- Create a new file under drawable folder and name it rounded_drawable.xml, inside this file you will add an Android shape which is oval with a background color.

Create a new drawable file in Android Studio. (Large preview)
< ?xml version="1.0" encoding="utf-8"?>
< shape
  xmlns:android="http://schemas.android.com/apk/res/android"
  android:shape="oval">
  < solid
    android:color="#666666"/>
< /shape>
10- Open up recyclerview_mail_item.xml file and add an Android TextView that will represent the email sender icon. In this TextView you will use the rounded drawable as the background and you will need to adjust the layout width and height that so that it will look great next to the other views.
< TextView
    android:id="@+id/tvIcon"
    android:layout_width="40dp"
    android:layout_height="40dp"
    android:background="@drawable/rounded_drawable"
    android:text="A" />
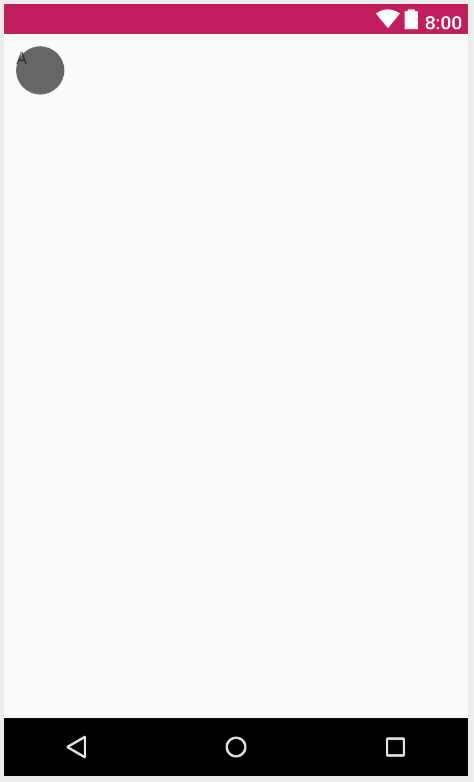
Android circle TextView. (Large preview)
11- Customize the appearance of (tvIcon) by changing the text color, increasing text size, add some margin from the top and position the text to be in the center.
< TextView
    android:id="@+id/tvIcon"
    android:layout_width="40dp"
    android:layout_height="40dp"
    android:layout_marginTop="10dp"
    android:background="@drawable/rounded_drawable"
    android:gravity="center"
    android:text="A"
    android:textColor="@android:color/white"
    android:textSize="20sp" />
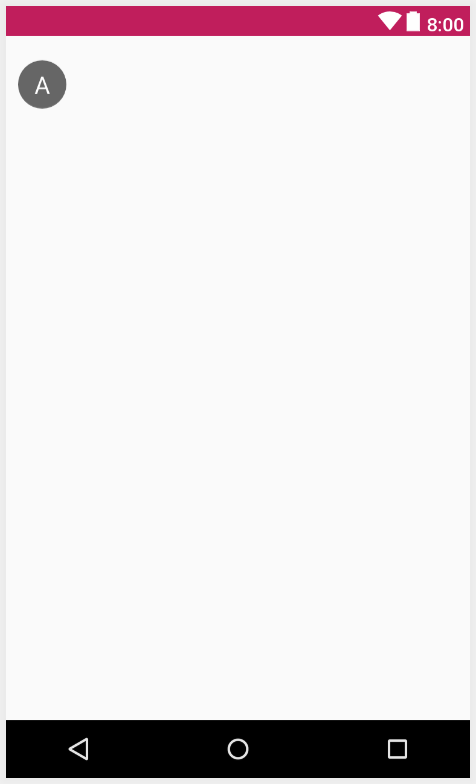
Android circle TextView with a new look. (Large preview)
12- Next you need to add the email sender TextView, this TextView will be positioned next to (tvIcon) TextView.
< TextView
    android:id="@+id/tvEmailSender"
    android:layout_width="wrap_content"
    android:layout_height="wrap_content"
    android:layout_toEndOf="@+id/tvIcon"
    android:layout_toRightOf="@+id/tvIcon"
    android:text="TextView" />
13- Customize the appearance of (tvEmailSender) by increasing text size, add some margin from the left and change the text style to bold.
< TextView
    android:id="@+id/tvEmailSender"
    android:layout_width="wrap_content"
    android:layout_height="wrap_content"
    android:layout_marginLeft="10dp"
    android:layout_marginStart="10dp"
    android:layout_toEndOf="@+id/tvIcon"
    android:layout_toRightOf="@+id/tvIcon"
    android:text="TextView"
    android:textSize="16sp"
    android:textStyle="bold" />
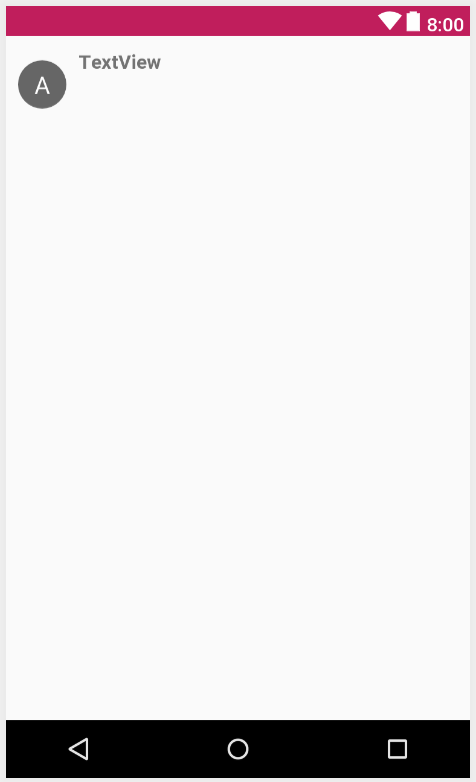
Android email sender TextView. (Large preview)
14- Now you need to add email title TextView, this TextView will be positioned below (tvEmailSender) and make sure to change the text style to make it bold.
< TextView
    android:id="@+id/tvEmailTitle"
    android:layout_width="wrap_content"
    android:layout_height="wrap_content"
    android:layout_below="@+id/tvEmailSender"
    android:layout_marginLeft="10dp"
    android:layout_marginStart="10dp"
    android:layout_marginTop="5dp"
    android:layout_toEndOf="@+id/tvIcon"
    android:layout_toRightOf="@+id/tvIcon"
    android:text="TextView"
    android:textStyle="bold" />
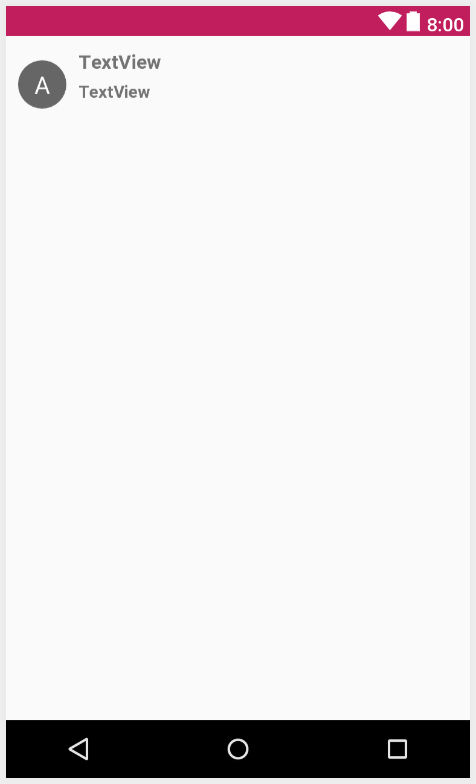
Android email title TextView. (Large preview)
15- Add the email details TextView, this will be placed below (tvEmailTitle) and make sure to add some margin from the top.
< TextView
android:id="@+id/tvEmailDetails"
android:layout_width="match_parent"
android:layout_height="wrap_content"
android:layout_below="@+id/tvEmailTitle"
android:layout_marginLeft="10dp"
android:layout_marginStart="10dp"
android:layout_marginTop="5dp"
android:layout_toEndOf="@+id/tvIcon"
android:layout_toRightOf="@+id/tvIcon"
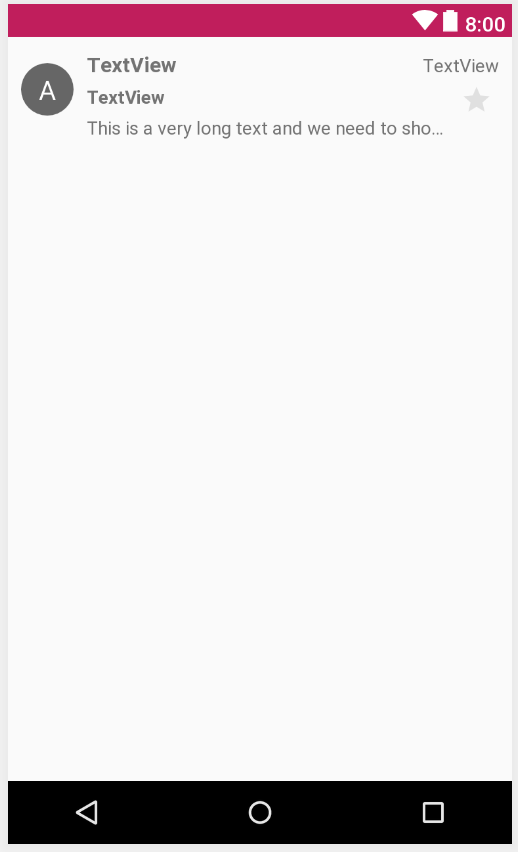
android:text="This is a very long text and we need to show 3...(dots)" />
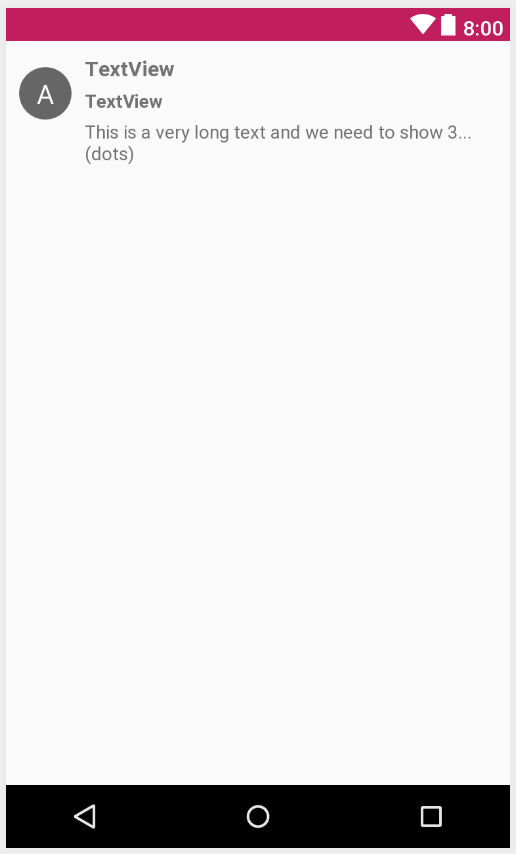
Android TextView with very long text. (Large preview)
16- As you’ve noticed in the image above that the TextView text is very long and that doesn’t look good, imagine the user have to scroll through a long list with each row having this type of long text! It will be tiring. Fortunately there is a solution, you can use Android android:ellipsize="end" and android:maxLines="1" together inside Android TextView and when you have a long text, Android will transform that into 3 dots.
< TextView
android:id="@+id/tvEmailDetails"
android:layout_width="match_parent"
android:layout_height="wrap_content"
android:layout_below="@+id/tvEmailTitle"
android:layout_marginLeft="10dp"
android:layout_marginStart="10dp"
android:layout_marginTop="5dp"
android:layout_toEndOf="@+id/tvIcon"
android:layout_toRightOf="@+id/tvIcon"
android:ellipsize="end"
android:maxLines="1"
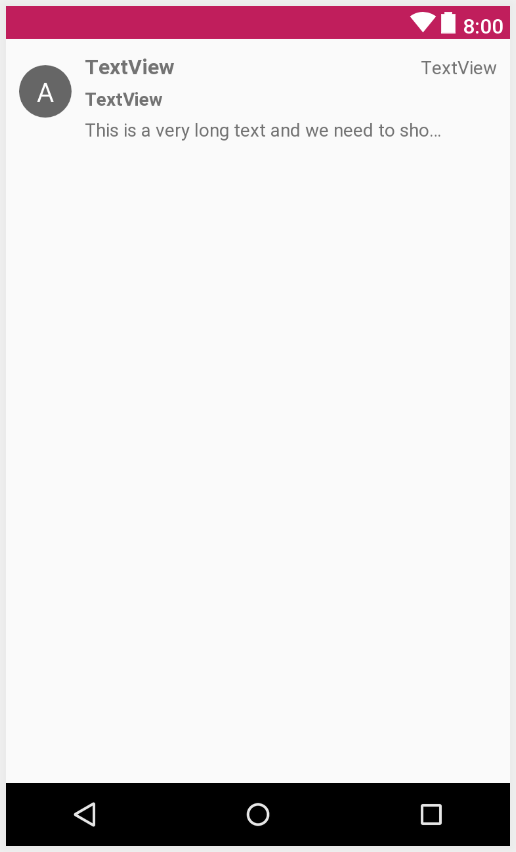
android:text="This is a very long text and we need to show 3...(dots)" />

Android TextView with 3 dots. (Large preview)
17- The last TextView that you need to add is the time of when the email reached, this TextView will be placed on the same line as (tvEmailSender) and should be aligned to the right of the screen.
< TextView
    android:id="@+id/tvEmailTime"
    android:layout_width="wrap_content"
    android:layout_height="wrap_content"
    android:layout_alignBaseline="@id/tvEmailSender"
    android:layout_alignParentEnd="true"
    android:layout_alignParentRight="true"
    android:text="TextView" />
Android email time TextView. (Large preview)
18- Finally you need to add Android ImageView, this ImageView will have a star icon and it will be used to add a particular email to your favorites. This ImageView will be placed under (tvEmailTime) and you can get the star icon from Android Studio asset studio.
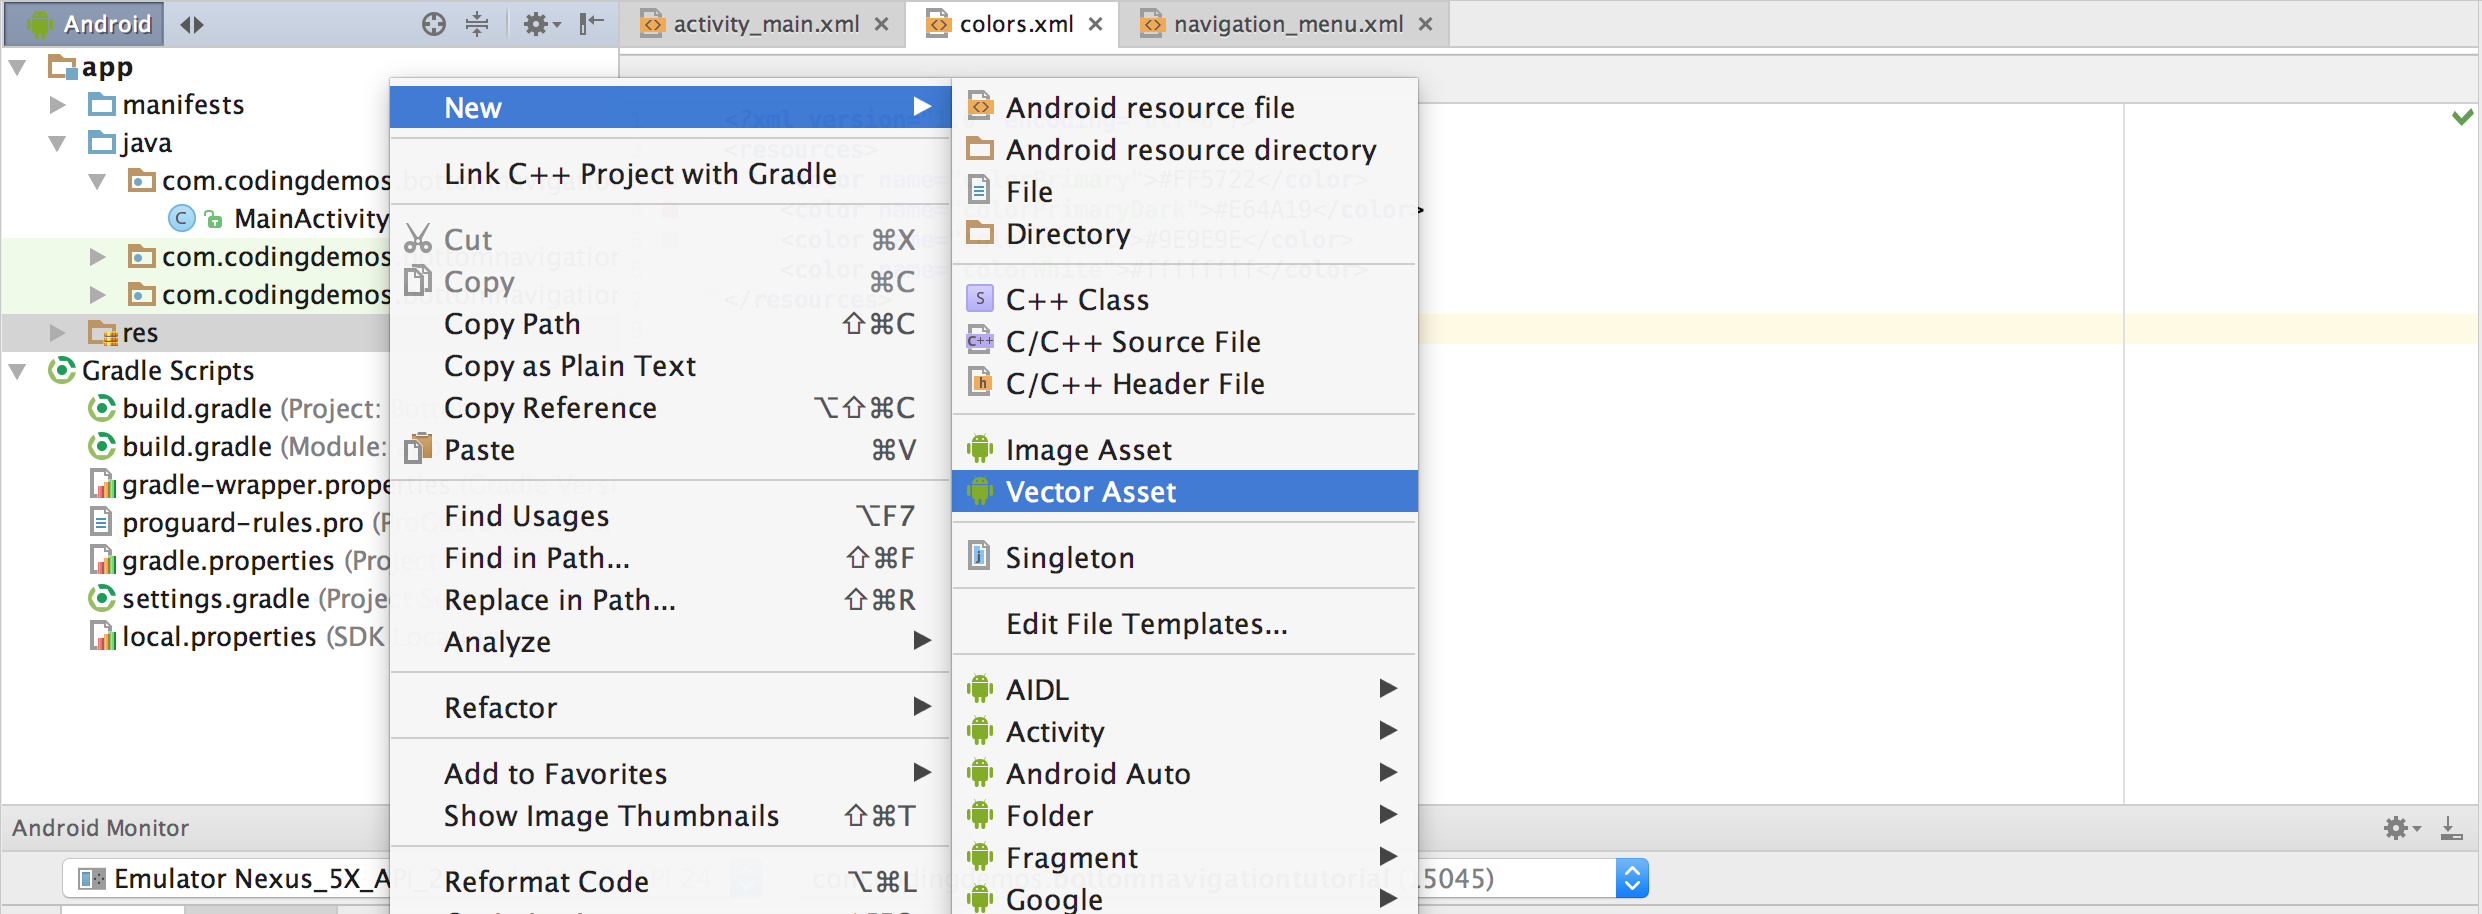
How to open Android studio vector asset. (Large preview)
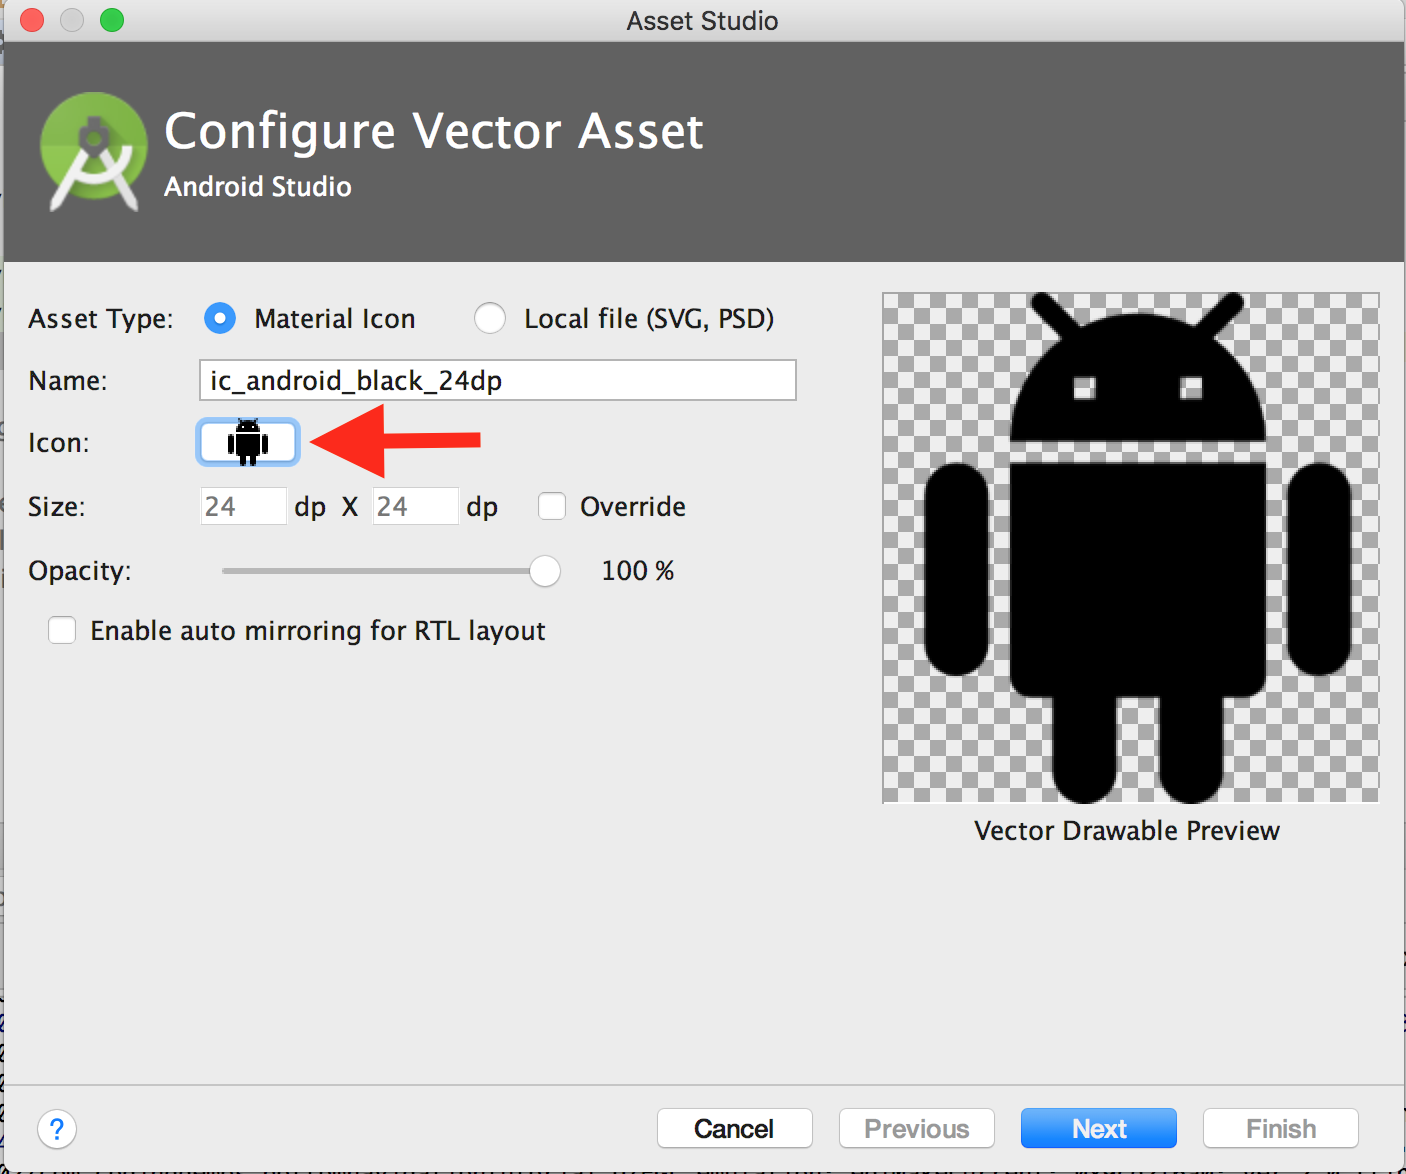
How to choose an icon from Android Studio asset studio. (Large preview)
< ImageView
    android:id="@+id/ivFavorite"
    android:layout_width="wrap_content"
    android:layout_height="wrap_content"
    android:layout_alignParentEnd="true"
    android:layout_alignParentRight="true"
    android:layout_below="@+id/tvEmailTime"
    android:padding="5dp"
    android:src="@drawable/ic_star_black_24dp" />
Android star icon ImageView. (Large preview)
19- Now you are done with customizing recyclerview_mail_item.xml, next you need to create a java class and name it (EmailData), this class will be used to assign values to the Recyclerview.
public class EmailData {

    private String mSender;
    private String mTitle;
    private String mDetails;
    private String mTime;

    public EmailData(String mSender, String mTitle, String mDetails, String mTime) {
        this.mSender = mSender;
        this.mTitle = mTitle;
        this.mDetails = mDetails;
        this.mTime = mTime;
    }

    public String getmSender() {
        return mSender;
    }

    public String getmTitle() {
        return mTitle;
    }

    public String getmDetails() {
        return mDetails;
    }

    public String getmTime() {
        return mTime;
    }
}
20- Create another java file and name it (MailAdapter) and make it extends RecyclerView.Adapter<MailViewHolder>, this is the class that plays an important role in handling the data in Recyclerview.
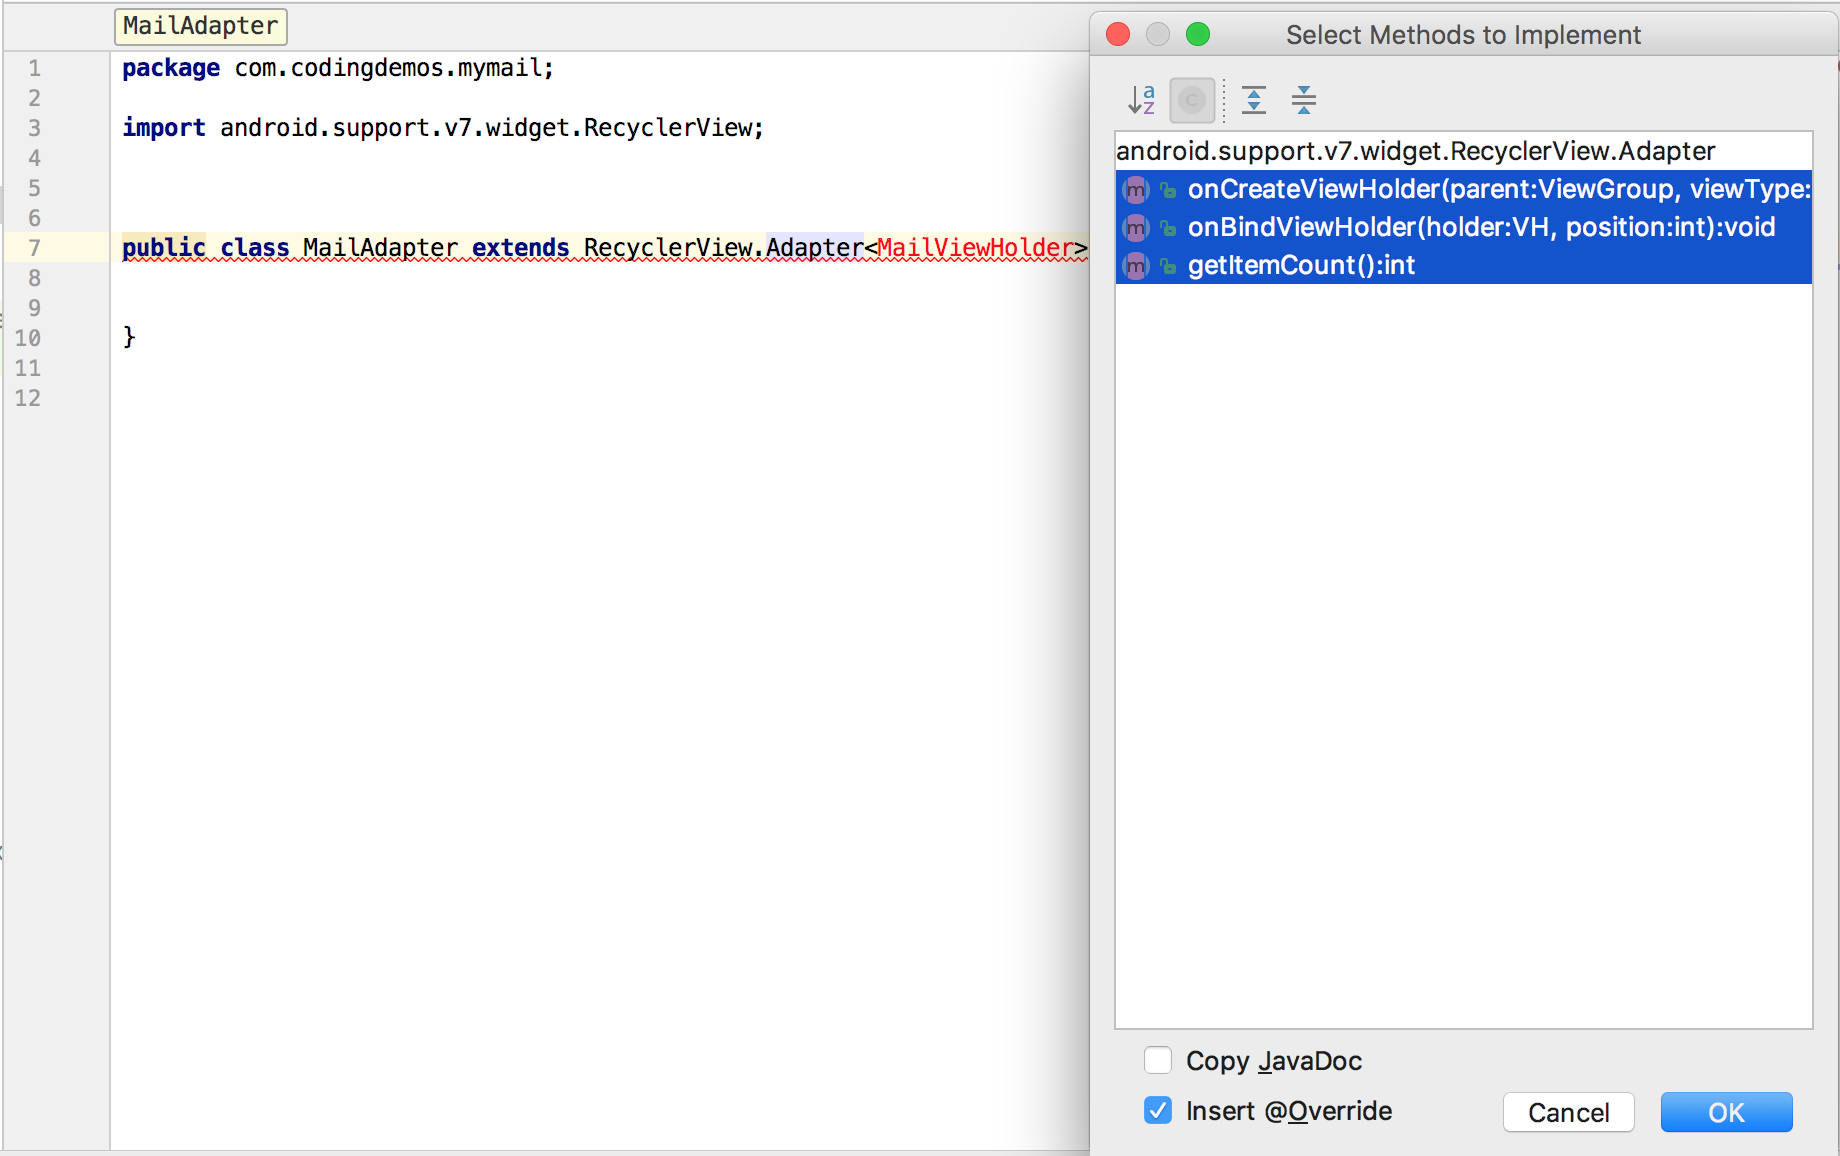
Add required methods for a RecyclerView adapter (Large preview)
21- You will see an error line under (MailViewHolder) which says that you need to create a new class, so create that class inside the same java file (MailAdapter) and make sure that (MailViewHolder) extends RecyclerView.ViewHolder
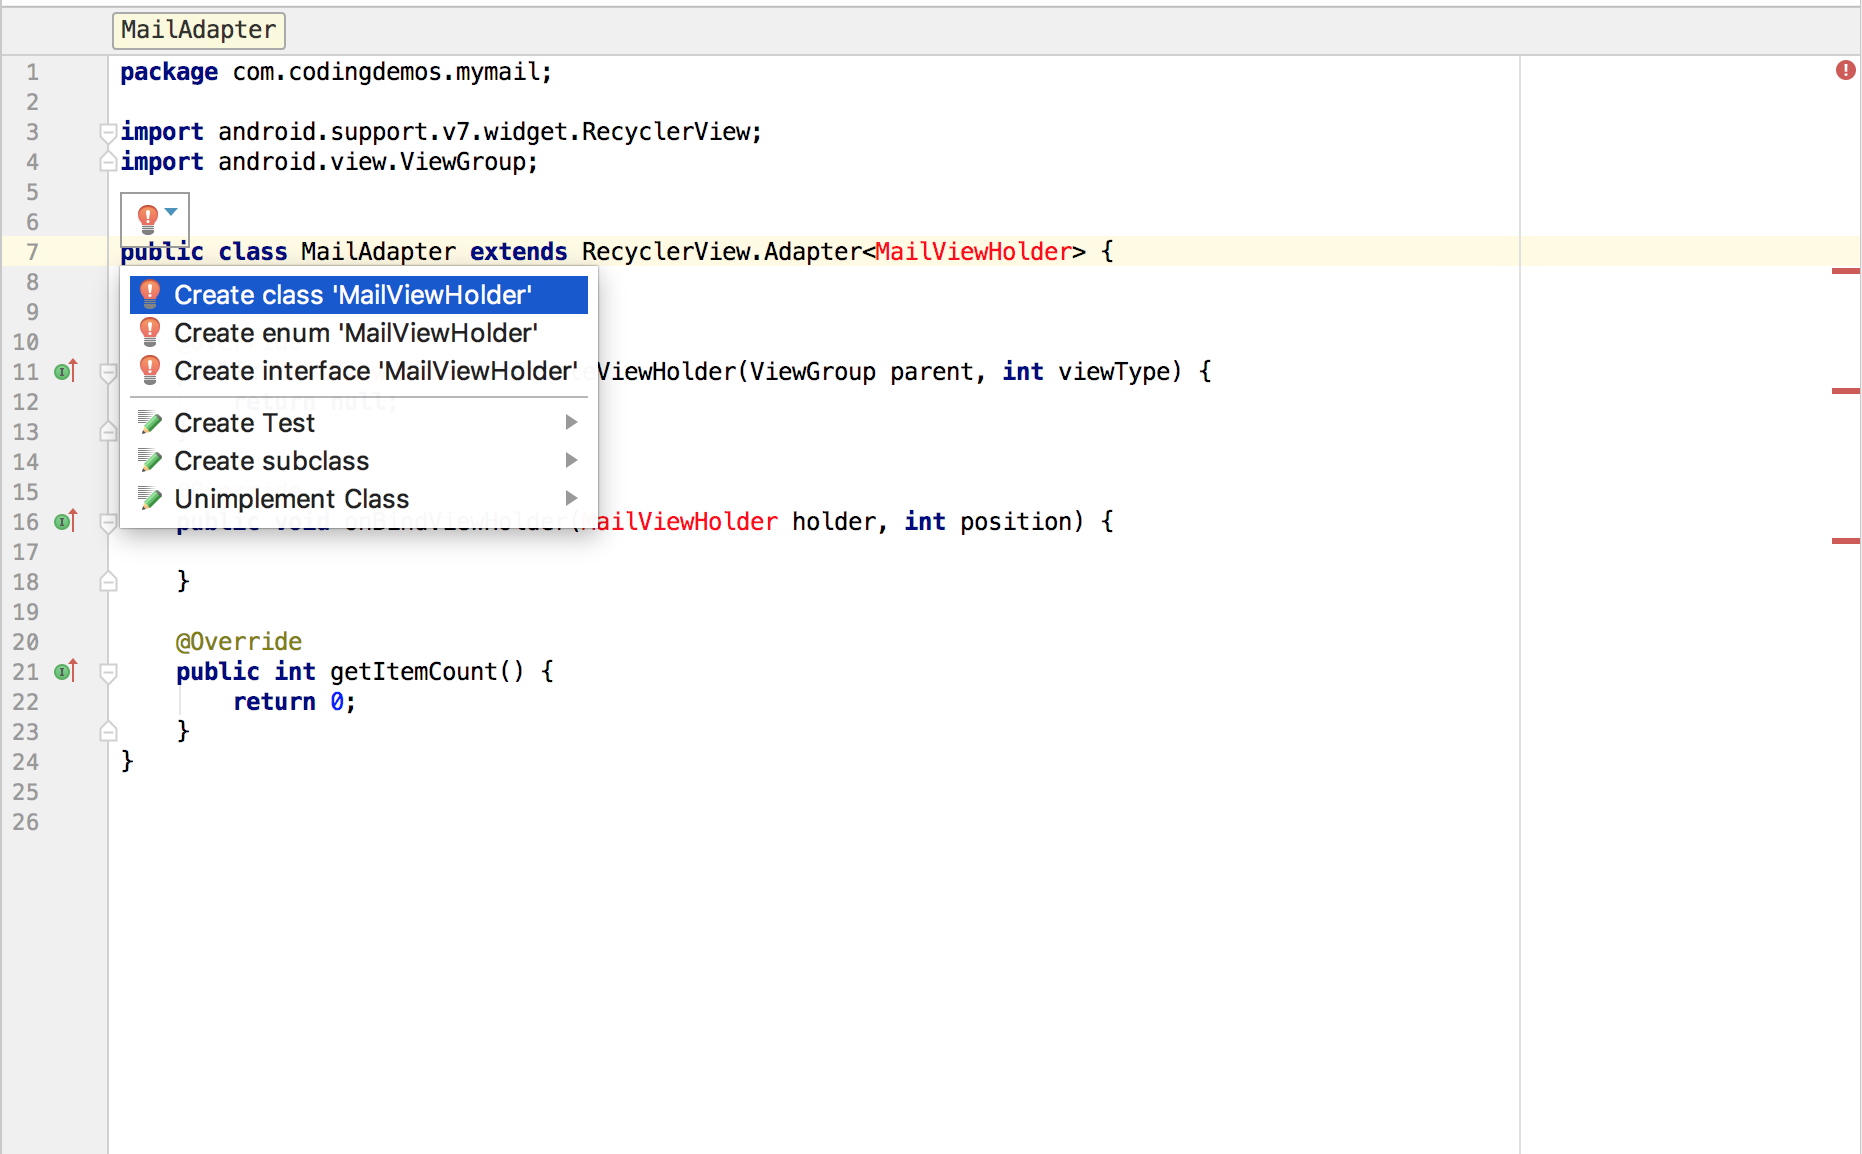
Create a ViewHolder class for the RecyclerView adapter (Large preview)
21- After you have created (MailViewHolder) class you will see another error saying that you need to create a constructor. This constructor have a view object which allows you to reference the views that you’ve created earlier inside recyclerview_mail_item.xml.
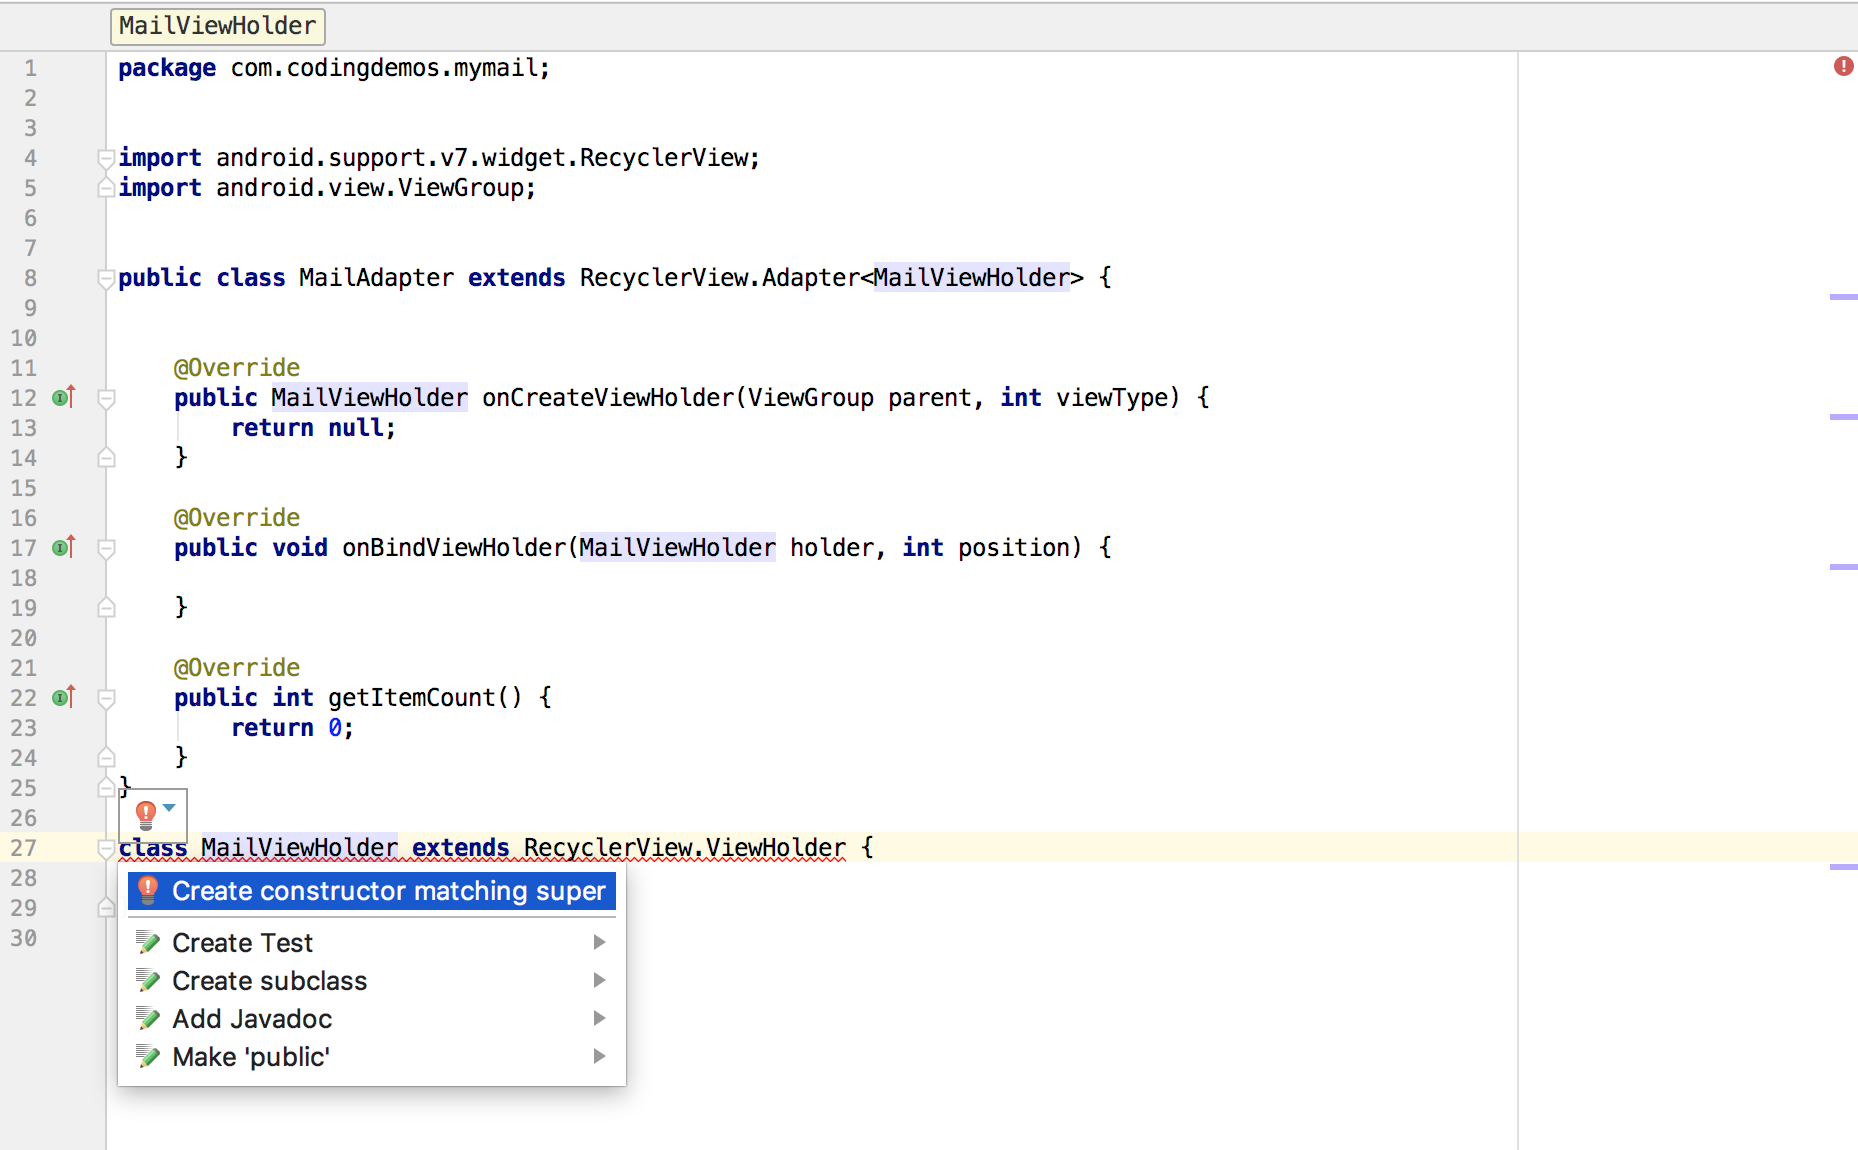
Create a ViewHolder class for the RecyclerView adapter (Large preview)
22- Here is (MailAdapter) class
public class MailAdapter extends RecyclerView.Adapter<MailViewHolder> {


    @Override
    public MailViewHolder onCreateViewHolder(ViewGroup parent, int viewType) {
        return null;
    }

    @Override
    public void onBindViewHolder(MailViewHolder holder, int position) {

    }

    @Override
    public int getItemCount() {
        return 0;
    }
}

class MailViewHolder extends RecyclerView.ViewHolder {

    public MailViewHolder(View itemView) {
        super(itemView);
    }
}
23- First you need to work on (MailViewHolder) class, here all you need to do is reference the views from recyclerview_mail_item.xml
class MailViewHolder extends RecyclerView.ViewHolder {

    TextView mIcon;
    TextView mSender;
    TextView mEmailTitle;
    TextView mEmailDetails;
    TextView mEmailTime;
    ImageView mFavorite;

    MailViewHolder(View itemView) {
        super(itemView);

        mIcon = itemView.findViewById(R.id.tvIcon);
        mSender = itemView.findViewById(R.id.tvEmailSender);
        mEmailTitle = itemView.findViewById(R.id.tvEmailTitle);
        mEmailDetails = itemView.findViewById(R.id.tvEmailDetails);
        mEmailTime = itemView.findViewById(R.id.tvEmailTime);
        mFavorite = itemView.findViewById(R.id.ivFavorite);

    }
}
24- Inside (MailAdapter) class create 2 variables and a constructor. The first variable is (Context) to be able to have access to certain methods, the second variable is (List) of a type (EmailData). You will use these 2 variables together inside the constructor to be able to pass the data later from MainActivity.java file to MailAdapter.java class.
    private List<EmailData> mEmailData;
    private Context mContext;

    public MailAdapter(Context mContext, List<EmailData> mEmailData) {
        this.mEmailData = mEmailData;
        this.mContext = mContext;
    }
25- Now you need to work on (onCreateViewHolder), here you need to inflate the recyclerview_mail_item.xml layout.
View view = LayoutInflater.from(parent.getContext()).inflate(R.layout.recyclerview_mail_item,
                parent, false);
return new MailViewHolder(view);
26- Finally you can initialize the views from recyclerview_mail_item.xml inside (onBindViewHolder), you can set those views value individually by accessing them through (mEmailData) list.
        holder.mSender.setText(mEmailData.get(position).getmSender());
        holder.mEmailTitle.setText(mEmailData.get(position).getmTitle());
        holder.mEmailDetails.setText(mEmailData.get(position).getmDetails());
        holder.mEmailTime.setText(mEmailData.get(position).getmTime());
27- Next you need to make ImageView (mFavorite) clickable, so that when you tap on it the color will change to orange using Android ColorFilter, otherwise it will be back to plain. You do that inside (onBindViewHolder).
        holder.mFavorite.setOnClickListener(new View.OnClickListener() {
            @Override
            public void onClick(View view) {
                if (holder.mFavorite.getColorFilter() != null) {
                    holder.mFavorite.clearColorFilter();
                } else {
                    holder.mFavorite.setColorFilter(ContextCompat.getColor(mContext,
                            R.color.colorOrange));
                }
            }
        });
28- Make sure to change the return value inside the override (getItemCount) method to the actual list size, because if you don’t do it you wont be able to see any data inside Android Recyclerview.
return mEmailData.size();
29- Now you are done with MailAdapter.java file, next you need to open up MainActivity.java file and initialize the following items one by one:
– Android Toolbar
– Android Recyclerview
– Android LinearLayoutManager
– Android DividerItemDecoration
– Actual data that will appear inside Recyclerview
– Set Recyclerview adapter to the actual data
30- Initialize Android Toolbar and set the app name to appear inside.
Toolbar mToolbar = findViewById(R.id.toolbar);
mToolbar.setTitle(R.string.app_name);
31- Initialize Android Recyclerview.
Recyclerview mRecyclerView = findViewById(R.id.recyclerView);
32- Initialize Android LinearLayoutManager, this layout manager is used together with Android Recyclerview to determine whether you want to allow the user to scroll in a vertical or horizontal orientation.
LinearLayoutManager mLinearLayoutManager = new LinearLayoutManager(MainActivity.this,
LinearLayoutManager.VERTICAL, false);
mRecyclerView.setLayoutManager(mLinearLayoutManager);
33- Initialize Android DividerItemDecoration, this item decoration is used to draw a line under each item in Recyclerview.
mRecyclerView.addItemDecoration(new DividerItemDecoration(MainActivity.this,
DividerItemDecoration.VERTICAL));
34- Initialize the actual data that will show up in Recyclerview.
EmailData mEmail = new EmailData("Sam", "Weekend adventure",
                "Let's go fishing with John and others. We will do some barbecue and have soo
                 much fun",
                "10:42am");
        mEmailData.add(mEmail);
        mEmail = new EmailData("Facebook", "James, you have 1 new notification",
                "A lot has happened on Facebook since",
                "16:04pm");
        mEmailData.add(mEmail);
        mEmail = new EmailData("Google+", "Top suggested Google+ pages for you",
                "Top suggested Google+ pages for you",
                "18:44pm");
        mEmailData.add(mEmail);
        mEmail = new EmailData("Twitter", "Follow T-Mobile, Samsung Mobile U",
                "James, some people you may know",
                "20:04pm");
        mEmailData.add(mEmail);
        mEmail = new EmailData("Pinterest Weekly", "Pins you’ll love!",
                "Have you seen these Pins yet? Pinterest",
                "09:04am");
        mEmailData.add(mEmail);
        mEmail = new EmailData("Josh", "Going lunch", "Don't forget our lunch at 3PM in Pizza
                 hut",
                "01:04am");
        mEmailData.add(mEmail);
35- Set the data to Android Recyclerview adapter.
MailAdapter mMailAdapter = new MailAdapter(MainActivity.this, mEmailData);
mRecyclerView.setAdapter(mMailAdapter);
36- Build and run the app to see the progress.
Android Recyclerview with data (Large preview)
37- Based on the progress image above it seems that there is something wrong: (tvIcon) is showing the same value and color for all rows. Open up MailAdapter.java file, inside (onBindViewHolder) we forgot to pass the first letter of the email sender value to (tvIcon).
holder.mIcon.setText(mEmailData.get(position).getmSender().substring(0, 1));
37- Build and run the app to see the changes in the emulator.
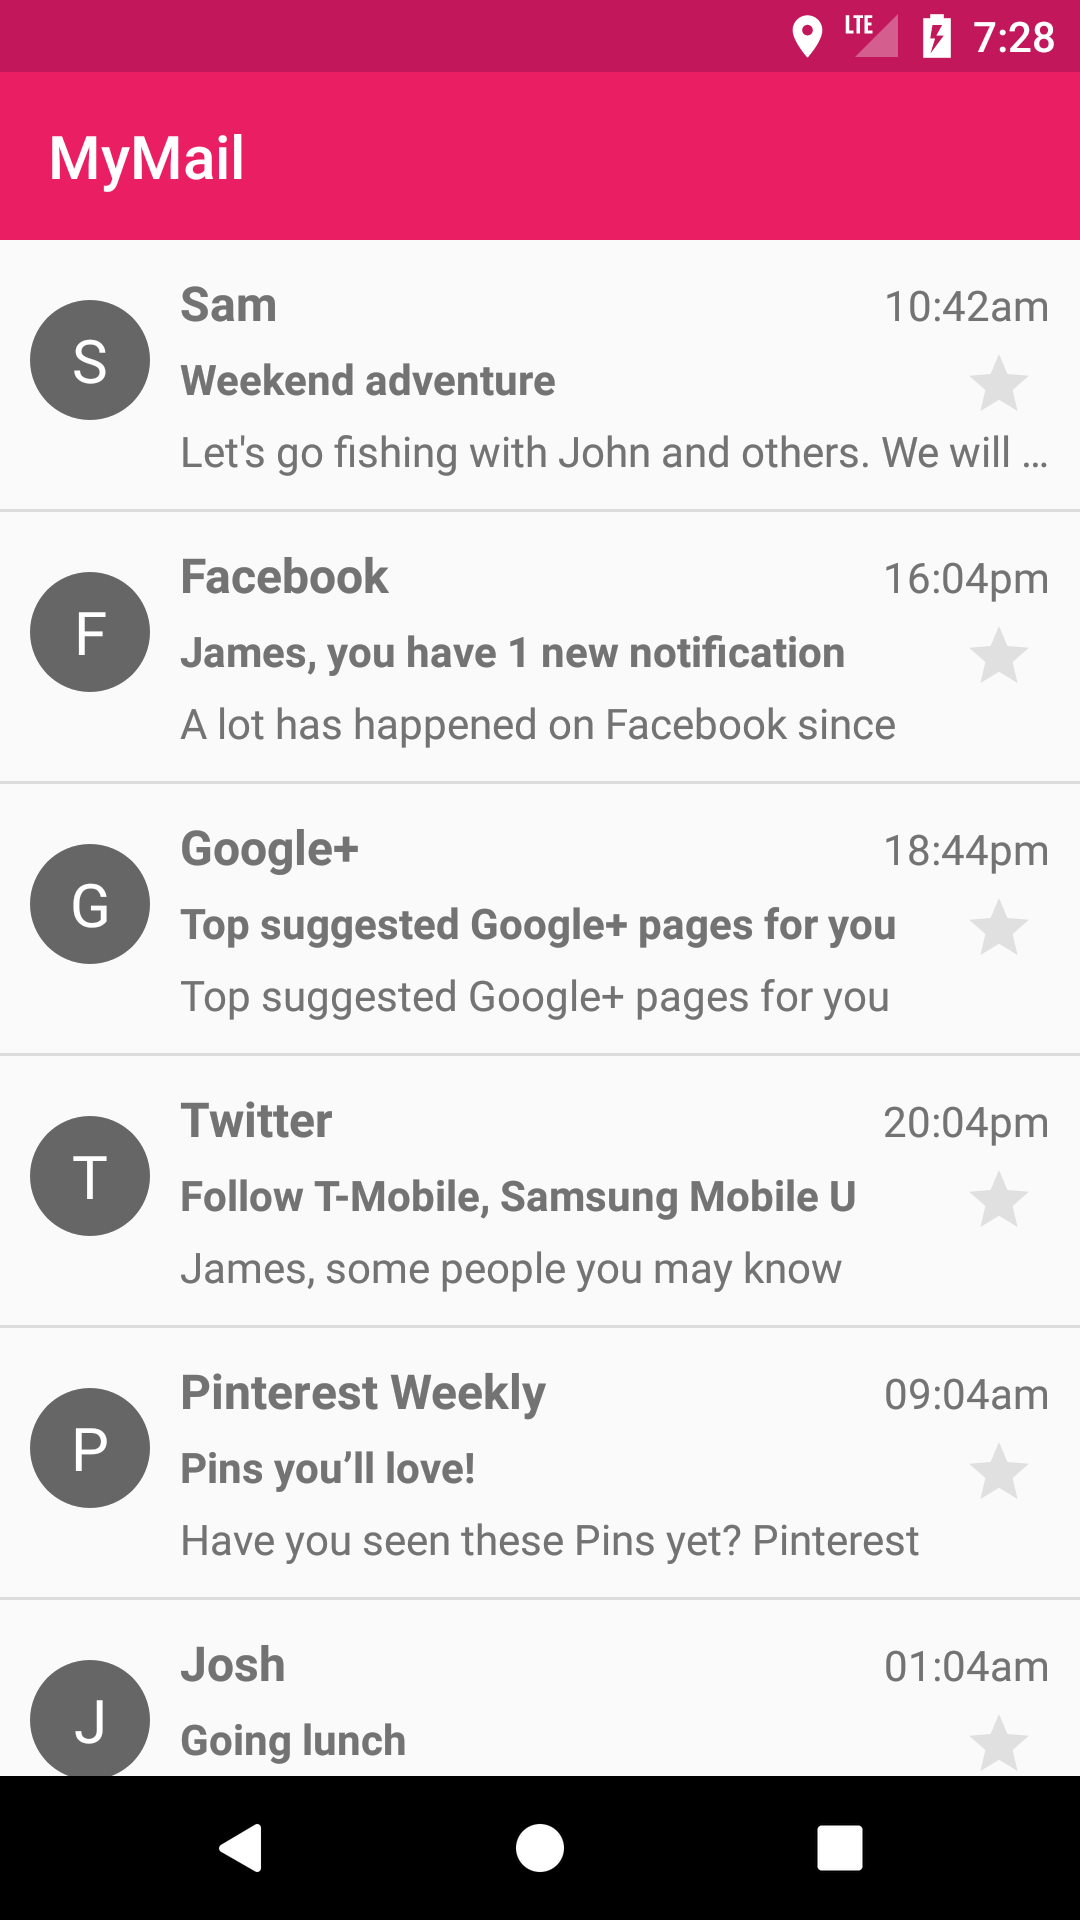
Android circle TextView showing the correct value (Large preview)
38- Now you need to work on showing different colors for every rows inside Android Recyclerview, you can use java Random method with Android Color, then you use that random color as a background for (tvIcon).
Random mRandom = new Random();
int color = Color.argb(255, mRandom.nextInt(256), mRandom.nextInt(256), mRandom.nextInt(256));
((GradientDrawable) holder.mIcon.getBackground()).setColor(color);
39- Build and run the app to see how it looks like in the emulator.
Android circle TextView showing the different colors (Large preview)
40- It will be really good if the user can actually tap on any of the rows to move to another page, you need to create a new Android Activity and name it (DetailActivity). Inside this new activity you will show the full email details.
41- Open up activity_detail.xml file, here you will the following views:
– TextView email title
– TextView email sender
– Android horizontal line
– ImageView favorite icon
– TextView email time
– TextView email details
  < TextView
    android:id="@+id/tvEmailTitle"
    android:layout_width="wrap_content"
    android:layout_height="wrap_content"
    android:layout_alignParentTop="true"
    android:layout_margin="16dp"
    android:ems="12"
    android:text="TextView"
    android:textSize="20sp" />

  < ImageView
    android:id="@+id/ivFavorite"
    android:layout_width="wrap_content"
    android:layout_height="wrap_content"
    android:layout_alignParentEnd="true"
    android:layout_alignParentRight="true"
    android:layout_margin="16dp"
    android:padding="5dp"
    android:src="@drawable/ic_star_black_24dp" />

  < View
    android:id="@+id/line"
    android:layout_width="match_parent"
    android:layout_height="1dp"
    android:layout_below="@id/tvEmailTitle"
    android:layout_marginBottom="5dp"
    android:layout_marginTop="5dp"
    android:background="#D3D3D3" />

  < TextView
    android:id="@+id/tvIcon"
    android:layout_width="40dp"
    android:layout_height="40dp"
    android:layout_below="@+id/line"
    android:layout_marginLeft="12dp"
    android:layout_marginStart="12dp"
    android:layout_marginTop="10dp"
    android:background="@drawable/rounded_drawable"
    android:gravity="center"
    android:text="A"
    android:textColor="@android:color/white"
    android:textSize="20sp" />

  < TextView
    android:id="@+id/tvEmailSender"
    android:layout_width="wrap_content"
    android:layout_height="wrap_content"
    android:layout_alignTop="@+id/tvIcon"
    android:layout_marginLeft="10dp"
    android:layout_marginStart="10dp"
    android:layout_toEndOf="@+id/tvIcon"
    android:layout_toRightOf="@+id/tvIcon"
    android:text="TextView"
    android:textSize="18sp"
    android:textStyle="bold" />

  < TextView
    android:id="@+id/tvEmailTime"
    android:layout_width="wrap_content"
    android:layout_height="wrap_content"
    android:layout_alignLeft="@+id/tvEmailSender"
    android:layout_alignStart="@+id/tvEmailSender"
    android:layout_below="@+id/tvEmailSender"
    android:text="TextView" />

  < TextView
    android:id="@+id/tvEmailDetails"
    android:layout_width="wrap_content"
    android:layout_height="wrap_content"
    android:layout_below="@+id/tvIcon"
    android:layout_marginLeft="12dp"
    android:layout_marginStart="12dp"
    android:layout_marginTop="20dp"
    android:text="TextView" />
Email detail page. (Large preview)
42- Open up MailAdapter.java file, inside (onBindViewHolder) you are going to start a new activity whenever the user taps on a row and pass all the email values to DetailActivity.java.
holder.mLayout.setOnClickListener(new View.OnClickListener() {
            @Override
            public void onClick(View view) {
                Intent mIntent = new Intent(mContext, DetailActivity.class);
                mIntent.putExtra("sender", holder.mSender.getText().toString());
                mIntent.putExtra("title", holder.mEmailTitle.getText().toString());
                mIntent.putExtra("details", holder.mEmailDetails.getText().toString());
                mIntent.putExtra("time", holder.mEmailTime.getText().toString());
                mIntent.putExtra("icon", holder.mIcon.getText().toString());
                mIntent.putExtra("colorIcon", color);
                mContext.startActivity(mIntent);
            }
        });
43- Open up again DetailActivity.java file, initialize all the views that you’ve added them inside activity_detail.xml file and make sure to use Android Bundle to be able to receive the data through Android Intent.
        TextView mIcon = findViewById(R.id.tvIcon);
        TextView mSender = findViewById(R.id.tvEmailSender);
        TextView mEmailTitle = findViewById(R.id.tvEmailTitle);
        TextView mEmailDetails = findViewById(R.id.tvEmailDetails);
        TextView mEmailTime = findViewById(R.id.tvEmailTime);
        ImageView mFavorite = findViewById(R.id.ivFavorite);

        Bundle mBundle = getIntent().getExtras();
        if (mBundle != null) {
            mIcon.setText(mBundle.getString("icon"));
            ((GradientDrawable) mIcon.getBackground()).setColor(mBundle.getInt("colorIcon"));
            mSender.setText(mBundle.getString("sender"));
            mEmailTitle.setText(mBundle.getString("title"));
            mEmailDetails.setText(mBundle.getString("details"));
            mEmailTime.setText(mBundle.getString("time"));
        }
        mFavorite.setOnClickListener(new View.OnClickListener() {
            @Override
            public void onClick(View view) {
                if (mFavorite.getColorFilter() != null) {
                    mFavorite.clearColorFilter();
                } else {
                    mFavorite.setColorFilter(ContextCompat.getColor(DetailActivity.this,
                            R.color.colorOrange));
                }
            }
        });
44- Build and run the app to see the final output in the emulator, tap on any rows and you will be directed to the second page where you can see the email details. The source code for this tutorial is available on GitHub, I hope you find this tutorial helpful and if you have any question please post them in the comment below.
hi
thanks very usefull lesson.
ı want to set these codes to show my string file and image is it possible?
mRecyclerView.setLayoutManager(mLinearLayoutManager);
EmailData mEmail = new EmailData(“Sam”, “Weekend adventure”,
“R.Strings.mm”,
“10:42am”);
mEmailData.add(mEmail);
mEmail = new EmailData() { //tvEmailTitle.setText(R.string.aa);
// ivFavorite.setImageResource(R.drawable.bb);
}
mEmailData.add(mEmail);
mEmail = new EmailData(“Google+”, “Top suggested Google+ pages for you”,
“Top suggested Google+ pages for you”,
“18:44pm”);
mEmailData.add(mEmail);
Hi, yeah you can use the string value from strings.xml file. You can change the image of favorite (star icon) inside recyclerview_mail_item.xml file
hi coding demos;
could you help me?
I will create recyclerview apps. as my will then I create a random image button my last page(detailedactivity.java). I click buton then my image change randomly but at last it doesnt return my main page what can ı do? and I enter my apps again. I still see my random image there. there is not my main page and my main image. thanks: here my codes:
Bundle mBundle = getIntent().getExtras();
if (mBundle != null) {
mToolbar.setTitle(mBundle.getString(“Title”));
mFlower.setImageResource(mBundle.getInt(“Image”));
mDescription.setText(mBundle.getString(“Description”));
}
showRandomFact();
fab.setOnClickListener(new View.OnClickListener() {
@Override
public void onClick(View view) {
showRandomFact();
}
});
}
private void showRandomFact() {
shuffleFacts();
mFlower.setImageResource(factArray[0].getivImage());
mDescription.setText(factArray[0].getmFact());
}
Facts f01 = new Facts(R.drawable.a,”hjgbfvjhsdbfvskhbsdıkfvsdkb”);
Facts f02 = new Facts(R.drawable.aa,”hjgbfvjhsdbfvskhbsdıkfvsdkb”);
Facts f03 = new Facts(R.drawable.aas,”hjgbfvjhsdbfvskhbsdıkfvsdkb”);
Facts[] factArray = new Facts[] {
f01,f02,f03
};
public void shuffleFacts(){ Collections.shuffle(Arrays.asList(factArray));
} }
Hi, try delete this line that is located above fab.setOnClickListener–> showRandomFact();
Now when you delete that line, the random text and image will only happen when you tap on the floating action button (fab).
Hi there,
This is a great demo! I was wondering if you could help me.
I was hoping to add pictures and more TextViews onto the second activity (DetailActivity) specific to each email without them appearing on the email list in the first activity (RecyclerView). Or have the description of the email only appear once the second activity (DetailActivity) appears.
I haven’t been able to make it work yet.
Thanks,
George
Nice Article.. It helped me ..
Thanks a lot for sharing this article, it helped a lot.
in which folder should i create recyclerview_main_item and what is its values ?
can anyone send the entire code of xml and main activity?
Hi, here is the link to the full source code: https://github.com/codingdemos/MyMail